
Subscribe to Our Youtube Channel
Related Manuals for Horizon Fitness TYPE S Formula DRIFT PRO Series


Summary of Contents for Horizon Fitness TYPE S Formula DRIFT PRO Series
- Page 1 PRO SERIES LED 72” ULTRA-SLIM SMART LED TRIM KIT WP ITM. LM533066 Installation Guide & Safety Information Important, retain for future reference: Read carefully...
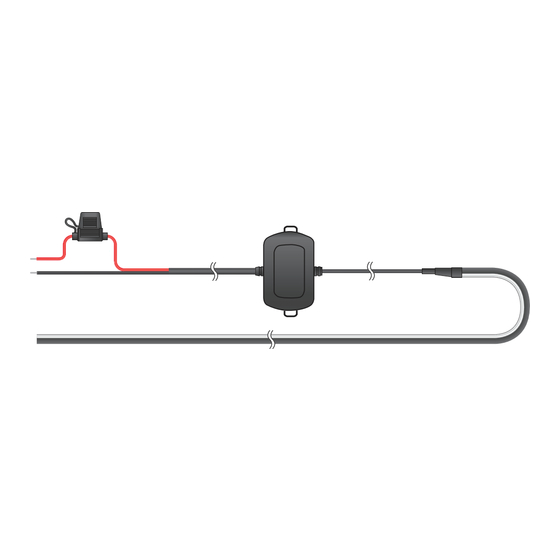
- Page 2 PACKAGE CONTENTS SMART HUB & TRIM LIGHT ASSEMBLY Smart Hub 2A Fuse 59” Wire 24” Wire 2 x 36” Ultra-Slim Trim Lights...
-
Page 3: Install Accessories
PACKAGE CONTENTS INSTALL ACCESSORIES 2 x Adhesion Promoters 1 x 75” 3M Double-Sided Tape 2 x Alcohol Pads 2 x 3M VHB™ Double-Sided Tape (For Smart Hub) 1 x Pry / Wedge Tool 2 x Cable Ties... -
Page 4: Technical Specifications
TECHNICAL SPECIFICATIONS ⎓ Operating Voltage: System Only Frequency Band: 2.4 GHz Bluetooth / App Distance: 30 ft Line-of-sight (Obstacles may create interference) OS Compatibility: iOS & Android LED Type: 1615 RGB Total Length of LED Trim: 72 Inches / 183 cm Replacement Fuse: Maximum Wattage Draw: 3W (0.25A) -
Page 5: Installation
INSTALLATION NOTE: Test LED Trim and app functionality before installation. 1. Choose your desired location to install the LED Trim Lights (Refer to the figure on the right for the recommended installing location.) 2. Use the Pry / Wedge Tool to increase space between panels if needed, then carefully slide the Trim Light into the gap between interior panels. - Page 6 INSTALLATION 4. Secure the Smart Hub to any flat surfaces far away from the car engine or any moving components. Make sure to avoid placing the Smart Hub or cables near any extremely HOT location or next to the vehicle’s engine. Clean the surface thoroughly with the alcohol pads provided and let it dry completely.
-
Page 7: Connect To Power
CONNECT TO POWER Option A - Connect to vehicle battery Smart Hub hardwire cables are color coded, for POSITIVE (+) and BLACK for NEGATIVE (-). Connect the cable to the POSITIVE (+) battery clamp as illustrated. The POSITIVE battery post will be slightly larger than the NEGATIVE post, and will be marked with a PLUS (+) sign. - Page 8 CONNECT TO POWER Option B - Connect to fuse panel You can also connect the hardwire cables to the fuse panel inside your vehicle with a fuse tap. NOTE: Fuse tap is NOT included.
- Page 9 CONNECT TO POWER NOTE: After connecting the Smart Hub to the power source, the LED power indicator will flash Blue. If the LED power indicator does not flash once connected, please double check your power connections. The Smart Hub has built-in voltage protection to prevent the vehicle battery from draining in case the Trim Lights are accidentally left on.
-
Page 10: App Installation
APP INSTALLATION Scan the QR code below or search “TYPE S LED” in the App Store or Google Play. Download and install the App. Once installed, open the App and begin enjoying your TYPE S LED App. Compatible with iPhone Compatible with phones 4s &... -
Page 11: Using The App
USING THE APP Home Page Tap the “PRO SERIES” icon to start. The App will automatically pair to the Smart Hub when the Trim Lights are powered on and within the 30- foot Bluetooth range. We strongly recommend that you setup a private ®... -
Page 12: Master On/Off Switch
USING THE APP A. Master On/Off Switch Master On/Off Switch B. LED Zone Functions Zone On/Off: Press each zone icon to turn LED On LED Zone Functions or Off. Save Preset Press and hold the zone icon to bring up the Password following settings under each zone:... - Page 13 USING THE APP Move Zone Icon Rename Zone Icon Move Zone Icon: Select “Move” to position each zone icon at your desired location and tap CONFIRM. Rename Zone Icon: Select “Rename” to rename each zone icon. (NOTE: Maximum 4 characters).
-
Page 14: Preset Functions
USING THE APP Preset Functions Save Preset Select Multiple: You can select and control multiple zones at a time. Press and hold the zone icon, select “Select Multiple” then select your desired zones by pressing “Confirm”. To ungroup your selection, press and hold the zone icon and select “Ungroup”. -
Page 15: Select Preset
USING THE APP Select Color Select Preset Select Preset: To select your previously saved preset setting, simply press “Select Preset” and choose your saved setting. Delete Saved Preset Setting: To delete a saved preset setting, press “Select Preset”, press and hold the preset you wish to delete. - Page 16 USING THE APP D. Password You can set up a password to prevent other devices from controlling your lights. Once you have entered your password, it will be saved in the App and the Smart Hub. NOTE: To set or change the password, your device must be connected to the Smart Hub and then follow the on-screen instructions.
-
Page 17: Music Mode
USING THE APP Music Mode Sync lights with the beat of music Music Mode allows music to control the lighting tempo through your smartphone or tablet. Sync lighting with your music in two ways: 1.) Through locally downloaded music files, or 2.) Through an enabled microphone on the smartphone / tablet. Tap TYPE S LED App Media Player to choose music from your music library. - Page 18 WARNINGS Important Safety Instructions: 1. SAVE THESE INSTRUCTIONS - This manual contains important safety and operating instructions for LED Kit model LM533066. 2. NEVER use the App while operating your vehicle. Use the App when vehicle is stationary only. 3. Before using this LED Kit, read all instructions and cautionary markings to ensure the product is properly &...
- Page 19 WARNINGS FCC Compliance Statement: This device complies with Part 15 of the FCC rules. Operation is subject to the following two conditions: (1) This device may not cause harmful interference, and (2) this device must accept any interference received, including interference that may cause undesired operation.
- Page 20 WARNINGS This equipment complies with FCC RF radiation exposure limits set forth for an uncontrolled environment. In order to avoid the possibility of exceeding the FCC radio frequency exposure limits, human proximity to the antenna shall not be less than 20cm during normal operation.
- Page 21 NOTES...
- Page 22 NOTES...
- Page 23 NOTES...
- Page 24 A Horizon Brands Company 2975 Red Hill Ave., Ste. 100, Costa Mesa, CA 92626, U.S.A. 1.866.294.9244 | info@typesauto.com ©2022 TYPE S. All rights reserved. www.typesauto.com ML-533066_V1...
Need help?
Do you have a question about the TYPE S Formula DRIFT PRO Series and is the answer not in the manual?
Questions and answers