Table of Contents
Advertisement
Advertisement
Table of Contents

Related Manuals for Oppo DV-980H


Summary of Contents for Oppo DV-980H
-
Page 1: User Manual
® DVD PLAYER DV-980H USER MANUAL READ CAREFULLY BEFORE OPERATION... -
Page 3: Table Of Contents
Table of Contents Important Information ... 1 Important Safety Instructions ... 2 Additional Safety Instructions ... 2 Cautions... 3 FCC Statement ... 3 Copyright Protection ... 4 Trademarks ... 4 Compatible Disc Types ... 4 INSTALLATION ... 5 Front Panel Controls ... 5 Front Panel Display Window ... - Page 4 Speaker Setup Page ... 42 Audio Setup Page... 46 Video Setup Page... 49 Preference Page... 51 REFERENCES... 53 Useful Notes... 53 Troubleshooting ... 53 Specifications ... 54 Language Code List ... 55 LIMITED WARRANTY ... 56 OPPO Digital, Inc. Limited One Year Warranty... 56...
-
Page 5: Important Information
Important Information CAUTION RISK OF ELECTRIC SHOCK. DO NOT OPEN. CAUTION: TO PREVENT ELECTRICAL SHOCK, DO NOT REMOVE THE COVER. NO USER-SERVICEABLE PARTS INSIDE. REFER SERVICING TO QUALIFIED SERVICE PERSONNEL. WARNING: TO PREVENT DAMAGE WHICH MAY RESULT IN FIRE OR SHOCK HAZARD, DO NOT EXPOSE THIS APPLIANCE TO RAIN OR MOISTURE. -
Page 6: Important Safety Instructions
I M P O R T A N T I N F O R M A T I O N Important Safety Instructions 1) Read these instructions. 2) Keep these instructions. 3) Heed all warnings. 4) Follow all instructions. 5) Do not use this apparatus near water. 6) Clean only with dry cloth. -
Page 7: Cautions
I M P O R T A N T I N F O R M A T I O N 13) When smoke, abnormal smell or sound appears from the product, please cut off power immediately and contact your dealer or service center. 14) Never insert any metal object into the cabinet. -
Page 8: Copyright Protection
HDMI, the HDMI logo and High-Definition Multimedia Interface are trademarks or registered trademarks of HDMI Licensing LLC. • The 480p/720p/1080i/1080p up-converting arrow logo is a trademark of OPPO Digital, Inc. • All other trademarks are the properties of their respective owners. -
Page 9: Installation
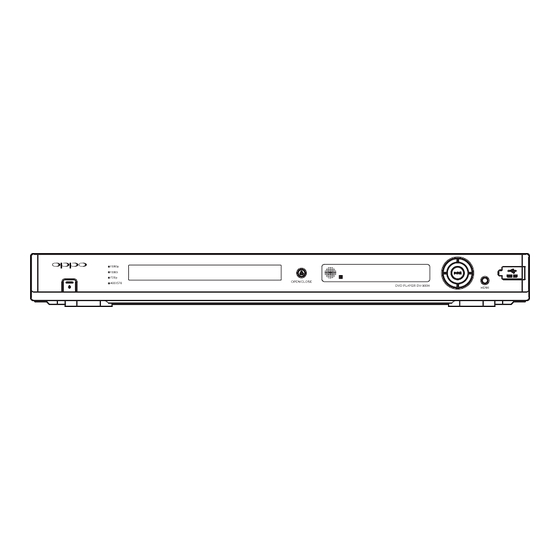
INSTALLATION Front Panel Controls 1. POWER Button 4. OPEN/CLOSE Button 7. Playback Control and Navigation Buttons Front Panel Display Window 1. Disc Type Indication – Indicates the currently playing disc type 3. Track/Chapter – When illuminated, the displayed time applies to a track or chapter 5. -
Page 10: Rear Panel Connectors
I N S T A L L A T I O N Rear Panel Connectors 1. HDMI Output 4. Component Video Output 7. 7.1CH Audio Output 2. Composite Video Output 5. Coaxial Digital Audio Output 3. S-Video Output 6. Optical Digital Audio Output... -
Page 11: Remote Control
I N S T A L L A T I O N Remote Control 1. POWER Button – Toggle power STANDBY and ON 2. DVD/USB Button – Select DVD or USB device as content source 3. ON Button – Turn power ON 4. -
Page 12: Battery Installation
I N S T A L L A T I O N Battery Installation 1. Remove the battery compartment cover Using the Remote Control When using the remote control, the front window of the remote control should be pointed to the infrared sensor on the front panel within an angle of ±30°... -
Page 13: Making The Video Connection
I N S T A L L A T I O N Making the Video Connection HDMI Connection HDMI In Video In S-Video • If your TV has an HDMI (High-Definition Multimedia Interface) input, you can use the included HDMI cable to connect the DVD player to the TV. This connection method delivers both video and audio in pure digital format via a single cable. -
Page 14: Dvi Connection
If your TV has a DVI input, you can purchase an HDMI-DVI adapter cable to connect the DVD player to the TV. This connection method delivers digital video to the TV without any signal degradation. The HDMI video output of the OPPO DVD player presents the highest possible resolutions and video quality. -
Page 15: Component Video Connection
I N S T A L L A T I O N Component Video Connection Component Video Pb/Cb Pr/Cr Audio Video In S-Video Method 3 – Component Video Connection to TV • If your TV has no digital video input but has component video inputs, please use a set of component video cable to connect the component video output of the DVD player to the TV. -
Page 16: Connecting To An Audio System
I N S T A L L A T I O N Connecting to an Audio System Connecting to a Receiver/Amplifier with HDMI Input/Output HDMI In Method 4 – HDMI Connection to Receiver and TV • HDMI can transmit both audio and video signals over a single cable. If you have an HDMI- capable receiver that can support HDMI audio, you can simply run an HDMI cable from the DVD player to your receiver and enable HDMI audio on the receiver (see your receiver’s owners’... -
Page 17: Connecting To A Receiver/Amplifier With 7.1Ch Audio Input
Please use 8 RCA-style audio interconnect cables to connect the FRONT/MIXED L/R, SURROUND L/R, CENTER, SUBWOOFER and SURROUND BACK L/R analog outputs of the OPPO DVD player to the corresponding multi-channel analog audio input jacks of your A/V receiver. Audio Interconnect Cable FRONT Receiver/Amplifier with 7.1ch Audio Input... -
Page 18: Connecting To A Receiver/Amplifier With 5.1Ch Audio Input
• Please use 6 RCA-style audio interconnect cables to connect the FRONT/MIXED L/R, SURROUND L/R, CENTER and SUBWOOFER analog outputs of the OPPO DVD player to the corresponding multi-channel analog audio input jacks of your A/V receiver. The SURROUND BACK L/R outputs do not need to be connected. -
Page 19: Connecting To A Receiver/Amplifier With Dolby Digital Or Dts Decoder
I N S T A L L A T I O N Connecting to a Receiver/Amplifier with Dolby Digital or DTS Decoder Rear Panel Coaxial In Optical In Receiver/Amplifier with Dolby Digital or DTS Decoder • Please use either a 75-Ohm coaxial digital audio cable with RCA-style connectors or an S/PDIF optical digital audio cable to connect one of the digital audio outputs to the corresponding input terminal on your A/V receiver. -
Page 20: Connecting To A Stereo Or Surround Audio System
I N S T A L L A T I O N Connecting to a Stereo or Surround Audio System Rear Panel Method 8 – Stereo Analog Audio Connection • If your audio system only offers stereo audio inputs, you can connect it to the FRONT/MIXED L/R audio outputs of the DVD player using the supplied Red/White audio cables. -
Page 21: Setting Up The Player - Initial Setup
Setup Menu Name > Menu Item > Submenu Item (or Selection) Setup Menu Name is the actual name of the uppermost setup menu level. With the OPPO DV-980H there are exactly five (5) Setup Menu pages or sections, each represented by an icon on the top of the Setup Menu screen. - Page 22 I N S T A L L A T I O N To access the DVD player’s Setup Menu simply press the SETUP button on the remote control. Since some setup menu options can become inaccessible when the player is playing a disc, it is recommended that you operate the setup menu when playback is fully stopped or when there is no disc in the player.
-
Page 23: Determine Your Display Type
Determine Your Display Type Widescreen, or 16:9 TV For best performance, your OPPO DVD player must be correctly configured for playback even before the first disc is inserted. This is done under General Setup Page > TV Display in the Setup Menu. -
Page 24: Select The Best Output Resolution
Unfortunately many TVs on the market only do an average job scaling the video. On the other hand, if you set the OPPO DVD player to output a resolution that matches or is very close to the native resolution of the TV, you are more likely to get a great picture. -
Page 25: Set Up Audio Options
I N S T A L L A T I O N 5. The selected output resolution will be briefly displayed on the upper left corner of the TV screen as well as on the DVD player’s front panel display. 6. - Page 26 I N S T A L L A T I O N To get the best possible audio via HDMI, you may need to set the following options on the DVD player’s setup menu, depending on your HDMI-capable receiver configuration: •...
- Page 27 Be aware, however, that HDMI is an evolving standard, and there could be compatibility issues. The OPPO DV-980H supports HDMI v1.1 and v1.2a audio. A receiver that supports HDMI v1.1 is required in order to play multi-channel audio for all formats, including DVD-Video/Audio and SACD (SACD DSD audio converted to multi- channel PCM).
- Page 28 I N S T A L L A T I O N Due to bandwidth limitation of the technology and copyright restrictions, unfortunately it is impossible to send high-resolution multi-channel digital audio from a source like SACD or DVD-Audio to the receiver using this connection method.
-
Page 29: Basic Operations
BASIC OPERATIONS Disc Playback DVD-A SACD POWER EJECT PLAY STOP Pause Playback SACD DVD-A 1. During playback, press the PAUSE button to temporarily pause the PLAY PAUSE 2. Press the PLAY button to resume playback. NOTE If the screen saver is set to “ON” (please refer to page 40 for details), after pausing for 2 minutes the screen saver will be displayed automatically. -
Page 30: Dvd Menu Playback
B A S I C O P E R A T I O N S DVD Menu Playback DVD-A NUMBERS TITLE MENU ARROW SELECT RETURN PLAY You may also: • Press the TITLE button to return to the disc title menu. •... -
Page 31: Osd (On-Screen Display)
B A S I C O P E R A T I O N S NOTE Check the MUTE status on the front panel display of the DVD player when there is no audio output. You may also press the MUTE button to verify the MUTE status. OSD (On-Screen Display) DVD-A Press the OSD button on the remote control to show disc information and operation... -
Page 32: Subtitle Selection
B A S I C O P E R A T I O N S Subtitle Selection When playing DVD discs or DivX programs recorded with subtitles, press the SUBTITLE button on the remote control to select the desired subtitle. Each press of SUBTITLE button switches one available subtitle in a looping SUBTITLE manner:... -
Page 33: Zooming The Displayed Frame
B A S I C O P E R A T I O N S Zooming the Displayed Frame The feature zooms in or out the displayed frame. ARROW SELECT ZOOM 1. To change the zoom ratio, press the ZOOM button on the remote control. -
Page 34: Advanced Operations
ADVANCED OPERATIONS TV System Selection While you will want to set the video output system (NTSC/PAL) to the same as that supported by your TV, realize that the DVD player will convert, on-the-fly any content that is not in the format your TV understands. The default output is NTSC for North America. -
Page 35: Slow Playback
A D V A N C E D O P E R A T I O N S Slow Playback To slow down the playback speed, please use the following steps. 1. Press the SLOW button on the remote control and the player starts PLAY SLOW 2. -
Page 36: Repeat The Selected Section
A D V A N C E D O P E R A T I O N S Repeat the Selected Section SACD DVD-A To repeatedly play a specified section, please follow these steps: 1. During normal playback, press the A-B button on the remote at the desired beginning point (Point A) for the repeat play. -
Page 37: Sacd Discs
A D V A N C E D O P E R A T I O N S SACD discs Insert disc. After the player begins reading the disc, enter the track number directly and press the SELECT button to select the track for playback. Playback from a Specific Location DVD-A DVD discs... -
Page 38: Cd Discs
A D V A N C E D O P E R A T I O N S CD discs 1. Disc time search • Repeatedly press the GOTO button until the TV screen displays the following picture. Use the NUMBER buttons to enter the MINUTE and SECOND. 2. -
Page 39: Memory And Automatic Resume
A D V A N C E D O P E R A T I O N S Memory and Automatic Resume POWER EJECT STOP PLAY Viewing Static Pictures on DVD-Audio Discs DVD-A Some DVD-Audio discs contain static pictures, such as photos of the band or narration of the album. -
Page 40: Playing Divx, Digital Audio And Picture Files
A D V A N C E D O P E R A T I O N S MENU Video Type NTSC Video Scale Title 01/01 Chapter _0/05 BITRATE 85 TITLE ELAPSED: 0:01:25 MENU Video Type NTSC Video Scale Title 01/01 Chapter 04/05... -
Page 41: Digital Music Play Operations
A D V A N C E D O P E R A T I O N S Digital Music Play Operations When playing digital music files, the following operations are available: • Repeat, Shuffle or Random Playback – Press the REPEAT button on the remote control to switch the playback mode. -
Page 42: Playing A Disc With Both Digital Audio And Picture Files
A D V A N C E D O P E R A T I O N S • Press the MENU button to stop the slide show and return to the disc navigation menu. • Press the ARROW buttons to rotate or flip the picture: UP: Invert DOWN: Mirror LEFT: Rotate counter-clockwise... -
Page 43: Audio-Only Mode
OPPO background screen when playback is stopped. To restore the original OPPO background screen, please set the “Background” item in the “General Setup Page” of the DVD player’s setup menu to “Default”. Refer to page 40 for details about this setup menu item. -
Page 44: Setup Menu Options
SETUP MENU OPTIONS The Setup Menu of the DVD player presents many setup and configuration options. For most users, the default configuration works well enough and there is no need to change the settings. However if you need to configure the DVD player to perfectly match your home theater settings and viewing preference, please refer to the following sections for details about each configuration option. - Page 45 DVD player control function, please program it with the code for TOSHIBA, PHILIPS, MAGNAVOX, MARANTZ or ZENITH DVD players. Since each brand of remote control may have several sets of codes, you may need to try several times using different codes to get the working one.
-
Page 46: Speaker Setup Page
S E T U P M E N U O P T I O N S Speaker Setup Page 1. Down-mix Mode: To set the audio down-mix mode for converting multi-channel audio into two- channel output. This setting affects the analog and HDMI audio outputs. The options are: •... - Page 47 S E T U P M E N U O P T I O N S • Small – Choose if the surround speakers are small. Bass frequencies are not passed to the surround speakers to reduce possible distortion. • Off –...
- Page 48 S E T U P M E N U O P T I O N S For example, in the above diagram, measure the distance (in feet) from the primary listening position to the Front Left or Front Right Speaker. Your Front Right and Left speakers should measure the same distance.
- Page 49 S E T U P M E N U O P T I O N S • Press the left/right ARROW buttons to select the channel to be adjusted. • Press the up/down ARROW buttons to raise or lower the volume of the selected channel in 0.5dB increments.
-
Page 50: Audio Setup Page
Press the SELECT button to confirm the setting. 6. Pro Logic II: Taking a step further than most DVD players, the OPPO DVD player allows you to configure Dolby Pro Logic II to expand 2-channel source audio into full 5-channel surround sound. - Page 51 S E T U P M E N U O P T I O N S A. Pro Logic II: To turn on or off the Pro Logic II processing. The options are: • On – Pro Logic II processing is always on •...
- Page 52 S E T U P M E N U O P T I O N S A. Dual Mono: To choose the output for Dolby Digital discs encoded with two independent audio channels, such as bilingual programs. The options are: •...
-
Page 53: Video Setup Page
S E T U P M E N U O P T I O N S Video Setup Page 1. Sharpness: To set the sharpness of video output. Sharpness level can be set with the following options: • Sharp – Enable edge enhancement. Video details are the sharper. May cause slight white line etching around objects. - Page 54 S E T U P M E N U O P T I O N S 7. Color Space: To select the color space for the HDMI output. The available options are: • RGB 4:4:4 – The HDMI output uses RGB color space. •...
-
Page 55: Preference Page
S E T U P M E N U O P T I O N S Preference Page The Preference Page can only be accessed when playback is completely stopped, or when there is no disc in the DVD player. 1. - Page 56 S E T U P M E N U O P T I O N S • Press the up/down ARROW buttons to select the rating to allow (G/PG/PG 13/PGR/R/NC17/ADULT). The selected rating and below will be allowed, and any rating above the selected will be blocked.
-
Page 57: References
• In case of player malfunctioning, please turn it off, wait for 30 seconds and turn it back on. If the problem still exists, please follow the troubleshooting instructions or contact an OPPO service center. Troubleshooting Use this chart to help you solve operational problems. -
Page 58: Specifications
R E F E R E N C E S Interference from other devices Some setup Some setup options cannot be menu items are changed while a disc is playing. grayed out Some setup options may be mutually exclusive with other setup options. -
Page 59: Language Code List
R E F E R E N C E S Language Code List Code Language Name 6565 Afar 6566 Abkhazian 6570 Afrikaans 6577 Ameharic 6582 Arabic 6583 Assamese 6588 Aymara 6590 Azerbaijani 6665 Bashkir 6669 Byelorussian 6671 Bulgarian 6672 Bihari 6678 Bengali, Bangla 6679... -
Page 60: Limited Warranty
This warranty does not apply to products purchased or shipped outside of the U.S.A. and Canada. OPPO Digital, Inc. may at its sole discretion, refuse to honor the warranty of any such unauthorized product that may be presented for service. - Page 61 W A R R A N T Y • If it is determined that your product needs service, a Return Merchandise Authorization (RMA) number will be issued to you along with return instructions and address of an OPPO service center. •...
Need help?
Do you have a question about the DV-980H and is the answer not in the manual?
Questions and answers