Table of Contents
Advertisement
Quick Links
H290
H291
AC outlet
HC18A
accessories
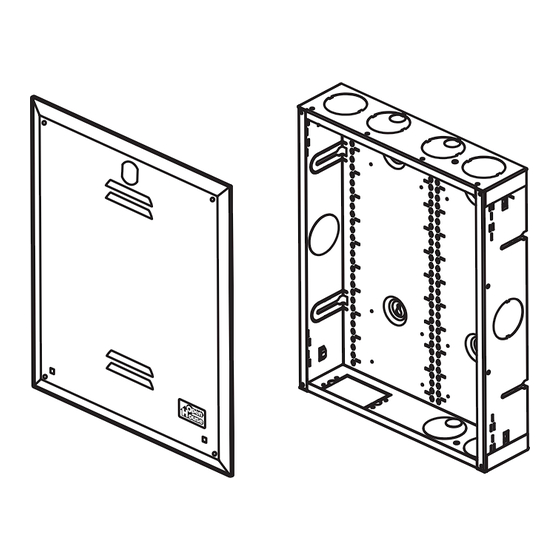
18" cover
18" enclosure
Mounting the enclosure
1. For tab mounting, install the mounting tabs
A. Select the proper slots for the wallboard thickness.
Slots A - For 3/8" wallboard
Slots B - For 1/2" wallboard
Slots C - For 5/8" wallboard
B. Insert m o u n t i n g tab.
(Don't worry if the tabs seem
loose - they tighten up when
screwed to the studs.)
2. Attach enclosure
Use the four screws provided.
(The screws will force mounting tabs
flat, tightening the tab.)
Wood
Stud
Or, when mounting without
the tabs, use screws in the
four slide mount slots.
1/8"
Enclosure
Wallboard
When mounting without using
Stud
the mounting tabs adjust the
enclosure to protrude 1/8"
beyond the wallboard surface.
Installing cables
Remove the knockouts as needed
and line the holes with the grommets provided.
H272
The H318 and H336 enclosures include
H272 grommets. If you need more
grommets, they are available as part
number H272.
Remove paint shield and save.
Route cabling into enclosure.
Use H271 (not included) to
join 2 or more enclosures.
After cabling is routed, reverse paint
shield and return it to the enclosure to
protect cabling.
If H290 is installed, fold flaps on the paint
shield to bend the shield over the H290 AC
outlet accessory.
ChannelPlus Enclosures
H318
HC36A
36" cover
36" enclosure
A
B
C
16" on
center
H272 Grommet
H271
Coupling tube
®
OpenHouse modules attach from the top
1) Hook from the top
2) Swing into place
3) Push button to lock
H336
Mounting the H290/H291 AC outlet accessory
The H290/H291 accessory brings AC
power inside the H318 and H336
enclosures. The H290/H291 gives the
installer a clean location to mount power
adapters. Mount the H290/H291 in any
corner of the enclosure using the four #6
screws provided. Installation of AC outlets
should be done only by a qualified
electrician.
1/2" knockouts for 120VAC
Using wire ties with the OpenHouse grid
1) Fold back tip of
wire tie and insert
into hole
Installing the cover
An old electrician's trick ...
When hanging a heavy cabinet cover,
insert two nails (included) through the
mounting holes on the cover. Guide the
nails into the mating holes on the
enclosure and let the cover hang from
the nails while you attach the screws.
Grounding the cabinet
When used with model H290/H291 accessory, the grounding lug on
the H290/H291 is used. Standard #10-32 grounding screws may be
added to the tapped holes top or bottom.
Optional lock kit - H208
Remove knockouts on the cover to install optional lock kit H208. If an H290/H291
is used the cover must be fastened to the enclosure using the included screws
(even when using the lock kit.) This is a UL requirement.
1
3
From
Telco
R
4
T
R
3
T
R
2
T
R
1
T
2
H290/H291 installs in any of 4 locations
The H290/(H291) provides
space for 4/(2) standard duplex
OEM
AC ADAPTER
receptacles. Wires should exit
the H290/(H291) using the
grommets provided. The
grommets may be cut as shown.
®
2) Push wire tie slowly
3) Pull tip through
into hole until tip
second hole
snaps to next hole
Telephone Master Hub (4 lines x 6 phones)
ChannelPlus model H616
Expansion
Telephones
Ports
RJ31X
Out
4) Works
horizontally too
Advertisement
Table of Contents

Related Manuals for Open House ChannelPlus H318


Summary of Contents for Open House ChannelPlus H318
- Page 1 Installing cables Remove the knockouts as needed and line the holes with the grommets provided. H272 The H318 and H336 enclosures include H272 grommets. If you need more grommets, they are available as part number H272. Remove paint shield and save.
- Page 2 Warranty Linear LLC warrants the OpenHouse Model H318/H336 to be free from defects in material and workmanship for 15 years. The time period will be measured using the date code labeled on the product. Linear LLC is not responsible for damage to the product resulting from the buyer's improper handling, stocking or warehousing of the product.
Need help?
Do you have a question about the ChannelPlus H318 and is the answer not in the manual?
Questions and answers