Advertisement
Quick Links
Advertisement

Related Manuals for Rubicon Netgate-8200


Summary of Contents for Rubicon Netgate-8200
- Page 1 Security Gateway Manual Netgate-8200 © Copyright 2023 Rubicon Communications LLC Mar 14, 2023...
- Page 2 CONTENTS 1 Out of the Box 2 How-To Guides 3 References...
- Page 3 Tip: Before getting started, a good practice is to download the PDF version of the Product Manual and the version of the pfSense Documentation in case Internet access is not available during setup. © Copyright 2023 Rubicon Communications LLC...
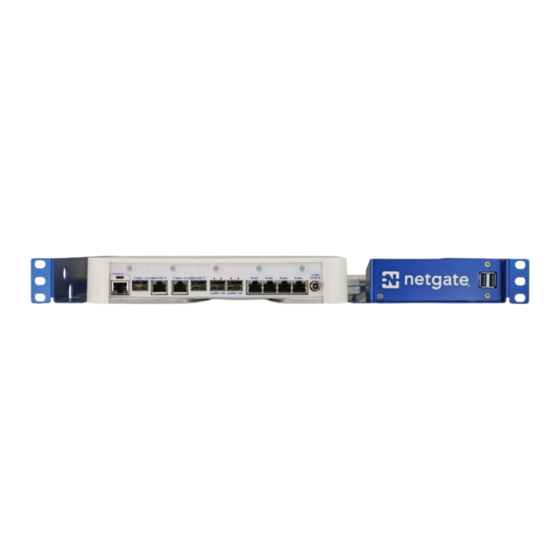
- Page 4 CHAPTER OUT OF THE BOX 1.1 Hardware Overview Fig. 1: Netgate 8200 Security Gateway Front Angled View 1.1.1 1U Rack Mount Design The Netgate 8200 Security Gateway was designed with rack mounting in mind and comes pre-assembled in a 1U rack mount configuration.
- Page 5 Warning: Do not block the portion of the fan intake under the network ports. The bottom of the unit can be placed on top of another device so long as the fan intake under the network ports can pull in air unobstructed. © Copyright 2023 Rubicon Communications LLC...
- Page 6 WAN and LAN, so if the default IP address on the ISP-supplied modem is also 192.168.1.1/24, disconnect the WAN interface until the LAN interface on the firewall has been renumbered to a different subnet (like 192.168.2.1/24) to avoid an IP Address conflict. © Copyright 2023 Rubicon Communications LLC...
- Page 7 3. On the General Information page, use the following as a guide to configure the firewall. Hostname Any desired name can be entered. For the purposes of this guide, the default hostname pfsense is used. © Copyright 2023 Rubicon Communications LLC...
- Page 8 Security Gateway Manual Netgate-8200 Fig. 5: Click Advanced and then Proceed to 192.168.1.1 (unsafe) Fig. 6: Click Next © Copyright 2023 Rubicon Communications LLC...
- Page 9 Change the default LAN IP Address of the device during a later step in the configuration to avoid having conflicting subnets on the WAN and LAN. 7. Change the Admin Password. Enter the same password in both fields. © Copyright 2023 Rubicon Communications LLC...
- Page 10 Security Gateway Manual Netgate-8200 Fig. 8: Change the Timezone and Click Next Fig. 9: Default Settings Should be Acceptable. Click Next © Copyright 2023 Rubicon Communications LLC...
- Page 11 Fig. 10: Read and Click Accept If the Ethernet cable was unplugged at the beginning of this configuration, reconnect it to the WAN1 port now. This completes the basic configuration for the Netgate appliance. © Copyright 2023 Rubicon Communications LLC...
- Page 12 Plus software is installed, and if an update is available. Section 3 Describes Netgate Service and Support. Section 4 Shows the various menu headings. Each menu heading has drop-down options for a wide range of config- uration choices. © Copyright 2023 Rubicon Communications LLC...
- Page 13 Note: Auto Config Backup is a built-in service located at Services > Auto Config Backup. This service will save up to 100 encrypted backup files automatically, any time a change to the configuration has been made. Visit the Auto Config Backup page for more information. © Copyright 2023 Rubicon Communications LLC...
- Page 14 Security Gateway Manual Netgate-8200 Fig. 13: Backup & Restore Fig. 14: Click Download configuration as XML © Copyright 2023 Rubicon Communications LLC...
- Page 15 Note: Only one type of console connection will work at a time and the RJ45 console connection has priority. If both ports are connected only the RJ45 console port will function. • The Power connector is 12VDC with threaded locking connector. Power Consumption 20W (idle) © Copyright 2023 Rubicon Communications LLC...
- Page 16 • Energy Efficient Ethernet (EEE) • Intel PROSet for Windows Device Manager • Intel ANS teams or VLANs (LBFO is supported) • Fibre Channel over Ethernet (FCoE) • Data Center Bridging (DCB) © Copyright 2023 Rubicon Communications LLC...
- Page 17 • SFP+ AoCs (Active optical Cables). Note: Limited to 10G link speed (no 1G support). • Third party SFP+ SR/LR dual speed 1G/10G) optical modules • SFP+ active copper cables • 1000BASE-SX / 1000BASE-LX optical modules Specific known-working modules include: © Copyright 2023 Rubicon Communications LLC...
- Page 18 Finisar FTLF8519P3BNL 1000BASE-SX and 2G Fibre Channel (2GFC) 500m Extended Temperature SFP Optical Transceiver Note: Links at 1G, 2G is not supported 1.5.3 Rear Side Fig. 16: Rear view of the Netgate 8200 Security Gateway © Copyright 2023 Rubicon Communications LLC...
- Page 19 The primary use for the USB ports is to install or reinstall the operating system on the device. Beyond that, there are numerous USB devices which can expand the base functionality of the hardware, including some supported by © Copyright 2023 Rubicon Communications LLC...
- Page 20 Protective grounding/earthing is provided by Listed AC adapter. Building installation shall provide appro- priate short-circuit backup protection. e) Protective bonding must be installed in accordance with local national wiring rules and regulations. © Copyright 2023 Rubicon Communications LLC...
- Page 21 Recyceln trägt dazu bei, potentielle negative Folgen für Umwelt und die menschliche Gesundheit zu vermeiden. Wenn Sie weitere Informationen zur Entsorgung Ihrer Altgeräte benötigen, wenden Sie sich bitte an die örtlichen Behörden oder städtischen Entsorgungsdienste oder an den Händler, bei dem Sie das Produkt erworben haben. © Copyright 2023 Rubicon Communications LLC...
- Page 22 NETGATE tímto prohla uje, e tento NETGATE device, je ve shod se základními po adavky a dal ími p íslu n mi ustanoveními sm rnice 1999/5/ES. Dansk [Danish] Undertegnede NETGATE erklærer herved, at følgende udstyr NETGATE device, overholder de væsentlige krav og øvrige relevante krav i direktiv 1999/5/EF. © Copyright 2023 Rubicon Communications LLC...
- Page 23 Alulírott, NETGATE nyilatkozom, hogy a NETGATE device, megfelel a vonatkozó alapvetõ követelményeknek és az 1999/5/EC irányelv egyéb elõírásainak. Íslenska [Icelandic] Hér me l sir NETGATE yfir ví a NETGATE device, er í samræmi vi grunnkröfur og a rar kröfur, sem ger ar eru í tilskipun 1999/5/EC. © Copyright 2023 Rubicon Communications LLC...
- Page 24 övriga relevanta bestämmelser som framgår av direktiv 1999/5/EG. Español [Spanish] Por medio de la presente NETGATE declara que el NETGATE device, cumple con los requisitos esenciales y cua- lesquiera otras disposiciones aplicables o exigibles de la Directiva 1999/5/CE. © Copyright 2023 Rubicon Communications LLC...
- Page 25 We each agree that any dispute resolution proceedings will be conducted only on an individual basis and not in a class, consolidated or representative action. We also both agree that you or we may bring suit in court to enjoin infringement or other misuse of intellectual property rights. © Copyright 2023 Rubicon Communications LLC...
- Page 26 LESS OTHERWISE SPECIFIED IN WRITING. YOU EXPRESSLY AGREE THAT YOUR USE OF THE PROD- UCTS/SERVICES IS AT YOUR SOLE RISK. TO THE FULL EXTENT PERMISSIBLE BY APPLICABLE LAW, RUBICON COMMUNICATIONS, LLC (RCL) AND ELECTRIC SHEEP FENCING (ESF) DISCLAIM ALL WARRANTIES, EXPRESS OR IMPLIED, INCLUD- ING, BUT NOT LIMITED TO, IMPLIED WARRANTIES OF MERCHANTABILITY AND FITNESS FOR A PAR- TICULAR PURPOSE.
- Page 27 CERTAIN STATE LAWS DO NOT ALLOW LIMITATIONS ON IMPLIED WARRANTIES OR THE EXCLUSION OR LIMITATION OF CERTAIN DAMAGES. IF THESE LAWS APPLY TO YOU, SOME OR ALL OF THE ABOVE DISCLAIMERS, EXCLUSIONS, OR LIMITATIONS MAY NOT APPLY TO YOU, AND YOU MIGHT HAVE ADDITIONAL RIGHTS. © Copyright 2023 Rubicon Communications LLC...
- Page 28 CHAPTER HOW-TO GUIDES 2.1 Connecting to the USB Console Port This guide shows how to access the serial console which can be used for troubleshooting and diagnostics tasks as well as some basic configuration. There are times when directly accessing the console is required. Perhaps GUI or SSH access has been locked out, or the password has been lost or forgotten.
- Page 29 Look for an entry with a title such as Silicon Labs CP210x USB to UART Bridge. If there is a label in the name that contains “COMX” where X is a decimal digit (e.g. COM3), that value is what would be used as the port in the terminal program. © Copyright 2023 Rubicon Communications LLC...
- Page 30 The device associated with the system console is likely to show up as /dev/cuaU0. Look for messages about the device attaching in the system log files or by running dmesg. Note: If the serial device is not present, ensure the device has power and then check again. © Copyright 2023 Rubicon Communications LLC...
- Page 31 Note: The sudo command will prompt for the local workstation password of the current account. • Set the Connection type to Serial • Set Serial line to /dev/ttyUSB0 • Set the Speed to 115200 bits per second • Click the Open button PuTTY will then display the console. © Copyright 2023 Rubicon Communications LLC...
- Page 32 Security Gateway Manual Netgate-8200 Fig. 1: An example of using PuTTY in Windows © Copyright 2023 Rubicon Communications LLC...
- Page 33 If portions of the text are unreadable but appear to be properly formatted, the most likely culprit is a character encoding mismatch in the terminal. Adding the -U parameter to the screen command line arguments forces it to use UTF-8 for character encoding: sudo screen -U <console-port> 115200 © Copyright 2023 Rubicon Communications LLC...
- Page 34 Some devices expose multiple ports, so using the incorrect port may lead to no output or unexpected output. Hardware Failure There could be a hardware failure preventing the serial console from working. Contact Netgate TAC for assistance. © Copyright 2023 Rubicon Communications LLC...
- Page 35 To disable flow control in GNU Screen, add the -ixon and/or -ixoff parameters after the serial speed as in the following example: sudo screen <console port> 115200,-ixon Terminal Speed Ensure the terminal program is configured for the correct speed. (See No Serial Output) © Copyright 2023 Rubicon Communications LLC...
- Page 36 Linux, minicom, or dterm. Examples of how to PuTTY in configure PuTTY and GNU screen are below. FreeBSD For FreeBSD the best practice is to run GNU screen or cu. An example of how to configure GNU screen is below. © Copyright 2023 Rubicon Communications LLC...
- Page 37 • Set Serial line to the console port determined previously • Set the Speed to 115200 bits per second. • Click the Open button PuTTY will then display the console. Fig. 3: An example of using PuTTY in Windows © Copyright 2023 Rubicon Communications LLC...
- Page 38 In many cases screen may be invoked simply by using the proper command line, where <console-port> is the console port that was located above. sudo screen <console-port> 115200 Note: The sudo command will prompt for the local workstation password of the current account. © Copyright 2023 Rubicon Communications LLC...
- Page 39 Others may be of low quality or have poor or worn connectors. The ideal cable to use is the one that came with the device. Failing that, ensure the cable is of the correct type and specifications, and try multiple cables. © Copyright 2023 Rubicon Communications LLC...
- Page 40 Remote Character Set Use font encoding or UTF-8 Handling of line drawing characters Use font in both ANSI and OEM modes or Use Unicode line drawing code points Window > Colours Indicate bolded text by changing The colour © Copyright 2023 Rubicon Communications LLC...
- Page 41 2. Write the image to a USB memstick. See also: Locating the image and writing it to a USB memstick is covered in detail under Writing Flash Drives. Connect to the console port of the Netgate device. © Copyright 2023 Rubicon Communications LLC...
- Page 42 8. The installer will automatically launch and present several options. On Netgate firewalls, choosing Enter for the default options will complete the installation process. Note: Options such as the type of disk partition can be modified through this installation if required. © Copyright 2023 Rubicon Communications LLC...
- Page 43 This guide configures an OPT port as an additional WAN type interface. These interfaces connect to upstream networks providing connectivity to the Internet or other remote destinations. See also: Multi-WAN documentation Configuring an additional WAN • Requirements • Assign the Interface • Interface Configuration • Outbound NAT © Copyright 2023 Rubicon Communications LLC...
- Page 44 The new interface must be enabled and configured. • Navigate to Interfaces > OPTx • Check Enable interface • Set custom name in the Description, e.g. WAN2 • Set IP address and CIDR for static, or DHCP/PPPoE/etc. See also: © Copyright 2023 Rubicon Communications LLC...
- Page 45 WAN listed as a Interface in the Automatic Rules at the bottom of the page. If so, skip ahead to the next section. If the mode is set to Manual, create a new rule or set of rules to cover the new WAN. © Copyright 2023 Rubicon Communications LLC...
- Page 46 Add to create a new gateway group • Click • Configure the group as follows: Group Name PreferWAN Gateway Priority Gateway for WAN on Tier 1, and WAN2 on Tier 2 Description Prefer WAN, fail to WAN2 • Click Save © Copyright 2023 Rubicon Communications LLC...
- Page 47 • Navigate to System > General Setup • Add at least one DNS server for each WAN, ideally two or more These servers must be unique, the same server cannot be listed more than once. © Copyright 2023 Rubicon Communications LLC...
- Page 48 Source LAN net Destination The other local subnet, VPN network, or an alias of such networks. Description Pass to local and VPN networks Do not set a gateway on this rule. • Click Save © Copyright 2023 Rubicon Communications LLC...
- Page 49 This guide configures an OPT port as an additional LAN type interface. These local interfaces can perform a variety of tasks, such as being a guest network, DMZ, IOT isolation, wireless segment, lab network, and more. Configuring an additional LAN • Requirements © Copyright 2023 Rubicon Communications LLC...
- Page 50 Note: As this guide does not know what that number will be on a given configuration, it will refer to the interface generically as OPTx. The newly assigned interface will have its own entry under the Interfaces menu and elsewhere in the GUI. © Copyright 2023 Rubicon Communications LLC...
- Page 51 • Configure the Range, e.g. from 192.168.2.100 to 192.168.2.199 This sets the lower (From) and upper (To) bound of automatic addresses assigned to clients. • The rest can be left at defaults • Click Save See also: DHCPv4 Configuration © Copyright 2023 Rubicon Communications LLC...
- Page 52 • Navigate to Firewall > Rules, on the OPTx tab (or the custom name) • Click to add a new rule at the top of the list • Configure the rule as follows: Action Pass © Copyright 2023 Rubicon Communications LLC...
- Page 53 • Navigate to Firewall > Rules, on the OPTx tab (or the custom name) Add rule to pass DNS to firewall (or other DNS servers) • Click to add a new rule at the bottom of the list. • Configure the rule as follows: Action Pass © Copyright 2023 Rubicon Communications LLC...
- Page 54 • Click Save Add rule to reject traffic from this network to private networks • Click to add a new rule at the bottom of the list. • Configure the rule as follows: Action Reject © Copyright 2023 Rubicon Communications LLC...
- Page 55 Tip: Rule separators are useful for documenting a ruleset in place. Similar to the isolated network, it’s also possible to be much more strict with rules to only allow specific outbound ports. When creating this type of configuration, © Copyright 2023 Rubicon Communications LLC...
- Page 56 When the device boots again it will be at its factory default settings and accessible from the LAN at https://192. 168.1.1. If this procedure fails, connect to the console and perform a factory reset there. © Copyright 2023 Rubicon Communications LLC...
- Page 57 CHAPTER THREE REFERENCES 3.1 Additional Resources 3.1.1 Netgate Training ® Netgate training offers training courses for increasing your knowledge of pfSense Plus products and services. Whether you need to maintain or improve the security skills of your staff or offer highly specialized support and improve your customer satisfaction;...
- Page 58 • All Specifications subject to change without notice For support information, view support plans offered by Netgate. See also: ® For more information on how to use pfSense Plus software, see the pfSense Documentation Resource Library. © Copyright 2023 Rubicon Communications LLC...
Need help?
Do you have a question about the Netgate-8200 and is the answer not in the manual?
Questions and answers