
Related Manuals for Rubicon Netgate SG-5100


Summary of Contents for Rubicon Netgate SG-5100
- Page 1 Secure Router Manual SG-5100 © Copyright 2022 Rubicon Communications LLC Mar 22, 2022...
-
Page 2: Table Of Contents
OUT OF THE BOX 1 Getting Started 2 Input and Output Ports 3 Connecting to Console Port 4 Additional Resources 5 Warranty and Support... - Page 3 Secure Router Manual SG-5100 This Quick Start Guide covers the first time connection procedures for the Netgate 5100 Secure Router and also provides information needed to stay up and running. © Copyright 2022 Rubicon Communications LLC...
-
Page 4: Getting Started
CHAPTER GETTING STARTED Use the following steps to configure the TNSR Secure Router. 1. To configure the Network Interfaces and gaining access to the Internet, follow the instructions provided in the Zero-to-Ping documentation. Note: Not all steps in the Zero-to-Ping documentation will be necessary for every configuration scenario. 2. -
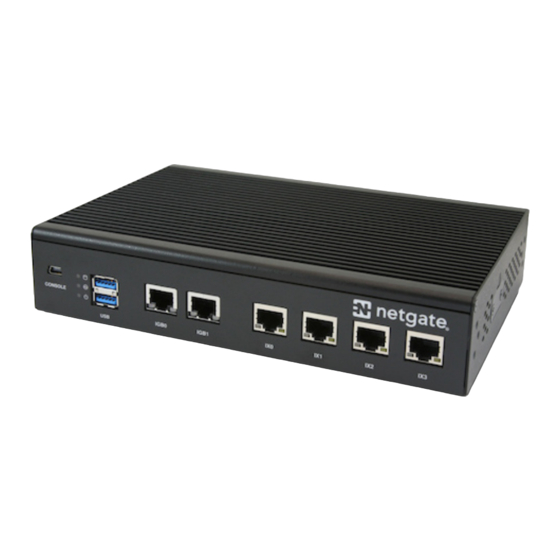
Page 5: Input And Output Ports
CHAPTER INPUT AND OUTPUT PORTS 2.1 Rear Side 2.2 Network Ports Port Label Linux Label TNSR Label Port Type Port Speed IGB0 enp3s0 GigabitEthernet3/0/0 RJ-45 1 Gbps IGB1 enp4s0 GigabitEthernet4/0/0 RJ-45 1 Gbps enp6s0f0 TenGigabitEthernet6/0/0 RJ-45 1 Gbps enp6s0f1 TenGigabitEthernet6/0/1 RJ-45 1 Gbps enp8s0f0... - Page 6 1. Receessed Reset Button 2. Power Button 3. Power (12VDC with threaded locking connector) Center Pin Positive Note: The power button on the Netgate 5100 has been programmed to perform a graceful shutdown when depressed. © Copyright 2022 Rubicon Communications LLC...
-
Page 7: Connecting To Console Port
CHAPTER THREE CONNECTING TO CONSOLE PORT 3.1 Simple Configuration Below are the simple instructions for connecting to the console port with Microsoft Windows. If these steps do not work for you or if you’re an operating system other than Windows, then please skip forward to Advanced Configura- tion. - Page 8 Open PuTTY and locate the Session display as shown below. For the Connection type, select Serial. Set Serial line to the COM Port that is displayed in Windows Device Manager, COM3 for this example, and the Speed to 115200 bits per second, the speed of the BIOS in this case. © Copyright 2022 Rubicon Communications LLC...
- Page 9 A Prolific PL2303 USB-to-UART bridge is used to provide access to the serial port that acts as a system console. This is exposed via a USB Mini-b (5-pin) port on the front of the case. There are several steps required to access the system console via this port. © Copyright 2022 Rubicon Communications LLC...
- Page 10 “COMX” where X is a decimal digit (e.g. COM1), that value is what would be used as the port in the terminal program. Mac OS X The device associated with the system console is likely to show up as /dev/cu.usbserial. © Copyright 2022 Rubicon Communications LLC...
- Page 11 Flow Control Off or XON/OFF. Hardware flow control (RTS/CTS) must be disabled. Client-Specific Examples PuTTY Launch PuTTY and configure it for a Serial type connection with a speed of 115200 using the port name located previously. • Windows Example: © Copyright 2022 Rubicon Communications LLC...
- Page 12 For example, on OS X this is commonly required sudo screen -U /dev/cu.usbserial 115200 Adding the -U parameter to the screen command line arguments forces it to use UTF-8 for character encoding. © Copyright 2022 Rubicon Communications LLC...
- Page 13 • Ensure the installed operating system is configured for the proper console (e.g. ttyS1 in Linux). Consult the various operating install guides on this site for further information. • If booting from a USB flash drive, ensure that the drive was written correctly and contains a bootable operating system image. © Copyright 2022 Rubicon Communications LLC...
-
Page 14: Additional Resources
CHAPTER FOUR ADDITIONAL RESOURCES 4.1 Professional Services Support does not cover more complex tasks such as network design and conversion from other firewalls. These items are offered as professional services and can be purchased and scheduled accordingly. https://www.netgate.com/our-services/professional-services.html 4.2 Netgate Training Netgate training offers training courses for increasing your knowledge of Netgate products and services. -
Page 15: Warranty And Support
CHAPTER FIVE WARRANTY AND SUPPORT • One year manufacturer’s warranty. • Please contact Netgate for warranty information or view our Product Lifecycle page. • All Specifications subject to change without notice. Enterprise Support is included with an active software subscription, for more information view our Netgate Global Support page.
Need help?
Do you have a question about the Netgate SG-5100 and is the answer not in the manual?
Questions and answers