Table of Contents
Advertisement
Available languages
Available languages
Quick Links
120 PSI LITHIUM RECHARGEABLE
AIR COMPRESSOR
WITH DIGITAL GAUGE
INSTRUCTION MANUAL
1
3
4
5
7
6
13
14
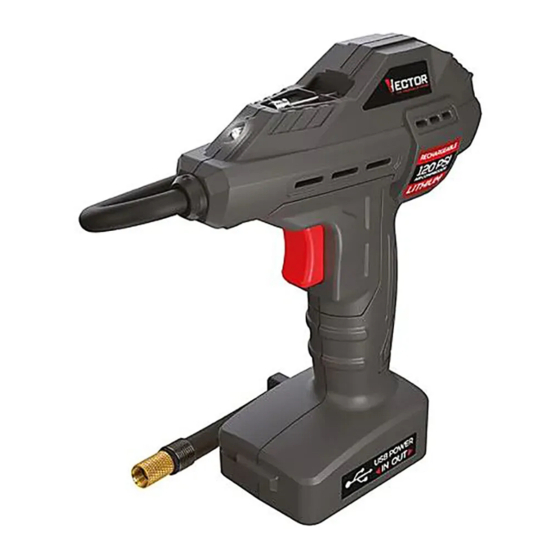
FEATURES
1. LED Area Light
5. Air Hose and Sure Fit
®
Nozzle
9. Digital Display (PSI Pressure
Value)
2. Nozzle Adapter Storage
6. Nozzle Adaptor
Compartment
10. Decrease Pressure Control
7. USB-A Port
Button (–)
3. Compressor Trigger
8. LCD Screen
4. Storage Clips
11. Power Button
SAVE THIS INSTRUCTION MANUAL FOR FUTURE REFERENCE.
© 2022 Baccus Global LLC, Boca Raton, FL 33487
SAFETY GUIDELINES / DEFINITIONS
DANGER:
Indicates an imminently hazardous situation which, if not avoided, will result in death or serious injury.
WARNING:
Indicates a potentially hazardous situation which, if not avoided, could result in death or serious injury.
CAUTION:
Indicates a potentially hazardous situation which, if not avoided, may result in minor or moderate injury.
CAUTION:
Used without the safety alert symbol indicates potentially hazardous situation which, if not avoided, may result in property damage.
RISK OF UNSAFE OPERATION.
When using tools or equipment, basic safety precautions should always be followed to reduce the risk of personal injury. Improper operation, maintenance or modification
of tools or equipment could result in serious injury and property damage. There are certain applications for which tools and equipment are designed. Manufacturer strongly recommends that this product NOT be
modified and/or used for any application other than for which it was designed. Read and understand all warnings and operating instructions before using any tool or equipment.
READ ALL INSTRUCTIONS
WARNING:
Read and understand this instruction manual before using this unit. Failure to follow all instructions listed below may result in electric shock, fire and/or serious injury.
IMPORTANT SAFETY INSTRUCTIONS
SPECIFIC SAFETY INSTRUCTIONS FOR LITHIUM BATTERIES
WARNING –
To reduce the risk of fire, electric shock, burst hazard, or injury to persons or property: Lithium batteries are small, compact and ideal for providing long-lasting power to this unit. However,
they must be used and charged properly. Improper use can result in serious injury, fire, or death.
• Lithium batteries can explode in the presence of a source of ignition. Do not use the product in the presence of an open flame.
• Do not place this lithium battery powered unit in fire or apply heat to it.
• Do not subject this lithium battery powered unit to strong impacts or shocks. The battery in this unit contains safety and protection devices which, if damaged, may cause the battery to generate heat, rupture or ignite.
• Do not use this unit if damaged in any way.
• Do not expose this lithium battery powered unit to water or salt water, or allow the battery to get wet.
• Avoid storing this lithium battery powered unit in the basement, bathroom or other areas of the house that are or may become wet or humid or where moisture may concentrate.
• Do not leave this lithium battery powered unit in direct sunlight, or use or store the unit inside cars in hot weather. Doing so may cause the battery to generate heat, rupture, or ignite. Using the battery in this
manner may also result in a loss of performance and a shortened life expectancy.
• Never charge this unit near heat or flammable objects.
• NEVER THROW WATER ON A BURNING LITHIUM BATTERY! If a lithium battery does catch on fire, it will burn even more violently if it comes in contact with water or even moisture in the air. A fire
extinguisher must be used.
Battery Charging and Capacity
This unit is delivered in a partially charged state – you must fully charge it before using it for the first time.
When stored at room temperature with a full charge, lithium batteries will will begin to discharge from the time they are manufactured, even when unused. Deep discharges also decrease their capacity. Battery life
can be extended by the following:
• Charge battery to full capacity before storage.
• Store this unit at temperatures between 5°C and 20°C (41°F and 68°F).
• Never discharge the battery fully.
• Charge after each use.
• Always charge at least once every 3-6 months if not in frequent use to prevent overdischarge.
Transportation of Lithium Batteries
• Always check all applicable local, national, and international regulations before transporting a unit containing a lithium battery.
• Transporting an end-of-life, damaged, or recalled battery may, in certain cases, be specifically limited or prohibited.
GENERAL SAFETY WARNINGS AND INSTRUCTIONS
• This unit was designed for household use only.
WARNING –
Risk of fire, electric shock, burst hazard, or injury to persons or property:
• Avoid dangerous environments. Don't use appliances in damp or wet locations. Don't use appliances in the rain.
• Keep children away. All visitors should be kept at a distance from work area.
• Store idle appliance indoors. When not in use, appliances should be stored indoors in dry, and high or locked-up place – out of reach of children.
• Disconnect appliances. Disconnect the appliance from the power supply when not in use, before servicing, and when changing accessories.
• Use of accessories and attachments. The use of any accessory or attachment not recommended for use with this appliance could be hazardous. Refer to the accessory section of this manual for further details.
• Stay alert. Use common sense. Do not operate this equipment when you are tired or impaired.
• Check for damaged parts. Any part that is damaged should be replaced by the manufacturer before further use. Do not use the tool if switch does not turn it on and off. Contact the manufacturer at 1-877-571-
2391 for more information.
• Do not operate this appliance near flammable liquids or in gaseous or explosive atmospheres. Motors in these tools normally spark, and the sparks might ignite fumes.
• Never cover unit while it is operating.
• Disconnect the unit from any power source before attempting maintenance or cleaning.
• Risk of fire and burn, do not open, crush, heat above 60˚C or incinerate the unit. Follow the instruction manual.
SPECIFIC SAFETY INSTRUCTIONS FOR INFLATORS
WARNING –
Burst hazard:
• Carefully follow instructions on articles to be inflated. Never exceed recommended pressures. Bursting articles can cause serious injury.
• Always monitor the pressure on the LCD screen.
CAUTION –
To reduce the risk of injury or property damage:
• Never leave the inflator unattended while in use.
• The Inflator is capable of inflating to 120 pounds per square inch (PSI) pressure. Follow the instructions in the "Portable Inflator" section.
• When not in use, always turn off the inflator.
• To prevent hose damage, secure the Inflator Hose and Sure Fit
®
nozzle using the Storage Clips after each use.
• Always allow the unit to cool before storing it.
INSTRUCTIONS PERTAINING TO THE USB PORTS
• IMPORTANT: Some household USB-powered electronics will not operate with the USB ports provided with this device. Check the manual of the corresponding electronic device to confirm that it can be used with
this type of USB port.
• The USB ports do not support data communication. They only provide power to an external USB powered device (5V DC/2.4A using the USB Port on the unit, or 5V DC/2A using the USB port on the AC/USB
Charging Adapter or the DC/USB Charging Adapter). Make sure the rating of equipment plugged into the USB Port does not exceed the amperage stated.
• Always connect the appropriate charging adapter to either the 120 volt AC or 12 volt DC power source before plugging any devices into it.
• Do not attach USB hubs allowing connection of multiple personal electronic devices to any of the USB ports on the charging adapters.
LCD liquid crystal display:
If liquid crystal comes in contact with your skin: Wash area off completely with plenty of water. Remove contaminated clothing. If liquid crystal gets into your eye: Flush the affected
eye with clean water and then seek medical attention. If liquid crystal is swallowed: Flush your mouth thoroughly with water. Drink large quantities of water and induce vomiting. Then seek medical attention.
CHARGING / RECHARGING
This unit is shipped in a partially charged state. Charge unit after purchase and BEFORE first use and after each use until the Battery Status Icon shows 4 solid bars. Before each use, check the unit's battery status
on the LCD Screen:
• Four solid bars on the battery icon indicate a full battery. The unit is ready to use.
• Only one or two solid bars on the battery icon indicates that the unit's battery charge level is low. In this case, the battery SHOULD be recharged before use or the built-in low-voltage protection may activate (the
empty battery icon may flash for a short period before automatic shut-down). If the unit shuts down, it MUST be recharged immediately or the unit may not turn on.
IMPORTANT: When the unit is not in use, we recommend that the battery is charged at least every 3 to 6 months.
CAUTION –
TO AVOID THE RISK OF PROPERTY DAMAGE: Failure to keep the battery charged will cause permanent damage and result in poor performance.
NOTES:
• Pressing the Power Button during the charging process will enter to inflating mode and the LED lights.
• When the unit battery is fully charged, the charging process will terminate and the unit will automatically shut down.
• 2A USB is required in order to recharge the unit (2A AC and DC charging adapters included).
• During the charging process, the unit will stop charging if the battery of the unit is overheated due to extensive use or recharging and/or is too cold. The backlit LCD flashes. It will automatically resume after a cool
down or warm up period. Allow the unit to warm up or cool down for a period before resuming charging.
• Use only with Listed Class 2 Power Unit for charging
CHARGING/RECHARGING USING THE 120 VOLT AC/USB CHARGING ADAPTER
IMPORTANT: Always connect the 120V AC/USB Charging Adapter to the 120 Volt AC power source (using the USB Charging Cable) BEFORE connecting it to the unit.
1. Make sure to press and hold the Power Button for one second to turn the unit off (the LCD Screen is not lit).
2. Insert one end of the USB Charging Cable into the 120V AC/USB Charging Adapter.
3. Insert the 120V AC/USB Charging Adapter into a standard 120 volt AC wall outlet or a functioning 120 volt AC power source.
4. Insert the other end of the USB Charging Cable into the USB port on the unit.
When the unit is properly connected to an AC power source, the backlit LCD screen will display the following:
The bars on the Battery Status Icon will change from empty to solid (bottom to top) repeatedly to indicate the unit is charging. The backlight will turn on for 10 seconds (only).
5. Charge for approximately 6 hours or until the unit automatically shuts down.
6. Unplug the 120V AC/USB Charging Adapter from the 120 volt AC power source, and then disconnect the USB Charging Cable from the 120V AC/USB Charging Adapter and the unit.
7. Press the Power Button to turn the unit on. If the Battery Status Icon shows 4 solid bars, the unit battery is fully charged.
8. When charging is complete, store the 120V AC/USB Charging Adapter and USB Charging Cable in a safe place.
CHARGING/RECHARGING USING THE 12V DC/USB CHARGING ADAPTER
IMPORTANT: Always connect the 12V DC/USB Charging Adapter to the 12 Volt DC power source (using the USB Charging Cable) BEFORE connecting it to the unit.
1. Make sure to press and hold the Power Button for one second to turn the unit off (the LCD Screen is not lit).
2. Insert one end of the USB Charging Cable into the 12V DC/USB Charging Adapter.
3. Insert the 12V DC/USB Charging Adapter into a vehicle's 12 volt DC accessory outlet or other functioning 12 volt DC power source. The LED indicator on the 12V DC/USB Charging Adapter will light green when
it is properly plugged into the 12 volt DC power source.
Note:
Some vehicles require that the ignition be switched to the accessory outlet position in order to power the accessory outlet.
4. Insert the other end of the USB Charging Cable into the USB port on the unit.
BC
2
8
9
10
11
12
15
12. Increase Pressure Control
14. 12 Volt DC/USB Charging
Button (+)
Adapter (Optional Accessory)
13. USB Charging Cable (for use
15. 120 Volt AC/USB Charging
with 120 Volt AC/USB and
Adapter (Optional Accessory)
12 Volt DC/USB Charging
Adapters)
1-877-571-2391
When the unit is properly connected, the backlit LCD Screen will display the following:
CLI120FV
The bars on the Battery Status Icon will change from empty to solid (bottom to top) repeatedly to indicate the unit is charging. The backlight will turn on for 10 seconds (only).
5. Charge until the unit automatically shuts down.
6. Unplug the 12V DC/USB Charging Adapter from the 12 volt DC power source, and then disconnect the USB Charging Cable from the 12V DC/USB Charging Adapter and the unit.
7. Press the Power Button to turn the unit on. If the Battery Status Icon shows 4 solid bars, the unit battery is fully charged.
8. When charging is complete, store the 12V DC/USB Charging Adapter and USB Charging Cable in a safe place.
CHARGING/RECHARGING USING THE USB CHARGING CABLE AND A DEVICE WITH A USB POWER PORT (NOT SUPPLIED)
IMPORTANT: Always connect the USB Charging Cable to the external device's USB power port BEFORE connecting it to the unit. A 2A USB power source is required in order to recharge the unit.
1. Make sure to press and hold the Power Button for one second to turn the unit off.
2. Insert one end of the USB Charging Cable into an external device's functional USB power port.
3. Insert the other end of the USB Charging Cable into the one of dual USB ports on the unit.
4. When the unit is properly connected, the backlit LCD screen will display the following:
The bars on the Battery Status Icon will change from empty to solid (bottom to top) repeatedly to indicate the unit is charging. The backlight will turn on for 10 seconds (only).
5. Charge until the unit automatically shut down.
6. Disconnect the USB charging cable from the device's USB power port and the unit.
7. Press the Power Button to turn the unit on. If the Battery Status Icon shows 4 solid bars, the unit battery is fully charged.
8. When charging is complete, store the USB Charging Cable in safe place.
SAVE THESE INSTRUCTIONS
PORTABLE INFLATOR
USING THE INFLATOR IN AUTO MODE
This Lithium Rechargeable Inflator was designed to inflate most vehicle tires, trailer tires and recreational inflatables. The Inflator Hose with tire fitting is stored on the storage clips at the side of unit. A Nozzle Adapter
4
is supplied and is stored in the Nozzle Adapter Storage Compartment. Refer to the "Features" section to locate all components.
The Lithium Rechargeable Inflator can be used in either Auto Mode or Manual Mode, as detailed in the following sections.
IMPORTANT: When the inflator is operated either in the Manual Mode or at a low PSI in the Auto Mode, the unit may start in low and gradually rev up. When the inflator is operated at higher PSIs in Auto Mode,
the unit may operate normally for several minutes, then rev down for a few minutes before returning to normal operation. This feature protects the unit from overheating during normal use. In any event, do not
operate the inflator continuously for extended periods of time (approximately 10 minutes, depending on ambient temperatures), as it may overheat. This could damage the inflator. If the inflator must be operated
for longer periods: every 10 minutes press and hold the Power Button for one second to turn the inflator off, then restart after a cooling down period of approximately 30 minutes.
Note: The LED Area Light will remain lit as long as the unit is in inflate mode.. In inflate mode, if no further actions are taken after 1 minute,the unit will exit inflate mode and USB remains on. The digital screen will
show the Battery Status Icon only.
Inflating Tires or Products with Valve Stems in Auto Mode
In the Auto Mode, the desired pressure value can be preset and stored in the unit's memory and the inflator will automatically stop once this preset pressure is reached. The Power Button turns the unit on and off.
The Increase Pressure Control Button (+) and Decrease Pressure Control Button (–) are used to select a pressure value for when the inflator is used in Auto Mode. All three buttons are located on the control panel on
the back of the unit (refer to the "Features" section to locate).
1. Screw the Sure Fit
®
nozzle onto the valve stem. Do not overtighten.
2. Press the Power Button to turn the unit on. The unit is in inflate mode and the LED area light turns on. The USB turns on as well. The digital display will alternately show the flashing pre-set PSI value (that was
last set by the Pressure Control Buttons) for 2 seconds; then it will show the current pressure of the item being inflated for 5 seconds. As well as the Battery Status Icon.
3. Press the Increase (+) and Decrease (–) Pressure Control Buttons to select the desired pressure from a range of pre-set values (between 3 and 120), which will display on the backlit LCD screen. Hold the Button
to scroll upward or downward more quickly. Once the desired pressure has been reached, release the Button and wait two seconds. The digital display will flash the new selected pressure. This pressure value is
now stored in the unit's memory until it is manually reset.
4. Press the Power Button once more to begin inflation. The digital display will only show the current pressure of the object (which will light solid) to indicate that the inflator is working. Monitor the pressure on the
LCD screen.
5. When desired pre-set pressure is reached, the inflator will stop automatically. Press and hold the Power Button for one second to turn off the unit.
6. Unscrew and remove the Sure Fit
®
nozzle from the valve stem.
IMPORTANT AUTO MODE OPERATING NOTES:
• To interrupt the inflation process, press the Power Button once. To resume the inflation process, press the Power Button again.
• Do not switch to Manual Mode when the unit is operating in Auto Mode or the pressure shown on the display may be incorrect.
• To shut down the unit at any time, press and hold the Power Button for one second.
• If a Low Battery Voltage Fault occurs, the unit will automatically shut down immediately, or the display will flash the empty Battery Status Icon for a short period before the unit shuts down automatically. The unit
must be recharged immediately or it may not turn on.
• In any event, the compressor will automatically shut down after operating continuously for 10 minutes.
USING THE INFLATOR IN MANUAL MODE
Inflating Tires or Products With Valve Stems in Manual Mode
In the Manual mode, the Inflator Trigger on the front of the unit is used to operate the inflator until the desired pressure value is reached.
1. Screw the Sure Fit
nozzle onto the valve stem. Do not overtighten.
®
2. Press the Power Button to turn the unit on. The unit is in inflate mode and the LED area light turns on. The USB turns on as well. The digital display will alternately show the flashing pre-set PSI value (that was
last set by the Pressure Control Buttons) for 2 seconds; then it will then it will show the current pressure of the item being inflated for 5 seconds. As well as the Battery Status Icon.
3. Press the Inflator Trigger to begin the inflation process. The digital display will only show the current pressure of the object which will light solid to indicate that the inflator is working. Monitor the pressure on the
LCD screen.
4. When the desired pressure is reached, release the Inflator Trigger and the inflator will stop. Press and hold the Power Button for one second to turn off the unit.
5. Unscrew and remove the Sure Fit
®
nozzle from the valve stem.
IMPORTANT MANUAL MODE OPERATING NOTES:
• To interrupt the inflation process, release the Inflator Trigger. To resume the inflation process, press the Inflator Trigger again.
• To switch to Auto Mode, release the Inflator Trigger, then press the Increase (+) or Decrease (–) Pressure Control Buttons to set up the pressure and press the Power Button. (The unit cannot switch to the Auto
Mode while it is inflating.)
• To shut down the unit at any time, press and hold the Power Button for one second.
• If a Low Battery Voltage Fault occurs, the unit will automatically shut down immediately, or the display will flash the empty Battery Status Icon for a short period before the unit shuts down automatically. The unit
must be recharged immediately or it may not turn on.
Inflating Other Inflatables Without Valve Stems
Inflation of other items requires use of the nozzle adapter.
1. Screw the nozzle adapter into the Sure Fit
nozzle. Do not overtighten.
®
2. Insert the nozzle adapter into item to be inflated.
3. Press the Power Button to turn the unit on. The unit is in inflate mode and the LED area light turns on. The USB turns on as well. The digital display will alternately show the flashing pre-set PSI value (that was
last set by the Pressure Control Buttons) for 2 seconds; then it will then it will show the current pressure of the item being inflated for 5 seconds. As well as the Battery Status Icon.
4. Follow either steps 4 through 6 in the "Inflating Tires or Products With Valve Stems at Auto Mode" section or steps 4 through 5 in the "Inflating Tires or Products With Valve Stems at Manual Mode" section.
IMPORTANT NOTE: Small items such as volleyballs, footballs, etc. inflate very rapidly. Do not over-inflate.
5. Disconnect the nozzle adapter from the inflated item.
6. Unscrew and remove the nozzle adapter from the Sure Fit
IMPORTANT:
If the battery of the unit overheats (due to extensive use or recharging) or is too cold (the ambient temperature has dropped below –20°C), the inflator and area light automatically shut down
immediately. The backlit LCD flashes for one minute before the unit automatically shuts down.
USING THE LED AREA LIGHT
The Area Light is controlled by the Inflator. When the Inflator is turned on, the Area Light is activated. When the Inflator is tuned off, the Area Light turns off. Press the Power Button (refer to the "Features" section to
locate) to turn the Inflator and Area Light on. Press the Power Button and hold for one second to turn the unit off. Make sure the Power Button is turned off when the unit is being stored.
OPERATING THE USB PORT
The USB Port is located on low back of the unit. It is controlled by the Power Button (refer to the "Features" section to locate).
1. Press the Power Button to turn the unit on. The unit is in inflate mode and the LED area light turns on. The USB turns on as well. The USB port is ready to use. The digital display will alternately show the flashing
pre-set PSI value (that was last set by the Pressure Control Buttons) for 2 seconds; then it will show the current pressure of the item being inflated for 5 seconds. As well as the Battery Status Icon.
2. Plug the USB-powered device into the USB power port and operate normally.
3. Press and hold the Power Button for one second to turn off the unit.
IMPORTANT:
• If the battery of the unit overheats (due to extensive use or recharging) or is too cold (the ambient temperature has dropped below –20°C), the USB automatically shut down immediately. The backlit LCD flashes
for one minute before the unit automatically shuts down.
• If an Overload Fault or a Short-circuit occurs, the backlit LCD flashes for one minute before the unit automatically shuts down.
• If a Low Battery Voltage Fault occurs, the unit will automatically shut down immediately, or the display will flash the empty Battery Status Icon for a short period before the unit shuts down automatically. The unit
must be recharged immediately or it may not turn on.
• The USB will turn off automatically after four hours.
Periodically check the unit's battery status. Four solid bars on the battery icon indicate a full battery. The unit is ready to use. Only one or two solid bars on the battery icon indicates that the unit's battery charge
level is low. In this case, the battery SHOULD be recharged before use or the built-in low-voltage protection may activate (the empty battery icon will flash for a short period before automatic shut-down). If the unit
shuts down, it MUST be recharged immediately.
CARE AND MAINTENANCE
All batteries lose energy from self-discharge over time and more rapidly at higher temperatures. When the unit is not in use, we recommend that the battery is charged at least every 3-6 months.
From time to time wipe the outside of the appliance with a soft cloth. Do not immerse the appliance in water.
There are no user-replaceable parts. Periodically inspect the condition of adapters, connectors and wires. Contact manufacturer to replace any components that have become worn or broken.
Battery replacement/disposal
BATTERY REPLACEMENT
The battery should last the service life of the unit. Service life is dependent on a number of factors including but not limited to the number of recharge cycles, and proper care and maintenance of the battery by the
end user. Contact manufacturer for any information you may need.
SAFE BATTERY DISPOSAL
Contains a lithium battery, which must be disposed of properly. Recycling is required. Failure to
comply with local, state and federal regulations can result in fines, or imprisonment.
Please recycle.
WARNINGS:
• Do not dispose of the battery in fire as this may result in an explosion.
• Before disposing of the battery, protect exposed terminals with heavy-duty electrical tape to prevent shorting (shorting can result in injury or fire).
• Do not expose battery to fire or intense heat as it may explode.
Replacing the Fuse in the 12V DC/USB Charging Adapter
1. Unscrew the end cap of the DC plug (counterclockwise).
END CAP
2. Remove spring center contact and fuse.
CENTER
3. Check fuse with a continuity checker.
CONTACT
2A FUSE
4. If blown, locate a replacement 2 amp fuse.
5. Replace the fuse, spring, contact and end cap.
6. Screw end cap clockwise until it is finger tight – DO NOT OVER-TIGHTEN.
7. Test for proper operation of the 12V DC Charging Adapter.
TROUBLESHOOTING
Air Inflator will not turn on
• Make sure the Power Button is pressed to turn the unit on and that all directions in the "Portable Inflator" section have been followed exactly.
• The internal battery may be completely discharged. Charge the unit following the directions given in this manual.
The Air Inflator will not charge
• Check that all the unit functions are all turned off (the LCD Screen is not lit).
• Check that the USB Charging Cable is properly connected to either the 12V DC/USB charging adapter or the 120V AC/USB charging adapter, and to the unit.
• Check the connection to the AC or DC power source. Make sure there is good contact.
• Confirm that there is functioning AC or DC current.
• Confirm that the unit is plugged into a 2A USB power source.
• Check the plug fuse in the 12V DC/USB Charging Adapter. Replace the fuse following the instructions in this manual, if necessary.
• The unit may have shut down to protect the battery from overheating after a long period of operation or charging. Unplug the charging adapter from the power source and disconnect the USB charging cable from
the unit. Allow the unit to cool down for a period before resuming charging.
Air Inflator will not inflate
• Make sure the Power Button is pressed to turn the unit on and that all directions in the "Portable Inflator" section have been followed exactly.
• Make sure the nozzle is securely screwed on to the valve stem when attempting to inflate tires; or that the nozzle adapter is securely screwed into the Sure Fit
inflated on all other inflatables.
• The unit may have shut down to protect the battery from overheating after a long period of operation or charging or is too cold (the ambient temperature has dropped below –20°C). Allow the unit to warm up or
cool down for a period before resuming the function.
LED Area Light does not come on
Make sure the Power Button has been pressed to turn the unit on (when the Inflator is turned on, the Area Light turns on).
If the unit does not operate after taking the steps given above, contact the manufacturer at 1-877-571-2391.
ACCESSORIES
Recommended accessories for use with your tool may be available from the manufacturer. If you need assistance regarding accessories, please contact the manufacturer at 1-877-571-2391.
WARNING:
The use of any accessory not recommended for use with this appliance could be hazardous.
SERVICE INFORMATION
Whether you need technical advice, repair, or genuine factory replacement parts, contact the manufacturer at 1-877-571-2391.
ONE-YEAR LIMITED WARRANTY
The manufacturer warrants this product against defects in materials and workmanship for a period of ONE (1) YEAR from the date of retail purchase by the original end-user purchaser ("Warranty Period").
If there is a defect and a valid claim is received within the Warranty Period, the defective product can be replaced or repaired in the following ways: (1) Return the product to the manufacturer for repair or
replacement at manufacturer's option. Proof of purchase may be required by manufacturer. (2) Return the product to the retailer where product was purchased for an exchange (provided that the store is a
participating retailer). Returns to retailer should be made within the time period of the retailer's return policy for exchanges only (usually 30 to 90 days after the sale). Proof of purchase may be required. Please
check with the retailer for their specific return policy regarding returns that are beyond the time set for exchanges.
This warranty does not apply to accessories, bulbs, fuses and batteries; defects resulting from normal wear and tear, accidents; damages sustained during shipping; alterations; unauthorized use or repair; neglect,
misuse, abuse; and failure to follow instructions for care and maintenance for the product.
This warranty gives you, the original retail purchaser, specific legal rights and you may have other rights which vary from state to state or province to province. This product is not intended for commercial use.
The photos in this manual may differ from the actual product. Not all objects are included. Be sure to register your product at https://www.baccusglobal.com/registration to receive important product information,
special promotions and offers, and more.
SPECIFICATIONS
Input:
5V DC, 2A
LED Area Light:
1 white LED
Inflator:
120 PSI maximum (3 minutes
on, 30 minutes off)
USB Port:
5V DC, 2.4A max.
Battery Capacity:
Lithium polymer
®
nozzle.
12V DC/USB Charging Adapter
(Conforms to UL
STD. 2089) (Optional Accessory)
Input:
12V DC, 1.1A
Output:
5V DC, 2A
Fuse:
2A
Imported by Baccus Global LLC, 621 NW 53rd St., Suite 450, Boca Raton, FL 33487 • www.baccusglobal.com 1-877-571-2391
RD092222
®
nozzle and is inserted properly into the item to be
120V AC/USB Charging Adapter
(Conforms to UL
STD. 62368-1) (Optional Accessory)
Input:
120V AC, 60Hz, 13.3W
Output:
5V DC, 2A
Advertisement
Table of Contents

Related Manuals for Vector CLI120FV


Summary of Contents for Vector CLI120FV
- Page 1 When the unit is properly connected, the backlit LCD Screen will display the following: CLI120FV The bars on the Battery Status Icon will change from empty to solid (bottom to top) repeatedly to indicate the unit is charging. The backlight will turn on for 10 seconds (only).
- Page 2 Cuando la unidad está correctamente conectada, la pantalla LCD retroiluminada mostrará lo siguiente: CLI120FV Las barras en el ícono de estado de la batería cambiarán de vacío a sólido (de abajo hacia arriba) repetidamente para indicar que la unidad se está cargando. La luz de fondo se encenderá durante 10 segundos (solamente).
Need help?
Do you have a question about the CLI120FV and is the answer not in the manual?
Questions and answers