Table of Contents
Advertisement
Advertisement
Table of Contents

Related Manuals for Anviz CX3

Summary of Contents for Anviz CX3
- Page 1 Fingerprint & Card Time Clock Rev: 3 /2023...
-
Page 2: What's Included
15°C~32°C (59°F~89.6°F). The device will be less effective if exceeds these ranges. Please gently wipe the screen and panel with soft materials. Avoid scrubbing with water or detergent. The recommended power of CX3 terminal is DC 5V ~ 1A. The device will function less effective in case the power supply cable extends too long. -
Page 3: Getting To Know The Product
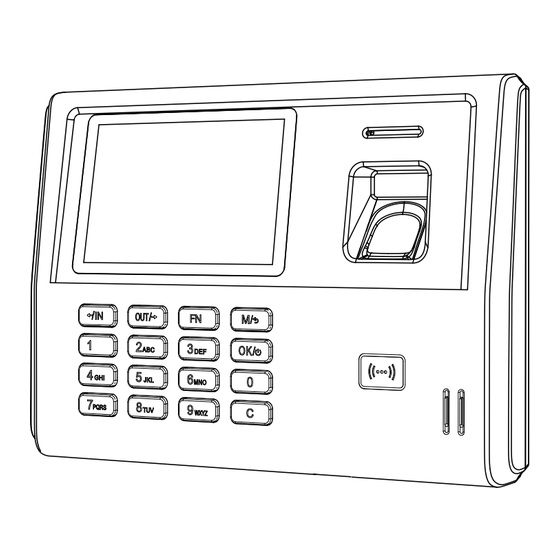
Getting to Know the Product Fingerprint Sensor 3.5”TFT Screen Device Menu Setup DC 5V Keypad Card Reader Area USB Drive What’s Request for Using FAT32 Format USB Drive for import and export time attendance and employee data (not provided). How to Install 1. - Page 4 4. Select the Set and press OK to save the time setting and move to the next step. 2.1 Creat a Work Schedule The CX3 selects the Overnight option to support the scheduled shift, whose employees work through midnight. The default schedule is recommended for businesses whose employees often work the same days and hours.
- Page 5 The CX3 time clock allows you to set up to 3 different work times at which to punch the shift. Each Work Time with IN and OUT status. and the Start Time and End Time of the IN or OUT are used to set up the valid punch time range.
- Page 6 2.3 How to creat a Overnight Work Schedule Select the Overnight option For Example : The employees who all work from 23:00–06:00. The Wotking Time 1: IN :Start : 23:00 and End :23:59. (Beginning of the shift ) OUT : Start : 06:00 and End: 08:00. (End of the shift ) Notice: The start time and end time can not be set up with overlaps at midnight.
- Page 7 3. Quick Enroll Employee 1. Press M button on device menu by input the default Admin ID and Password. 2. Select “Enroll” option to enroll user fingerprint directly. Default Admin ID: 0 Password: 12345 3. Input the unique identification number as User ID and press OK to create a new User in the device.
-
Page 8: Management User
3.1 Management User Select the User icon to the user management interface. Add New User Select Add to create a new user and input the user's basic information. User ID: The User ID is required and unique for each employee. User Name: Press FN key to input the name with characters. -
Page 9: Modify User
Modify User Select Modify to edit the registered user. Input the registered user ID to modify user information and the fingerprint template. Delete User Select Delete to user delete interface. Please input the user ID you want to delete and press OK to delete the user continue to click Yes to confirm the operation. - Page 10 Delete all Users (Caution): Click Delete all Users. The device will ask for confirmation, input the 12345 and confirm the operation to delete all users. Search Use Select Search and input the user ID in the upper left corner, and press OK for user search.
- Page 11 4. Data and Report Select the Data icon to access the time attendance data management interface. Notice: The data import and export are all base on USB Drive transfer. Please use USB Drive with FAT32 Format. 4.1 Employee Record Select the Record item to access the record interface, Press ←/IN and OUT/→ keys to select the data for the record Input the user id in the upper left corner, and press OK for the user records search.
-
Page 12: Data Import
4.3 Batch User Information Import The CX3 device supports import user information (do not include fingerprint template import) by Excel files. Select Users Import to access the user import interface. The device will... - Page 13 After plug the USB Drive, The device with two options: Export template and Import User. Step 1 Export template Will export a User Folder to a USB drive, which includes a blank template.xls file. Open the “template.xls” and fill in the user information as requested. Notice: The Card NO.
-
Page 14: Data Export
Step 2 Import User After filling in the “template.xls” in the USB drive. Please replug into the device and select the Import User button. The device will check the file and select Yes(OK) to continue importing user information. In the next step please enter the User--Search menu to enroll employees’ fingerprints one by one. -
Page 15: Record Export
USB Drive to backup. Because the backup files need third-party software tools. Notice: Because records are exported as compressed files, need third-party software tools to release. Please contact support@anviz.com to get help. 4.5 Time Attendance Report Select the Report to export the employee time attendance report to USB Drive. -
Page 16: Device Setting
5. Device Setting Select the Setting to setup device information. 5.1 Modify Device Password and Reset the device Select Device to modify device menu login password and reset the device. Volume: increase or decrease the device´s volume (0 to 5,0 is mute). Device ID: Insert the Device ID (default: 1). -
Page 17: Time And Date
5.2 Time and Date Select Time to manual setup device time and Daylight Saving Time Time Settings Press ←/IN and OUT/→ keys to manually setup the device time and date display format. Select Set to save the setup. DST Settings Daylight-saving time is a manual method to set the local area time zone deviation, according to where the device is located. -
Page 18: Display Settings
Display Settings Select Display to manage device’s screen and device language. Language: Select to switch the system language.(5 Languages) Power Saving: Energy saving display settings. Bright Level: LCD screen brightness level. Keyboard lock (CAUTION): Disable the device keypad input. (Disable the non-admin user operate the device by keyboard) Standby(min): Bright screen standby time. - Page 19 Please provid the device basic info to us when you need help from support@anviz.com. Update Select Update to upgrde the device firmware. Follow the instruction to plug a USB drive with update file and press Update button to begin the update. Notice: We will release the new firmware from community.anviz.com...
- Page 20 Devce Test Select Test to verify equipment health. Follow the item to test device´s keyboard, LCD display and speaker (alarms and voices).
-
Page 21: Advanced Setting
6. Advanced Setting The Advanced Setting includes the Time Attendance, System Verify mode, and Shift Schedule setting. 6.1 Time and Attendance Select T&A option to setup time attendance rules. Duplicate Punch Range(0-250min): Set the time interval for repeated punching of the same employee to prevent the system from generating duplicate punching records. - Page 22 Intelligent update FP: Automatically replaces the user fingerprint template on device ´s by a new one whenever the device detects a better-quality user template than the previous stored in. Pay Period: Set up company pay period and time attendance report period. Start Date of Payment: The start day of each week.
-
Page 23: Warranty And Disclaimer
Shipping Fees End Customer is responsible for the shipping fee for sending the product to Anviz, and the return shipping fee for sending the product back to customers is borne by Anviz (paying for one-way shipping). However, if the device is... - Page 24 RMA number. You will receive the RMA confirmation with RMA number in 72 hours, after receiving an RMA number, please send the product in question to Anviz by following the Anviz shipment guide. When the inspection of the product is completed, you receive an RMA report from technical support engineer.
- Page 25 Questions? Call Text 855-ANVIZ4U | 855-268-4948 408-837-7536 MON-FRI 5AM-5PM Pacific MON-FRI 5AM-5PM Pacific Email Community support@anviz.com Join community.anviz.com 24 Hours Answer if you have any question or suggestion to share Support@anviz.com...
Need help?
Do you have a question about the CX3 and is the answer not in the manual?
Questions and answers
I **** trying to import my users and i keep getting a pop up that says Please add user info to template file! I had added the info to the template file and renames the file as directed in the instructions but It will still not upload.
To resolve the "Please add user info to template file" error when importing users on the Anviz CX3, follow these steps:
1. Export the Template:
- Plug the USB drive into the device.
- Select the "Export template" option to generate a "template.xls" file.
2. Fill in User Information:
- Open the "template.xls" file on a computer.
- Enter the required user details as specified.
- Ensure that at least one user is added.
- The "Card NO." field can be left blank, and "Group No." defaults to 1.
3. Save and Reinsert USB Drive:
- Save the updated "template.xls" file.
- Reinsert the USB drive into the device.
4. Import Users:
- Select the "Import User" option.
- Confirm the import process by selecting "Yes (OK)."
If the error persists, verify that the file is correctly formatted and contains user data.
This answer is automatically generated