
Related Manuals for Memorex MKS-SS1


Summary of Contents for Memorex MKS-SS1
- Page 1 MKS-SS1 User’s Guide Sing Stand Karaoke System Before operating this product, please read these instructions completely.
-
Page 2: Fcc Warning
Dear Customer, Please read this manual thoroughly before operating the unit to become more familiar with it and obtain the performance that will bring you continued enjoyment for many years. Keep these instructions handy for future reference. PLEASE KEEP ALL PACKAGING MATERIAL FOR AT LEAST 90 DAYS IN CASE YOU NEED TO RETURN THIS PRODUCT TO YOUR PLACE OF PURCHASE OR IMATION ELECTRONIC PRODUCTS. - Page 3 Dear Customer: Selecting fine audio equipment such as the unit you’ve just purchased is only the start of your musical enjoyment. Now it’s time to consider how you can maximize the fun and excitement your equipment offers. This manufacturer and the Electronic Industries Association’s Consumer Electronics Group want you to get the most out of your equipment by playing it at a safe level.
-
Page 4: Important Safety Instructions
IMPORTANT SAFETY INSTRUCTIONS Read these instructions before using this product. 1. Read these instructions. 2. Keep these instructions. 3. Heed all warnings. 4. Follow all instructions. 5. Do not use this apparatus near water. 6. Clean only with a dry cloth. 7. -
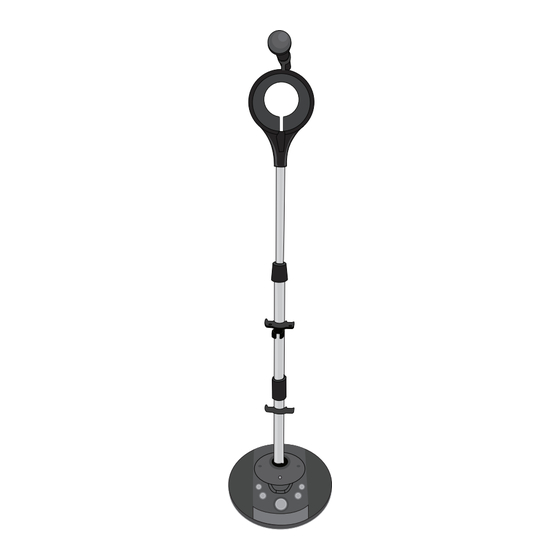
Page 5: Location Of Controls
LOCATION OF CONTROLS 1. Microphone (PART NO. 5249-06070-E010*) 2. Microphone ON/OFF Switch (on Microphone Handle) 3. Microphone Adjustment Knob 4. Microphone Holder 5. Multimedia Player Holder (PART NO. 4626-26075- 0010*) 6. Top Stand Bar 7. Top Stand Connector/ Adjustment Knob 8. - Page 6 LOCATION OF CONTROLS 1. MIC 1 In Jack 2. Left Speaker 3. Power Indicator 4. Power Button 4. MIC 1 Volume Control 6. Auto VOCAL Control 7. MIC 2 Volume Control 8. Master Volume Control 9. MEDIA In Jack (LINE IN CABLE PART NO. 2265-32000-E035*) 10.
- Page 7 ASSEMBLY Screw the Lower Stand Bar into the Amp and Unscrew the Top Stand Connector from the Upper rotate clockwise until tight. and Middle Stand bars. Insert the Wire Clip with Mic Holder onto the Middle Stand Bar. Lower the Top Stand Connector and then rotate Insert the Wire Clip onto the Lower Stand Bar.
- Page 8 ASSEMBLY Insert the Multimedia Player Holder onto the Top Insert the microphone into the top Microphone Stand Bar and rotate clockwise until tight. Holder. Rotate the Microphone Adjustment Knob counter-clockwise to loosen and clockwise to tighten the Microphone Holder. Run the wires through the Wire Clips.
-
Page 9: Headphones Jack
CONNECTIONS HEADPHONES JACK CONNECTING A GUITAR For private listening, connect 3.5mm (32 ohm) Insert a cable from the AUDIO OUT jack on your stereo headphones (not included) to this jack. The Guitar to the Guitar In jack on the side of this unit. speakers are automatically disconnected when the headphones plug is inserted in the jack. -
Page 10: Connecting An External Unit
CONNECTIONS (CONTINUED) CONNECTING AN EXTERNAL UNIT You can connect an external unit to this unit, such as a CD/CD+G player, etc. Simply connect an audio cable (not included) from the Audio Input jacks on this unit to the external unit's AUX OUT jacks. This will allow you to broadcast the external unit's sound through this unit’s speakers. -
Page 11: Power Source
POWER SOURCE Use the AC polarized line cord included with the unit for operation on AC power. Insert into a conveniently located AC outlet having 120V, 60Hz. NOTE: The AC plug supplied with the unit is polarized to help minimize the possibility of electric shock. If the AC plug does AC Outlet not fit into a nonpolarized AC outlet, do not file or cut the wide blade. - Page 12 OPERATION (CONTINUED) Make any desired connections as Adjust MIC1 Volume control as If using a second microphone, shown on pages 8 and 9. Press desired. adjust MIC2 Volume control as the Power button to turn the unit desired. on; the Power indicator will light. Rotate ECHO control...
-
Page 13: Troubleshooting Guide
TROUBLESHOOTING GUIDE Should this unit exhibit a problem, check the following before seeking service: Symptom: Squealing through the speakers. Possible Solution: This is microphone feedback, see below for more information. Symptom: No Sound (General): Possible Solution 1: Master Volume control is set to minimum, increase. Possible Solution 2: Power is off, turn on;... -
Page 14: Specifications
SPECIFICATIONS GENERAL: Power Source .....................120V, 60Hz AC Power Consumption ....................20W Speaker ........................4 ohms Dimensions................48 (H) x 13 (D) Inches (Min.) Weight........................11 lbs Output Power........................5 W Specifications are subject to change without notice. FOR ADDITIONAL SET-UP OR OPERATING ASSISTANCE, PLEASE VISIT OUR WEBSITE AT: WWW.MEMOREXELECTRONICS.COM OR CONTACT CUSTOMER SERVICE: For customers calling within US, call 1-800-919-3647. - Page 15 Imation Electronic Products, A Division of Imation Enterprises Corp. Weston, FL Printed in / Impreso en Hong Kong www.memorexelectronics.com 5201-06075-E010...
- Page 16 MKS-SS1 User’s Guide Guía del usuario Sing Stand Karaoke System Sistema de karaoke vertical para cantar Before operating this product, please read these instructions completely. Antes de operar este producto, s rvase leer este instructivo en su totalidad.
- Page 17 Estimado Cliente: Sírvase leer este manual detenidamente antes de operar la unidad para familiarizarse más con el producto y obtener el desempeño que le permitirá disfrutarla por muchos años. Mantenga estas instrucciones a la mano para futura referencia. CONSERVE EL EMPAQUE DE CARTÓN AL MENOS POR 90 DÍAS POR SI ACASO NECESITARA REGRESAR EL PRODUCTO A SU DISTRIBUIDOR O A IMATION ELECTRONIC PRODUCTS.
- Page 18 Estimado cliente: Este fabricante y el Grupo de Consumidores de Productos Electrónicos de la Asociación de Industrias Electrónicas desean que usted obtenga el mejor resultado de su equipo usándolo en un nivel seguro, es decir, para escuchar un sonido claro y sonoro, sin distorsión, sobre todo sin que afecte su sentido auditivo.
-
Page 19: Instrucciones Importantes De Seguridad
INSTRUCCIONES IMPORTANTES DE SEGURIDAD Lea las siguientes instrucciones antes de utilizar este producto. Lea las siguientes instrucciones. Conserve estas instrucciones. Preste atención a todas las advertencias. Respete todas las instrucciones. No utilice este artefacto cerca del agua. Límpielo únicamente con un paño seco. No obstruya las aberturas para ventilación. -
Page 20: Ubicación De Los Controles
UBICACIÓN DE LOS CONTROLES PARTE SUPERIOR PARTE SUPERIOR Micrófono (PIEZA NO. 5249- 06070-E010*) Interruptor ENCENDIDO/APAGADO (ON/OFF) del micrófono (en el soporte del micrófono) Perilla de ajuste del micrófono Porta micrófono Soporte del reproductor multimedia (PIEZA NO. 4626-26075-0010*) Barra del soporte superior Conector del soporte superior/perilla de ajuste Sujetador del cable y porta... - Page 21 UBICACIÓN DE LOS CONTROLES AMPLIFICADOR 1. Entrada del MICRÓFONO 1 2. Altavoz izquierdo 3. Indicador de Encendido/Apagado (Power) 4. Botón de Encendido/Apagado (Power) 4. Control de volumen del MICRÓFONO 1 6. Control auto voz 7. Control de volumen del MICRÓFONO 2 8.
-
Page 22: Montaje
MONTAJE Atornille la barra inferior del soporte al amplificador Desatornille el Conector del soporte superior de y gire hacia la derecha hasta que quede ajustado. las barras superiores y medias. Introduzca el sujetador de cables con el portamicrófono en la barra media del soporte. - Page 23 MONTAJE Introduzca el soporte del reproductor multimedia Coloque el micrófono en el porta micrófono en la barra superior y gire hacia la derecha hasta superior. Gire la perilla de ajuste del micrófono que quede ajustado. hacia la izquierda para aflojar y hacia la derecha para ajustar el porta micrófono.
-
Page 24: Entrada Para Auriculares
CONEXIONES ENTRADA PARA AURICULARES CONECTAR UNA GUITARRA Para escuchar el sonido de manera privada, Introduzca un cable desde la SALIDA DE AUDIO conecte auriculares estéreo de 3.5mm (32 ohm) de su guitarra a la entrada para guitarra en el (no proveídos) en dicho conector. Los altavoces se lateral de la unidad. - Page 25 CONEXIONES (CONTINUACIÓN) CONEXIÓN CON UNA UNIDAD EXTERNA Puede conectar una unidad externa a esta unidad, como por ejemplo un reproductor CD/CD+G u otro. Simplemente, conecte un cable de audio (no proveído) desde la entrada de audio de esta unidad a la SALIDA AUX de la unidad externa.
-
Page 26: Fuente De Alimentación
FUENTE DE ALIMENTACIÓN Utilice el cable de línea polarizado de CA, proveído con la unidad, para operar con alimentación de CA. Introdúzcalo en un tomacorriente de CA, convenientemente ubicado, con 120V, 60Hz. NOTA: El enchufe de CA provisto con la unidad es polarizado para ayudarlo a minimizar la posibilidad de descarga eléctrica. - Page 27 FUNCIONAMIENTO (CONTINUACIÓN) Efectúe cualquier conexión que Ajuste el control de volumen del Si utiliza un segundo micrófono, desee, como se indica en las micrófono 1 (MIC1) hasta el nivel ajuste el control de volumen del páginas 8 y 9. Oprima el botón de deseado.
-
Page 28: Guía De Resolución De Problemas
GUÍA DE RESOLUCIÓN DE PROBLEMAS Si esta unidad presentara un problema, lea el siguiente cuadro antes de llamar al servicio técnico. Problema: Se oye un chirrido a través de los altavoces. Solución posible: Esto se debe al acople del micrófono. A continuación obtendrá más información. Problema: No hay sonido (General): Solución posible 1: El control del volumen general está... -
Page 29: Especificaciones
ESPECIFICACIONES GENERAL: Fuente de Alimentación ................120V, 60Hz AC Consumo de Energía....................20W Altavoz........................4 ohms Dimensiones ..........48 (Altura) x 13 (Profundidad) pulgadas (Min.) Peso........................11 libras Potencia de Salida......................5 W Las especificaciones están sujetas a cambios sin previo aviso. PARA ASISTENCIA ADICIONAL SOBRE LA CONFIGURACIÓN O EL FUNCIONAMIENTO, INGRESE EN: WWW.MEMOREXELECTRONICS.COM O COMUNÍQUESE CON ATENCIÓN AL CLIENTE:... - Page 30 Imation Electronic Products, A Division of Imation Enterprises Corp. Weston, FL Printed in / Impreso en Hong Kong www.memorexelectronics.com 5201-06075-E010...
Need help?
Do you have a question about the MKS-SS1 and is the answer not in the manual?
Questions and answers