
Related Manuals for Memorex MKS8591


Summary of Contents for Memorex MKS8591
- Page 1 MKS8591 User’s Guide Karaoke/Audio Recording System with 5.5” B&W Monitor, USB Jack & SD/MMC Memory Card Slot Before operating this product, please read these instructions completely.
- Page 2 PLEASE KEEP ALL PACKAGING MATERIAL FOR AT LEAST 90 DAYS IN CASE YOU NEED TO RETURN THIS PRODUCT TO YOUR PLACE OF PURCHASE OR MEMOREX. For future reference, record the serial number of the unit printed on the rear of the cabinet.
- Page 3 Selecting fine audio equipment such as the unit you’ve just purchased is only the start of your musical enjoyment. Now it’s time to consider how you can maximize the fun and excitement your equipment offers. This manufacturer and the Electronic Industries Association’s Consumer Electronics Group want you to get the most out of your equipment by playing it at a safe level.
-
Page 4: Safety Instructions
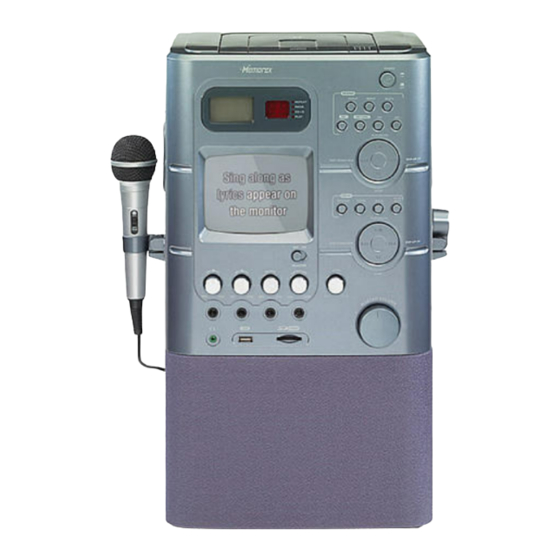
Before using the unit, be sure to read all operating instructions carefully. Please note that these are general precautions and may not pertain to your unit. For example, this unit may not have the capability to be connected to an outdoor antenna. READ INSTRUCTIONS All the safety and operating instructions should be read before the product is operated. - Page 5 LOCATION OF CONTROLS FRONT REAR CD Compartment (Top of Unit) CD+G Display with REPEAT Indicator PROG. (PROGRAM) Indicator CD+G Indicator PLAY/PAUSE Indicator USB–SD/MMC Display Carrying Handle (Side of Unit) PLAY/PAUSE (®P) Button (for USB & SD/MMC card) SKIP/SEARCH O Button (for USB &...
- Page 6 A/V jacks, we suggest that you use those jacks to connect your portable Karaoke system. After connecting the Video Out jack on this Karaoke system to the Video In jack on your TV with the included video cable, you have the following three choices: 1.
- Page 7 Karaoke system to a single mono channel for connection to your mono TV. 3. You can connect the Audio Out jacks from this portable Karaoke system to the Aux In or Audio In jacks of your home stereo system to hear the sound through your home stereo speakers. Follow the instructions for your home stereo system to select the device connected to the external jacks as the audio source.
- Page 8 CONNECTING THE MICROPHONE(S) This unit has two microphone jacks which will allow you to sing along with your favorite songs. Before connecting, make sure the MIC VOLUME controls are set to minimum. To turn the microphone(s) on, slide the ON/OFF switch(es), located on the side of the microphone(s), to the ON position.
- Page 9 OPERATION (CONTINUED) PLAYING COMPACT DISCS NORMAL PLAYBACK (For karaoke, please refer to page 12.) Press the POWER button to turn the unit on. The CD player will read the table of contents on the disc and the total number of tracks on the disc will appear in the CD+G display.
- Page 10 OPERATION (CONTINUED) CD PAUSE CONTROL During CD playback, if you wish to pause the disc momentarily, press the CD+G PLAY/PAUSE (®p) button. Playback stops but the disc continues to spin and the PLAY/PAUSE indicator will blink. TO BEGIN PLAYBACK FROM A SPECIFIC TRACK After you insert the disc into the CD player and the total number of tracks appear on the display, you may press...
- Page 11 OPERATION (CONTINUED) REPEAT PLAYBACK To repeat a single track, while in the Stop mode, press the CD+G REPEAT button ‚ once; the REPEAT indicator will blink. Press the CD+G SKIP/SEARCH o 2 or n 3 button to select the specific track that you wish to repeat.
- Page 12 OPERATION (CONTINUED) Press the CD+G SKIP/SEARCH o 1 or n 2 button to select the first track that you wish to program. When the desired track number blinks in the display, press the CD+G PROGRAM button „ again. To clear programmed playback, while in the Stop mode, press the CD+G PROGRAM button followed by the CD+G STOP (I) button or open the CD compartment door.
- Page 13 OPERATION (CONTINUED) PLAYING A CD+G (COMPACT DISC + GRAPHICS) KARAOKE DISC You can listen to a CD+G Karaoke disc. CD+G discs combine the recorded music with an additional video track that displays the song lyrics on this monitor and/or an external TV, if connected. As the song plays, the words to be sung are highlighted on most CD+Gs.
-
Page 14: To Play Along With A Guitar
OPERATION (CONTINUED) TO PLAY ALONG WITH A GUITAR Plug in the guitar to the GUITAR jack 1 and adjust the guitar volume with the GUITAR VOLUME control 2. TO PLAY ALONG WITH A KEYBOARD Plug in the keyboard to the KEYBOARD jack 1 and adjust the keyboard volume with the KEYBOARD VOLUME control 2. - Page 15 OPERATION (CONTINUED) PLAYING MP3/WMA FILES USING USB JACK AND/OR SD/MMC MEMORY CARD SLOT NORMAL PLAYBACK Press the POWER button to turn the unit on. If no devices are connected to the USB jack or SD/MMC Memory Card slot yet, “NO DEV” will appear in the display.
- Page 16 OPERATION (CONTINUED) PAUSE CONTROL During playback, if you wish to pause playback momentarily, press the PLAY/PAUSE (®p) button. Playback stops and the PLAY/PAUSE indicator in the display will blink. TO BEGIN PLAYBACK FROM A SPECIFIC FILE While in USB–SD/MMC Stop mode, use the DIR + 1 and/or DIR - 2 button to select a specific folder and SKIP/SEARCH o 3 or...
- Page 17 OPERATION (CONTINUED) REPEAT PLAYBACK To repeat a single file, while in the USB–SD/MMC Stop mode, press the REPEAT button ‚ once; the Repeat One indicator will appear in the display. Press the SKIP/SEARCH o 2 or n 3 button to select the specific file that you wish to repeat.
- Page 18 OPERATION (CONTINUED) USING THE RECORD AND RECORD SYNC FEATURES First connect and prepare the device(s) you want recorded (CD/CD+G, microphone(s), guitar and/or keyboard) as previously instructed. Then, connect and prepare the device that you want to record to (player connected to the USB jack or SD/MMC memory card) as previously instructed.
-
Page 19: Adjusting The Picture
OPERATION (CONTINUED) ADJUSTING THE PICTURE When viewing the On-Screen Graphics recorded on the CD+G disc on the monitor, adjust the brightness, v- hold and contrast as follows: V-HOLD KARAOKE UNIT If the picture moves up and down or rolls, rotate to adjust the vertical hold. -
Page 20: Care And Maintenance
CARE AND MAINTENANCE Caring for Compact Discs • Treat the compact disc carefully. Handle the compact disc only by its edges. Never allow your fingers to come in contact with the shiny, unprinted side of the compact disc. • Do not attach adhesive tape, stickers, etc. to the compact disc label. -
Page 21: Troubleshooting Guide
TROUBLESHOOTING GUIDE Should this unit exhibit a problem, check the following before seeking service: Symptom Possible Cause Compact Disc Player CD Player will not play. CD is not installed or installed upside-down. CD skips while playing. Disc is dirty or scratched. General No sound. -
Page 22: Specifications
OR CONTACT CUSTOMER SERVICE AT (954) 660-7100. PLEASE KEEP ALL PACKAGING MATERIAL FOR AT LEAST 90 DAYS IN CASE YOU NEED TO RETURN THIS PRODUCT TO YOUR PLACE OF PURCHASE OR TO MEMOREX. FOR PARTS AND ACCESSORIES, CONTACT FOX INTERNATIONAL AT 1-800-321-6993. - Page 23 Memcorp, Inc. Weston, FL Printed in Hong Kong Visit our website at www.memorexelectronics.com...
Need help?
Do you have a question about the MKS8591 and is the answer not in the manual?
Questions and answers
How do I pair the Mks8591 with my phone. Where is the button?
The Memorex MKS8591 does not support phone pairing. There is no mention of Bluetooth or wireless connectivity features, and no pairing button is described in the provided information.
This answer is automatically generated