Advertisement
Anker Innovations Limited. All rights reserved. AnkerMake and AnkerMake Logo are
trademarks of Anker Innovations Limited, registered in the United States and other
countries. All other trademarks are the property of their respective owners.
Product Name: AnkerMake M5
Model: V8111
USER MANUAL
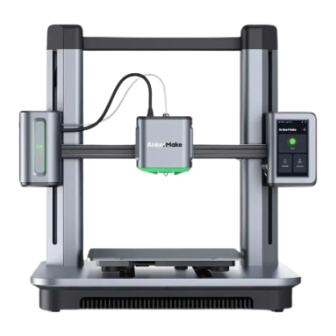
AnkerMake M5 FDM 3D Printer
M5
5X Faster, Extra Intelligent.
V01_EN
Advertisement
Table of Contents

Related Manuals for AnkerMake M5


Summary of Contents for AnkerMake M5
- Page 1 USER MANUAL AnkerMake M5 FDM 3D Printer Anker Innovations Limited. All rights reserved. AnkerMake and AnkerMake Logo are trademarks of Anker Innovations Limited, registered in the United States and other countries. All other trademarks are the property of their respective owners.
-
Page 2: Important Safety Instructions
Important Safety Instructions What's in the Box • The power cord shall be connected to socket-outlet with earthing Check if all items below are included while unboxing. If anything is missing, please contact our customer service. connection. • The power supply should be installed near the equipment, and the socket- outlet must be easily accessible. -
Page 3: Assembling The Printer
At a Glance Assembling the Printer Step 1. Installing Gantry Frame What You Need Gantry Frame USB-C Port Extruder Clip Touch Screen PTFE Feeding Tube Camera Extruder Platform Gantry Frame Screws Toolbox Indicator Light Nozzle Open the box, then place the foam cover (A) on a flat, stable surface. PEI Plate Platform Ventilation Holes... - Page 4 Route the USB-C cables through the holes, then insert the two supports of the gantry frame into the base holes. Move the gantry frame as shown below. Fasten 8 screws into the platform to firmly fix the gantry frame. Detach the bottom cover from the platform. M5×8...
- Page 5 Step 2. Wiring Connect and secure the USB-C cables with screws. What You Need M2.5 Screws Toolbox M2.5×4 Connect the motor wires and make sure that the connector's pin side is facing outside. Make sure to firmly secure the USB-C cables with screws.
- Page 6 Check if the voltage (115V for the USA, Canada and Japan; 230V for the EU) matches and remove the foam from the platform. Secure the filament holder with screws. Visit ankermake.com/support to learn how to switch voltages. Option 1 Connect the printer to a power outlet with the power cord, then switch on the printer.
- Page 7 Avoid moving the printer during the auto-leveling process. Steady Green: Working You can tap Skip, but make sure to level the heatbed before the first use. Please set up the system in the AnkerMake app while waiting for leveling to finish.
- Page 8 Sends warning messages during printing. Download and install the AnkerMake app from App Store (iOS devices) or Google Play (Android devices). ankermake Add AnkerMake M5 from the device list and enter the PIN code that is displayed on the printer's touch screen.
-
Page 9: Loading Filament
Loading Filament Connect your AnkerMake M5 to Wi-Fi and rename it. • Any Wi-Fi that needs authentication is not supported like the public Wi-Fi in airports, subways, hotels, etc. It only supports 2.4GHz network. Place the filament onto the holder. - Page 10 Installing the AnkerMake Slicer Insert the filament. Then press and hold the extruder clip while continuing to insert the filament. Stop when you feel some resistance. For the best printing experience, download and install the AnkerMake Slicer to your computer from ankermake.com/software The AI recognition capabilities will be not available when the printer works with other 3D slicer software, such as Cura.
- Page 11 • Rotate: Input a specific value or choose a preset value for rotation axes. Import a file to be sliced. • Mirror: Choose a specific axis for mirroring. Operating Interface • Move: Choose the direction of movement, then input a specific value or choose a preset value for the distance of movement.
-
Page 12: Importing Files
• PLA+、ABS、PETG、TPU by default. Supported • Customized materials. Transfer the Gcode file to this device through the AnkerMake app, then tap Print > Adjustable Local and select a file to print. Layer height, Infill type, Global support, Parameters General Adhesion. - Page 13 Printing Adjust the parameters. On the touch screen or in the AnkerMake app, select a file from Local/Internal or USB to start printing, then follow the onscreen instructions to complete the printing. You can also start printing via the AnkerMake Slicer.
-
Page 14: Maintenance
Article: Platform they need replacing, as this will prevent damage or wear to other parts. • The nozzle https://support.ankermake.com/s/article/ vibrates. How-to-Adjust-the-Eccentric-Nut-of-the- Please visit support.ankermake.com for more detailed information whenever in need. Extruder-and-Printing-Platform#content5 Spare Parts Illustration Potential Failure Solutions or Issue •... -
Page 15: Troubleshooting
Failures or Issues • Filament entangled. • The initial layer of the print Common Illustration Causes Solutions model is not sticky. https://support.ankermake. Spaghetti Failures or • Partial warping of the print com/s/article/How-to-Fix-the- Effect Issues model causes the collision of Spaghettification-Issue the nozzle and movement of the print model. -
Page 16: Specifications
This Class B digital apparatus complies with Canadian ICES-003. Connection Wi-Fi (App, AnkerMake Slicer), USB Flash Drive; OTA Upgrade Cet appareil numérique de la classe B est conforme à la norme NMB-003 du Canada. 1080p Image Match, Real-Time Monitoring Stream: 1MB... - Page 17 Hereby, Anker Innovations Limited declares that this device is in compliance with Radio Equipment Regulations 2017(SI 2017/1206). The full text of the UK declaration of conformity is available at the 12-month limited warranty | 12 Monate following internet address: https://ankermake.com. eingeschränkte Garantie | Garantía limitada RF exposure information: de 12 meses | Garantie limitée de 12 mois | 12...
Need help?
Do you have a question about the M5 and is the answer not in the manual?
Questions and answers