Maestro E200 Series Quick Start Manual
Cellular / wan / wi-fi router
Hide thumbs
Also See for E200 Series:
- User manual (220 pages) ,
- Quick start manual (84 pages) ,
- User manual (250 pages)
Table of Contents
Advertisement
Quick Links
MAESTRO WIRELESS SOLUTIONS
Cellular / WAN /
Wi-Fi Router
Quick Start
Guide
Maestro Wireless Solutions
th
Address: 9
Floor, Wing Cheong Factory Building,
121 King Lam Street, Cheung Sha Wan, Kowloon, Hong Kong
Phone: +852 3955 0222
Fax: +852 35684833
E-mail: contact@maestro-wireless.com
v1.0
http://support.maestro-wireless.com
Advertisement
Table of Contents

Subscribe to Our Youtube Channel
Related Manuals for Maestro E200 Series


Summary of Contents for Maestro E200 Series
- Page 1 MAESTRO WIRELESS SOLUTIONS Cellular / WAN / Wi-Fi Router Quick Start Guide v1.0 Maestro Wireless Solutions Address: 9 Floor, Wing Cheong Factory Building, 121 King Lam Street, Cheung Sha Wan, Kowloon, Hong Kong Phone: +852 3955 0222 Fax: +852 35684833 E-mail: contact@maestro-wireless.com...
-
Page 2: Table Of Contents
4.2 WI-FI ENABLED, WITH WPA/WPA2 TKIP KEY 4.3 CONNECTION UNDERSTANDING THE MAESTRO ROUTER 7 5. 5.1 LAN PANEL DETAILS 5.2 WAN PANEL DETAILS 5.3 FRONT PANEL DETAILS CONNECTING MAESTRO ROUTER 11 6. E200 SERIES | QUICK START GUIDE http://support.maestro-wireless.com... -
Page 3: Overview
Overview With high-speed cellular (3G and beyond), WAN, LAN and Wi-Fi connectivity, the Maestro’s E200 series of router are highly versatile, reliable and rugged router designed for mission- critical enterprise applications requiring faultless connectivity. The Maestro E200 series includes three models. -
Page 4: Prerequisite
Prerequisite Before continuing with the installation of your E200 Series router, make sure you have a computer equipped with the following: Computer with an Ethernet port or Wi-Fi connectivity and Internet service Active SIM card Web browser such as Internet Explorer 7+ or Google Chrome, Mozilla Firefox 1.5+ or Apple Safari to access the Maestro Web Admin Console... -
Page 5: Checking The Package Content
Diversity/GPS Antenna Cellular Antenna Quick Start Guide Note All the components are exclusive of the Maestro Router and must be purchased. If any component(s) from the package are missing, please contact Maestro Support at support@maestro-wireless.com. ... -
Page 6: Default Configuration
WPA Key W1rele$$ Note Username and Password are case sensitive. Connection WAN Connection – Automatic (DHCP - Automatic IP Address lookup) Active DHCP with starting IP Address: 192.168.1.100 with pool of 100 clients. E200 SERIES | QUICK START GUIDE http://support.maestro-wireless.com... -
Page 7: Understanding The Maestro Router
Ethernet port (LAN) – Cross Ethernet cable connects to LAN. Reset Button – Push the reset button for 3 seconds and device will be reset to default settings. Note Use a paper clip to push the reset button gently. E200 SERIES | QUICK START GUIDE http://support.maestro-wireless.com ... -
Page 8: Wan Panel Details
Wi-Fi Connector – RP-SMA antenna connector WAN Panel Details Figure – Maestro Router WAN Panel GPS / diversity SMA Antenna Connector Ethernet port (WAN) SIM Card holder Eject Button Cellular SMA Antenna Connector E200 SERIES | QUICK START GUIDE http://support.maestro-wireless.com... -
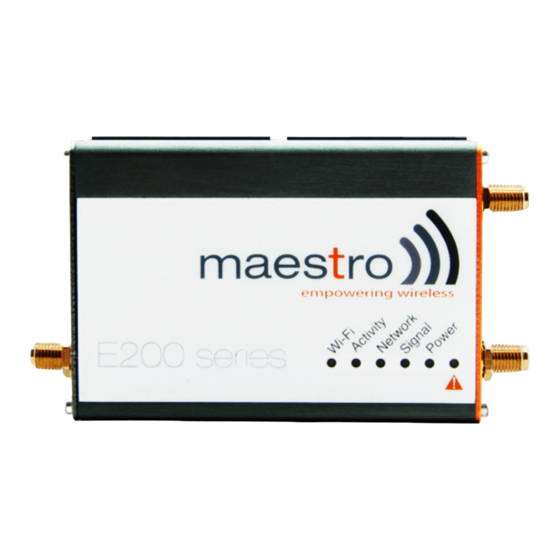
Page 9: Front Panel Details
Front Panel Details Figure – Front Pan The top panel of Maestro E200 Series Routers features 6 LEDs on the front to indicate critical system information. ... - Page 10 Power on No alert, device is running smoothly Red Flashing Software fault (crash, issues…) Alert Hardware fault (high Red ON temperature, problem with module or SIM card) Table – LED States and Description E200 SERIES | QUICK START GUIDE http://support.maestro-wireless.com...
-
Page 11: Connecting Maestro Router
Step2. Pull out the SIM holder and place the SIM card in it, following the shape of the tray. Note Make sure it fits perfectly and the golden circuit side of the SIM is faced upwards. Figure – Installing SIM Card in Maestro Router E200 SERIES | QUICK START GUIDE http://support.maestro-wireless.com... - Page 12 Step3. Carefully push the SIM tray containing the SIM card back into the Maestro Router. Step4. Connect GSM antenna with “Cell” connector on the Maestro Router. Make sure the antenna is tightly secured. Step5. Connect GPS antenna with “Div/GPS” connector.
- Page 13 For certain circumstances/environments may require a higher quality of antenna or one mounted in a different location. In this case, Maestro has many antenna options to choose from, please contact Maestro Support at support@maestro-wireless.com. Step6. Use standard Ethernet cable to connect the existing WAN access to WAN port of Maestro Router.
- Page 14 Step8. Connect the AC power connector into the “DC in” jack on LAN-side panel of the Maestro Router. Plug the other side of the cord to a standard AC receptacle and turn the power switch ON. The power LED will light when power is applied.
- Page 15 Step10. Enter the Username admin, and the Password admin in the login window. Click Login. Note We strongly recommend you to change your login password. Screen – Login Page E200 SERIES | QUICK START GUIDE http://support.maestro-wireless.com ...
- Page 16 Step11. Click Next on the Quick Setup Page. Configure the network parameters for LAN, WAN, Cellular and Wi-Fi. Alternately, go to Management Settings, import and load predefined settings file. Click Save & Apply to set the configuration. Screen – Quick Start Network Configuration Page E200 SERIES | QUICK START GUIDE http://support.maestro-wireless.com...
- Page 17 Number (PIN) is used to lock the card, preventing people from making unauthorized phone call or access cellular data. Enter the PIN of the SIM card. Username Enter the login name. Password Enter the password. E200 SERIES | QUICK START GUIDE http://support.maestro-wireless.com ...
- Page 18 Congratulations!!! This finishes the basic configuration of Maestro Router and you are ready to use the Router. E200 SERIES | QUICK START GUIDE http://support.maestro-wireless.com...
Need help?
Do you have a question about the E200 Series and is the answer not in the manual?
Questions and answers