
Related Manuals for Vortice VORT ARTIK DUCT


Summary of Contents for Vortice VORT ARTIK DUCT
- Page 1 Libretto istruzioni Instruction booklet VORT ARTIK DUCT CONTROLLO REMOTO COD. 5.471.084.819 04/10/2017...
-
Page 2: Table Of Contents
ndice Istruzioni per l’utente ..................3 Installazione e smontaggio ................3 Luogo e requisiti di installazione................3 Installazione del cavo di segnale................3 Installazione del controllo remoto cablato..............4 Smontaggio del controllo remoto cablato...............5 Istruzioni display e installazione ..............6 Display a cristalli liquidi.....................6 Pulsanti........................7 Istruzioni d’uso ......................8 Funzione di bloccaggio.....................8 Selezione gradi Celsius/Fahrenheit................8... -
Page 3: Istruzioni Per L'utente
Istruzioni per l’utente Si prega di leggere con cura il presente manuale prima di installare e utilizzare il prodotto. ● Non installare o rimuovere il controllo remoto cablato senza assistenza. In caso sia necessario, si prega di contattare il tecnico del servizio di assistenza post-vendita. ●... -
Page 4: Installazione Del Controllo Remoto Cablato
Installazione e smontaggio 3.Installazione del telecomando cablato Fare riferimento alla figura riportata di seguito e alle seguenti istruzioni: ● Estrarre il cavo dal foro di supporto e farlo passare attraverso il foro posizionato sul fondo del controllo remoto cablato. ● Utilizzare viti M4x25 per fissare la piastra di base al foro di installazione a parete. ●... -
Page 5: Smontaggio Del Controllo Remoto Cablato
Installazione e smontaggio 4.Smontaggio del controllo remoto cablato... -
Page 6: Istruzioni Display E Installazione
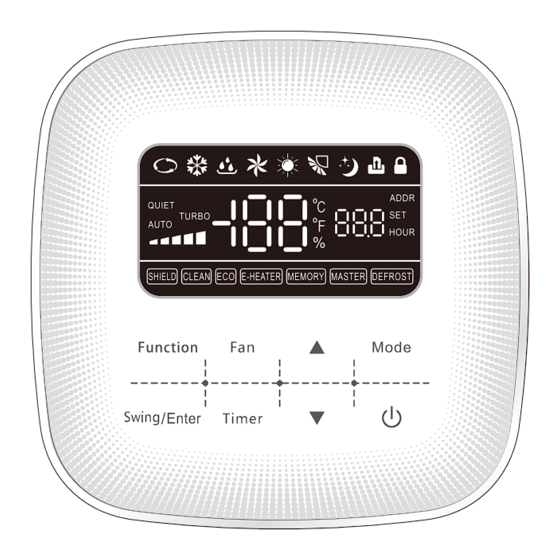
Istruzioni display e installazione Display a cristalli liquidi 13 14 15 18 19 Nome dell’icona Funzione AUTO Funzionamento in modalità AUTO COOLING Funzionamento in modalità raffreddamento Funzionamento in modalità DRY Funzionamento in modalità ventilatore HEATING Funzionamento in modalità riscaldamento SWING Funzione di oscillazione SLEEP Funzione di inattività... -
Page 7: Pulsanti
▼ Regola la velocità della ventola Aziona le funzioni CLEAN, ECO, SLEEP, TURBO, QUIET Function ecc. 1. Attiva/disattiva la funzione di oscillazione. Swing/Enter 2. Attiva/disattiva la funzione corrente Timer Attiva/disattiva il timer Funzione non disponibile sul modello Vort Artik Duct... -
Page 8: Funzione Di Bloccaggio
Istruzioni d’uso Funzione di bloccaggio A unità accesa o spenta, premere contemporaneamente "▲" e "▼" per 5 secondi fino a quando il controllo remoto cablato non entra nello stato di bloccaggio. Il display visualizza " ". Successivamente, premere nuovamente gli stessi due tasti per 5 secondi per disattivare lo stato di bloccaggio. -
Page 9: Impostazione Modalità
Istruzioni d’uso Impostazione temperatura Premere "▲" o "▼" per aumentare o diminuire la temperatura impostata, a unità accesa. Tenendo premuto uno dei due tasti la temperatura si modificherà più rapidamente. La gamma entro la quale può essere impostata la temperatura varia dai 16 ai 31 °C. -
Page 10: Impostazione Timer
Istruzioni d’uso Impostazione timer Premere "Timer" per attivare o disattivare il Timer. Intervallo disponibile: da 0,5 a 24 ore. Attenzione: L’intervallo di tempo minimo visualizzabile è pari a 0,5 ore. ● Impostazione timer: Premere "Timer" (l’icona "SET" lampeggerà, e verrà visualizzata l’icona "HOUR”); quindi premere "▲"... -
Page 11: Impostazione Funzione Turbo
Istruzioni d’uso Impostazione funzione Turbo Funzione TURBO: La massima velocità della ventola dell’unità può riscaldare o raffreddare rapidamente una stanza in modo che la temperatura ambiente si avvicini in pochi minuti alla temperatura desiderata. Premere "Function" per selezionare la funzione Turbo (l’icona "TURBO" lampeggerà); quindi premere "Swing/Enter"... -
Page 12: Impostazione Funzione Quiet
Istruzioni d’uso Impostazione funzione Quiet Premere "Function" per selezionare la funzione Quiet (l’icona "QUIET" lampeggerà); quindi premere "Swing/Enter" per attivarla o disattivarla. Attenzione: ● Quando si attiva la funzione Quiet, l’indicatore della velocità non cambia. ● Passando a un’altra modalità o regolando la velocità della ventola, la funzione Quiet verrà automaticamente interrotta. -
Page 13: Impostazione Funzione Eco
Istruzioni d’uso Impostazione funzione ECO La funzione ECO permette al condizionatore di funzionare in un intervallo di temperatura ridotto impostando un valore di temperatura desiderabile limitato (solamente nelle modalità riscaldamento o raffreddamento) in modo da ottenere un sensibile risparmio energetico. Nella modalità... -
Page 14: Codice Errore
Codici di errore In caso di guasto o malfunzionamento dell’unità, comparirà un codice di errore sul controllo remoto cablato. Nel caso in cui si verifichino molteplici errori contemporaneamente, i relativi codici di errore compariranno in sequenza. ● In caso di visualizzazione del codice di errore CL, spegnere l’unità... - Page 15 Content User Instructions ....................Installation and Disassembly ................Installation Place and Installation Requirements........... Installation of the Signal Wire................Installation of Wired Controller................Disassembly the Wired Controller................Display and Installation instruction ..............Liquid crystal display..................... Buttons......................... Operation Instruction ..................Lock Function......................The Switch of Centigrade and Fahrenheit.............
-
Page 16: User Instructions
User Instructions Please carefully read this manual before installation and use of this product. ● Do not install or remove the wired controller by yourself. If necessary, please contact the after- sales serviceman. ● Do not beat, toss, or frequently assemble/disassemble the wired controller. ●... -
Page 17: Disassembly The Wired Controller
Installation and Disassembly 3. Installation of Wired Controller The simple installation step of wired controller is as shown on the figure, please notice below issues: ● Pull out the 4 core twisted pair wire from the mounting hole and pass this line through the oblong hole located at the bottom of the wired controller. - Page 18 Installation and Disassembly 4. Disassembly the Wired Controller...
-
Page 19: Display And Installation Instruction
Display and Installation instruction Liquid crystal display: Icon Name Icon Instruction AUTO Operating in AUTO mode COOLING Operating in COOLING mode Operating in DRY mode Operating in FAN mode HEATING Operating in HEATING mode SWING SWING function SLEEP SLEEP function ACCESS CONTROL Plug-in/out card LOCK... -
Page 20: Buttons
2. Setting timer time, range: 0.5-24 hour ▼ Adjust fan speed Function Select CLEAN, ECO, SLEEP, TURBO, QUIET, etc. fuctions. 1. Turn on/off Swing function. Swing/Enter 2. Turn on/off function Timer Setting timer on/off * Function not available on model Vort Artik Duct... -
Page 21: Operation Instruction
Operation Instruction Lock Function In the on/off-state, press "▲" and "▼" buttons at the same time for 5s till the wired controller enters the lock state. In this case, the LED display " ". After that, repress these two buttons at the same time for 5s to quit the lock state. -
Page 22: Temperature Setting
Operation Instruction Temperature Setting Press "▲" or "▼" button to increase or decrease setting temperature in on-state of the unit. If press either of them continuously, temperature will be changed rapidly. Temperature setting range is 16°C~31°C (61°F-88°F). Notice: In Auto mode, the setting temperature is un-adjustable. Fan Speed Setting Press "Fan"... -
Page 23: Timer Setting
Operation Instruction Timer Setting In on-state, press "Timer" button to set turn off time; in off-state, press "Timer" button to set turn on time. Timer range: 0.5-24h Notice: The min gap of time display is 0.5h, less than 0.5h will display 0.5h. ●... -
Page 24: Turbo Function Setting
Operation Instruction Turbo Function Setting TURBO function: The unit at the highest fan speed can realize quick cooling or heating so that room temperature can quickly approach the setting temperature. Press "Function" button switch to the Turbo function, "TURBO" icon blinking, press "Swing/Enter"... -
Page 25: Quiet Function Setting
Operation Instruction Quiet Function Setting Press "Function" button switch to the Quiet function, "QUIET" icon blinking, press "Swing/Enter" button to turn on/off the function. Notice: ● When turn on Quiet function, the fan speed strip will not change. ● Switch to other mode and adjust the fan speed will both exit the Quiet function automatically. ●... -
Page 26: Eco Function Setting
Operation Instruction ECO Function Setting ECO function can make the air conditioner runs in a smaller temperature range by setting limited value of setting temperature in the Cooling or heating mode to achieve energy saving. In Cooling(Heating) mode, press "Function" button to switch to ECO limited temperature setting function, "ECO"... -
Page 27: Error Code
Error Codes When error happens to the unit, the error code will be shown on the wired controller. When multiple errors simultaneously happen, the error codes will circularly show up. the code will disappear. ● If show other code, please turn off and contact the service center. - Page 28 Vortice Elettrosociali S.p.A. reserves the right to make improvements to products at any time and without prior notice. La société Vortice Elettrosociali S.p.A. se réserve le droit d'apporter toutes les variations afin d'améliorer ses produits en cours de commercialisation. Die Firma Vortice Elettrosociali S.p.A. behält sich vor, alle eventuellen Verbesserungsänderungen an den Produkten des Verkaufsangebots vorzunehmen.
Need help?
Do you have a question about the VORT ARTIK DUCT and is the answer not in the manual?
Questions and answers