Advertisement
Quick Links
Advertisement

Related Manuals for Target Furniture ALFDS100WKD


Summary of Contents for Target Furniture ALFDS100WKD
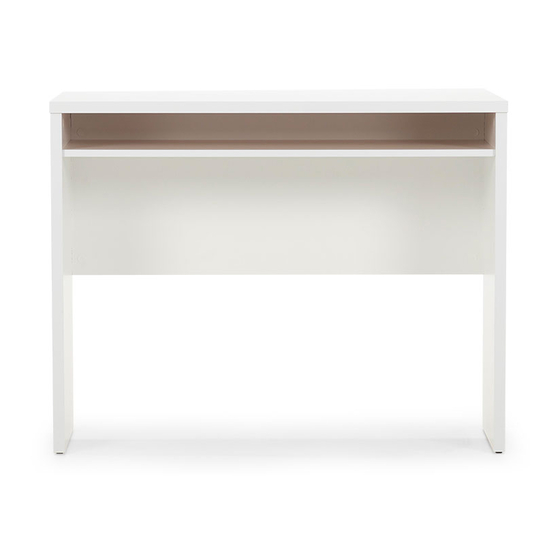
- Page 1 1000 Wide Shelf Desk INSTRUCTION MANUAL Job no.
-
Page 2: Assembly Details
Assembly Details Floor Area 3m x 2m Required Assembly Space Approximate Assembly Time 1 Person Assembly Tools Required AFTER SALES SUPPORT support@compacfurniture.co.nz or 0800 100 858... -
Page 3: Care And Maintenance
Tips before you start 1. For the protection of your furniture, we recommend that the product is placed on a protected surface during assembly to prevent damage 2. Please check that all parts are present before you start the assembly of your furniture 3. -
Page 4: Parts List
Parts List PART MEASUREMENTS NOTES 1000 x 500 x 25mm Laminate on one side. LH End 745 x 396 x 25mm Laminate on both sides. RH End 745 x 396 x 25mm Laminate on both sides. Modesty 390 x 944 x 15mm Laminate on both sides. - Page 5 Cam Installation & Operation Guide The Cam and Connecting Bolt system is used to put your unit together. Below is an explanation of how this system works. AFTER SALES SUPPORT support@compacfurniture.co.nz or 0800 100 858...
- Page 6 Assembly STEP 1: Top • To begin assembly, lay the top finished side down on a clean and clear surface • Screw four Connecting Bolts into the holes as shown Connecting Bolt Connecting Bolts STEP 2: LH End • Insert two Large Cams as shown (make sure the arrow on the top of the Cam points towards the top edge of the End).
- Page 7 STEP 3: RH End • Repeat the previous steps to install the hardware in the RH End. Connecting Bolt Large Cam Dowel Nail on Glide Connecting Bolts Dowels Cams Nail on Glides STEP 4: Modesty • Install four Large Cams into the Modesty as shown below (ensure the arrow on the top of the Cam points towards the edge.
- Page 8 STEP 5: Attach the Shelf to the Modesty • Attach the Shelf to the Modesty by fitting the Connecting Bolts with the corresponding pre-drilled holes as shown below. • Lock the pieces together by turning the Cams ¼ - ½ of a turn in a clockwise direction. Shelf Modesty STEP 6: Attach the LH End...
- Page 9 STEP 7: Attach the RH End • Attach the RH End by fitting the Connecting Bolts with the corresponding pre-drilled holes as shown below. • Lock the pieces together by turning the Cams ¼ - ½ of a turn in a clockwise direction. STEP 8: Attach the Top •...