Table of Contents
Advertisement
Quick Links
Advertisement
Table of Contents

Related Manuals for Gates Underwater Products EM5 ULTRA

Summary of Contents for Gates Underwater Products EM5 ULTRA
-
Page 1: Setup, Use, And Care Guide
Page 1 EM5 ULTRA Underwater Monitor Housing Setup, Use, and Care Guide... - Page 2 Page 2 Copyright 2023, Gates Underwater Products, Inc. Photos © Gates Underwater Products This manual and current revision is available in 8.5 x 11 size and full color at GatesHousings.com Gates Underwater Products, Inc. 13685 Stowe Drive Poway, California 92064 USA Phone: 858.391.0052...
-
Page 3: Table Of Contents
Cautions ................5 EM5 ULTRA Setup ............6 Preparing the SmallHD ULTRA 5 LCD ......6 Secure EM5 ULTRA to Camera Housing ......7 Open the Housing Shell ............ 7 Insert ULTRA 5 LCD into to Rear Shell ......8 Visual Check .............. -
Page 4: 1: Introducing The Em5 Ultra
Please read through this entire guide to learn about the EM5 ULTRA so you can get the most out of this imaging tool. In this section, we’ll introduce you to the features of the monitor housing so you can get started. -
Page 5: Unpacking The Em5 Ultra
USER RESPONSIBILITY. This Setup, Use and Care guide contains important detailed procedures for setup and use of the EM5 ULTRA. It is the user’s responsibility to read, understand and employ these procedures. Failure to do so can result in poor or non-operation of the monitor housing and may void your warranty. -
Page 6: 2: Em5 Ultra Setup
EM5 ULTRA Setup Page 6 2: EM5 ULTRA Setup The EM5 ULTRA requires complete and thorough setup prior to use. Preparing the SmallHD ULTRA 5 LCD ✓ Auto boot. Setup the ULTRA 5 LCD to boot when power is present at the rear connector. -
Page 7: Secure Em5 Ultra To Camera Housing
Secure EM5 ULTRA to Camera Housing ✓ EM5 ULTRA Setup is best conducted with it secured to a camera housing. ✓ Refer to the image for a typical mounting of the EM5 ULTRA to a housing. Slide Monitor Dovetail onto Housing and tighten thumbscrews. -
Page 8: Insert Ultra 5 Lcd Into To Rear Shell
EM5 ULTRA Setup Page 8 Insert ULTRA 5 LCD into to Rear Shell ✓ First, connect video and power connectors as shown. Then seat into the rear shell. ✓ Make a visual check to verify the orange o-ring is clean and free of any foreign matter. -
Page 9: Visual Check
EM5 ULTRA Setup Page 9 Visual Check ✓ Inspect the gap where front and rear shells meet. Ensure it is even all around. Refer to the image below, shown in highlight. After closing, inspect the seal line around the housing. It should be... -
Page 10: Connect To Camera Housing
Connect BNC connector to the camera SDI output, and power to an appropriate D- Tap output. Refer to your Gates housings SU&C Guide for more details on specific camera connections. Insert the EM5 ULTRA Monitor Cable into the camera housing as shown. Tighten the brass collar until snug. -
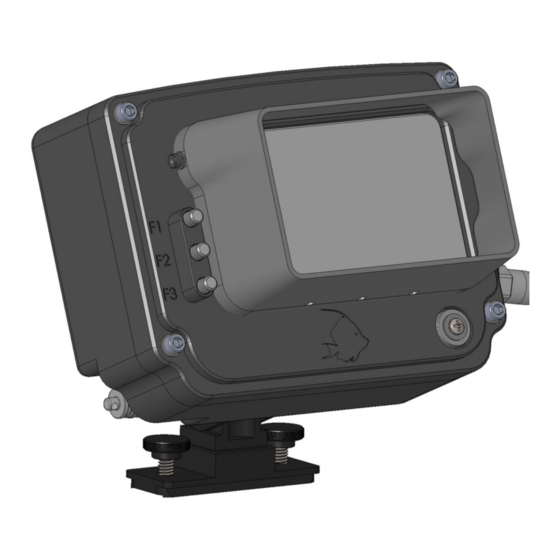
Page 11: Em5 Ultra Controls
EM5 ULTRA Setup Page 11 EM5 ULTRA Controls ✓ F1 / F2 / F3. On the front face are F1 / F2 /F3 assignable controls. Refer to SmallHD ULTRA 5 for details. F1 / F2 / F3 Assignable... -
Page 12: Em5 Ultra Cable Replacement
EM5 ULTRA Cable Replacement ✓ Replacing the EM5 ULTRA cables is straightforward. Referring to the image below, use a 9/64 hex tool to remove 4 screws securing the Bulkhead Adapter to the housing shell. Carefully remove the cable with bulkhead adapter and replace with new. -
Page 13: 3: Em5 Ultra Maintenance
O-Ring Care and Maintenance Your Gates EM5 ULTRA has 1 serviceable o-ring. It is located on the main housing the front shell mates. Its color is orange. Servicing the o-rings is easy and covered in the “Housing Care and Maintenance”... -
Page 14: 4: Customer Support
Customer Support Page 14 4: Customer Support Should you have any questions about the EM5 ULTRA and its operation, please contact Gates at the numbers below. Email: Customer.srvc@GatesHousings.com Web: https://www.gateshousings.com/contacts/ Phone: 858.391.0052...
Need help?
Do you have a question about the EM5 ULTRA and is the answer not in the manual?
Questions and answers