Table of Contents
Advertisement
Advertisement
Table of Contents

Related Manuals for Oregon OR25TBS-2


Summary of Contents for Oregon OR25TBS-2
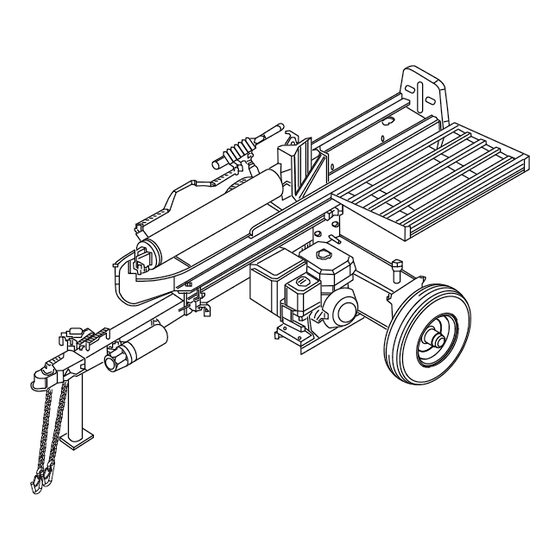
- Page 1 Original Instruction Manual VERTICAL/HORIZONTAL LOG SPLITTER Models OR25TBS-2, OR25TKO-2, OR30TBS-2, OR30TKO-2, OR35TBS-2, OR35TKO-2 OregonProducts.com 633904_AB_OregonLogSplitterManual_Models-2.indd 1 633904_AB_OregonLogSplitterManual_Models-2.indd 1 3/18/22 10:05 AM 3/18/22 10:05 AM...
- Page 2 INTRODUCTION Introduction Read this manual before operating your Oregon equipment. The information presented will prepare you to do a better and safer job. Keep this manual handy for ready reference. Require all operators to read this manual carefully and become acquainted with all adjustment and operating procedures before attempting to operate. Replacement manuals can be obtained from your dealer.
-
Page 3: Table Of Contents
TABLE OF CONTENTS Table of Contents Explanation of Signal Words Assembly Instructions Specifications Operating Instructions Hydraulic Oil Recommendation: General Information Engine Oil Recommendations Operating the Log Splitter Safety Rules Log Splitter Setup Log Splitter Operation – Horizontal Position Training Log Splitter Operation – Vertical Position Preparation Towing Towing Safety... -
Page 4: Explanation Of Signal Words
EXPLANATION OF SIGNAL WORDS Explanation of Signal Words This section contains safety information for the Oregon Rotary Cutter. Throughout this manual, the terms DANGER, WARNING, and CAUTION are used in conjunction with the Safety-Alert Symbol (a triangle with an exclamation mark) to indicate the degree of hazard for items of personal safety. -
Page 5: Specifications
SPECIFICATIONS Specifications Model No. OR25TBS-2 OR25TKO-2 OR30TBS-2 OR30TKO-2 OR35TBS-2 OR35TKO-2 Engine Briggs & Stratton Kohler Briggs Stratton Kohler Briggs & Stratton Kohler CR950 SH265 XR1150 SH265 XR1450 CH395 208cc 196cc 250cc 196cc 306cc 277cc Maximum 25 Tons 25 Tons 30 Tons... -
Page 6: Safety Rules
SAFETY RULES Safety Rules ATTENTION! Become alert! Your safety is involved! Safety is a primary concern in the design and manufacture of our products. Unfortunately, our efforts to provide safe equipment can be wiped out by an operator’s single careless act. In addition to the design and configuration of equipment, hazard control and accident prevention are dependent upon the awareness, concern, judgment, and proper training of personnel involved in the operation, transport, maintenance and storage of equipment. -
Page 7: Towing Safety
SAFETY RULES Towing Safety • Never allow anyone to sit or ride on your log splitter. • Never move your log splitter over hilly or uneven terrain without a tow vehicle or adequate help. • Never carry any cargo or wood on your log splitter. •... -
Page 8: General Safety
SAFETY RULES General Safety • Never allow children or those lacking proper instructions and understanding to operate this log splitter. • Never wear loose clothing or jewelry that can be caught by moving parts of the log splitter. Keep clothing and hair away from all moving parts when operating this log splitter. -
Page 9: Operation Of The Log Splitter
SAFETY RULES Operation of the Log Splitter Only one operator may operate the log splitter from the operator zone as shown in the diagram. Keep all bystanders and pets away. The operator has the safest and most efficient access to the control valve and the beam in this location. -
Page 10: General Repair
SAFETY RULES General Repair • Never alter your log splitter in any manner. Such alterations may cause your log splitter to be unsafe and will void the warranty. • Never tamper with the engine to run it at excessive speeds. The maximum engine speed is preset by the manufacturer, and is set within safety limits. -
Page 11: Fire Prevention
SAFETY RULES Fire Prevention • Never operate your log splitter near a flame or spark, or smoke during operation. Hydraulic oil and gasoline are flammable and can explode. • Never fill the gas tank while the engine is hot or running. Allow the engine to cool before refueling. •... -
Page 12: Safety & Instructional Decals
SAFETY & INSTRUCTIONAL DECALS Safety & Instructional Decals ATTENTION! Become alert! Your safety is involved! Replace immediately if damaged! Make sure that all safety warning decals are in good condition and readable. Always replace missing or defaced decals. Call 1-800-525-8322 for replacement decals. Safety Decal Kit Material # is 622521. PART NUMBER: S52062500 LOCATION: SIDE, FRONT END OF TONGUE PART NUMBER: S52062200... - Page 13 SAFETY & INSTRUCTIONAL DECALS PART NUMBER: S52062300 LOCATION: STRIPPER PLATE, NON-OPERATOR SIDE PART NUMBER: S52062600 LOCATION: STRIPPER PLATE, OPERATOR SIDE PART NUMBER: 621827 PART NUMBER: S52062100 LOCATION: ENGINE FUEL TANK LOCATION: TOP OF HYDRAULIC CYLINDER 633904_AB_OregonLogSplitterManual_Models-2.indd 13 633904_AB_OregonLogSplitterManual_Models-2.indd 13 3/18/22 10:05 AM 3/18/22 10:05 AM...
- Page 14 SAFETY & INSTRUCTIONAL DECALS PART NUMBER: 622869 LOCATION: CRATE PART NUMBER: 582221 LOCATION: TONGUE PART NUMBER: 608317 LOCATION: TONGUE PART NUMBER: 619312 LOCATION: TANK Be Careful! • Keep safety decals clean and visible. Use a clean, damp cloth to clean safety decals. •...
-
Page 15: Assembly Instructions
ASSEMBL Y INSTRUCTIONS Assembly Instructions This log splitter is partially assembled at the factory. Please refer to the drawings and parts list should it become necessary to disassemble the unit for repair or replacement of parts. The drawings in this manual are for reference only. Some of the components on your log splitter may look slightly different. - Page 16 ASSEMBL Y INSTRUCTIONS STEP 2: Locate the tongue assembly and rotate the jack into the down position. Remove the hold down bolt that secures the tank to the base of the pallet. Position the tongue so that the mounting holes align with the holes in the tanks tongue mount. Insert the two M12 x 110mm bolts with a flat washer under the head of the bolt.
- Page 17 ASSEMBL Y INSTRUCTIONS STEP 3: Rotate tank tongue assembly on the crate base corner so that axles are clear of the base. Locate wheel assemblies, Flat washers, Castle nuts, Cotter pins and Dust caps from the hardware kit. Remove the protective cover from one axle shaft and the plastic cover from one wheel. Install the wheel (with the valve stem pointed out), outer bearing, flat washer, and castle nut.
- Page 18 ASSEMBL Y INSTRUCTIONS STEP 4: Remove the two hold down bolts securing the beam to the crate base. Slide the beam down so that the foot plate hangs over the edge of the crate base. Using two people or a suitable lifting device, stand the beam assembly up on end as shown, making sure that the beam is on a stable and level surface.
- Page 19 ASSEMBL Y INSTRUCTIONS STEP 5: Locate the engine and pump assembly and remove the two hold down bolts. Place motor/pump assembly onto the engine plate located on the tank assembly. For the 25T and 30T models Locate (4) M8 x 40 bolts, (8) #8 flat washer, (4) #8 lock washers and (4) M8 nuts, from the hardware kit. For the 35T models Locate the (4) M10 x 45 bolts, (8) #10 flat washer, (4) #10 lock washers and (4) M10 nuts, from the hardware kit.
- Page 20 ASSEMBL Y INSTRUCTIONS STEP 6: Place wheel chocks, or other suitable blocks on both wheels. Confirm beam is locked to the tongue. Lift log splitter by the tongue and beam handle unit it the foot plate rests on the ground and have an assistant stabilize the unit. Remove the plug from the suction hose, item 1, while keeping the open end as high as possible.
- Page 21 ASSEMBL Y INSTRUCTIONS STEP 7: Locate manual canister, (3) M6 screw and (3) M6 flat washers from the hardware kit. Remove the cap of the manual canister to ease installation. Install the manual canister with the provided hardware. Item Description Quantity Manual Canister Washer M6...
- Page 22 ASSEMBL Y INSTRUCTIONS STEP 8: Locate log catcher accessory box. Remove the contents and inspect for damage. NOTE: If any part is damaged, contact your dealer or delivering carrier. Locate the (2) M12 x 35mm bolts, (2) M12 flat washers, and (2) M12 lock washers Align holes in log catcher with holes in the beam.
-
Page 23: Operating Instructions
OPERATING INSTRUCTIONS Operating Instructions WARNING STEP 2: After the hydraulic reservoir and the engine crankcase are filled with the recommended oil and Read and thoroughly understand all instructions in hydraulic fluid, fill the engine with fuel and start. With the this manual and on safety decals before assembling engine running at full speed, move the hydraulic valve or operating this log splitter. -
Page 24: Log Splitter Setup
OPERATING INSTRUCTIONS Log Splitter Setup Block wheels by placing wheel chocks on both sides of the wheel to keep the log splitter stable while in use. Move log splitter to selected area mentioned above. Disengage the log splitter from towing vehicle by pulling on the locking lever from the 2"... -
Page 25: Log Splitter Operation - Horizontal Position
OPERATING INSTRUCTIONS Log Splitter Operation – Horizontal Position Before engaging the actuator, please ensure that you are standing in the proper location. See diagram. Horizontal Position Vertical Position Engine Foot Beam Plate Tongue Operator Operator Zone Zone Once proper PPE is worn and the engine is started, select your first log to be split, not exceeding 100 lbs. -
Page 26: Log Splitter Operation - Vertical Position
OPERATING INSTRUCTIONS Log Splitter Operation – Vertical Position DO NOT place the other hand on the log while the wedge is traveling towards the foot plate. NEVER touch the log while Horizontal Position Vertical Position hydraulics are engaged. Engine Foot Beam Plate Tongue... -
Page 27: Towing
OPERATING INSTRUCTIONS Storage Once the beam is in the vertical position, engage the beam vertical lock located on the right side of the tongue and 1. Follow engine manufacture recommendation for engine beam bracket. including storing with fuel in the tank. Select a log and roll it to the splitter and place it on the foot 2. -
Page 28: Replacement Parts
REPLACEMENT PARTS Replacement Parts Beam Assembly Item Kit No Description Item Kit No Description Item Kit No Description 622519 Beam 25T, with 622554 Beam 35T, with 622543 Beam 30T, with Oregon Decals Oregon Decals Oregon Decals 622524 8" Wedge, 25T 624191 8"... -
Page 29: Wheel Assembly
REPLACEMENT PARTS Wheel Assembly 25T & 30T Item Kit No Description Item Kit No Description 622492 Hardware Kit, Bracket 622492 Hardware Kit, Bracket S400312B0 4.8" X 8" Wheel Assembly S400312B0 4.8" X 8" Wheel Assembly 633904_AB_OregonLogSplitterManual_Models-2.indd 29 633904_AB_OregonLogSplitterManual_Models-2.indd 29 3/18/22 10:05 AM 3/18/22 10:05 AM... -
Page 30: Tank Assembly
REPLACEMENT PARTS Tank Assembly Item Kit No Description Item Kit No Description Item Kit No Description 622526 Assembly Tank, 25T 622622 Assembly Tank, 30T 622626 Assembly Tank, 35T 622528 Filter Assembly Kit 622528 Filter Assembly Kit 622528 Filter Assembly Kit 622529 Vent Cap Assy 622529... -
Page 31: Motor Assembly
REPLACEMENT PARTS Motor Assembly 25T with Briggs CR950 30T with Briggs XR1150 Item Kit No Description Item Kit No Description 623641 Motor, Briggs CR950 622564 Motor, Briggs XR1150 622535 SM Pump Mount Assembly Kit 622535 SM Pump Mount Assembly Kit 622493 Briggs CR950 CPLR Kit 622538... - Page 32 REPLACEMENT PARTS Motor Assembly 35T with Briggs XR1450 35T with with Kohler CH395 Item Kit No Description Item Kit No Description S39054500 Motor, Briggs XR1450 622567 Motor, Kohler CH395 623939 MD Pump Mount Assembly Kit 625330 LG Pump Mount Assembly Kit 622550 Briggs XR1450 CPLR Kit 623657...
-
Page 33: Tongue Assembly
REPLACEMENT PARTS Tongue Assembly 25T & 30T Item Kit No Description Item Kit No Description 622530 Tongue Assembly Ground Stand Kit 622575 Tongue Assembly Jack Stand Kit 622533 Ground Stand Kit 622578 Jack Stand Kit 622532 2in Ball Coupler Kit with Chains 622532 2in Ball Coupler Kit with Chains 622492... -
Page 34: 622492 Hardware Kit For 30T
REPLACEMENT PARTS 622492 Hardware Kit for 30T Item Description Quantity 25T & 30T Dust cap Item Description Quantity 4 x 50 Cotter Pin M8 x 40mm Bolt M22 Castle Nut M8 Flat Washer M22 Flat Washer M8 Lock Washer M12 x 110mm Socket Head Cap Screw M8 Nut M12 Flat Washer M12 Lock Washer... -
Page 35: Limited Warranty
REPLACEMENT PARTS Limited Warranty This log splitter is guaranteed to be free from defects in material and workmanship for the normal service life of the product not to exceed 24 consecutive months from the date of purchase. • The cylinder, valve, pump and other hydraulic components are guaranteed for two (2) years from the date of purchase. •... - Page 36 Oregon Tool, Inc. 4909 SE International Way Portland, Oregon 97222 USA 800-525-8322 OregonProducts.com 633904 AB 03/22 633904_AB_OregonLogSplitterManual_Models-2.indd 36 633904_AB_OregonLogSplitterManual_Models-2.indd 36 3/18/22 10:05 AM 3/18/22 10:05 AM...
Need help?
Do you have a question about the OR25TBS-2 and is the answer not in the manual?
Questions and answers