TP-Link Omada OC200 Installation Manual
Multi-gigabit vpn router
Hide thumbs
Also See for Omada OC200:
- Installation manual ,
- User manual (117 pages) ,
- Installation manual (24 pages)
Advertisement
Quick Links
Installation Guide
Omada Multi-Gigabit VPN Router
Note: The image may differ from the actual product.
Hardware Overview
Front Panel
LED
Reset: Press and hold the button for 5 seconds, the SYS LED will flash quickly,
indicating the device is being reset to its factory default settings.
Description
USB 2.0 for USB modem and USB storage device.
2.5G RJ45 WAN port.
2.5G RJ45 WAN/LAN port.
By default, it is a LAN port connecting to local PCs or switches.
You can configure it to a WAN port on the management page.
Gigabit RJ45 WAN/LAN port.
By default, it is a WAN port.
You can configure it to a LAN port on the management page.
Gigabit RJ45 WAN/LAN ports.
By default, they are LAN ports connecting to local PCs or switches.
You can configure each port to a WAN port on the management page.
Gigabit SFP WAN/LAN port connecting to an SFP module.
By default, it is a LAN port.
You can configure it to a WAN port on the management page.
Secure the lock (not provided) into the security slot to prevent the device
from being stolen.
The router comes with a lightning protection mechanism.
Connect to the power outlet via the provided power adapter.
Hardware Connection
Connect via Ethernet
Modem
Connect to 2.5G RJ45 WAN Port
Connect via fiber network
Connect to SFP WAN Slot
Fiber-Optic Cable
Note:
1. If you want to connect to the internet via another RJ45 WAN port, refer to FAQ-Q1 to configure your desired port to a WAN port first (excluding port 3), and connect the port to
the internet via an RJ45 cable.
2. For internet connection via fiber network, refer to FAQ-Q1 to configure the SFP port as a WAN port first, and connect the SFP port to the internet via an SFP module.
Software Configuration
The router supports two configuration options:
Standalone Mode: Configure and manage the router by itself.
Controller Mode: Configure and manage network devices centrally. It is recommended in large-scale networks, which consist of a large number of devices such as
access points, switches, and gateways.
Note: When the router is managed by a controller, configurations of the router will be overridden by the controller.
1
2
SFP Module
To ask questions, find answers, and communicate with TP-Link users or
engineers, please visit https://community.tp-link.com to join TP-Link
Community.
For technical support and other information, please visit
https://www.tp-link.com/support, or simply scan the QR code.
© 2023 TP-Link 7106510150 REV1.1.0
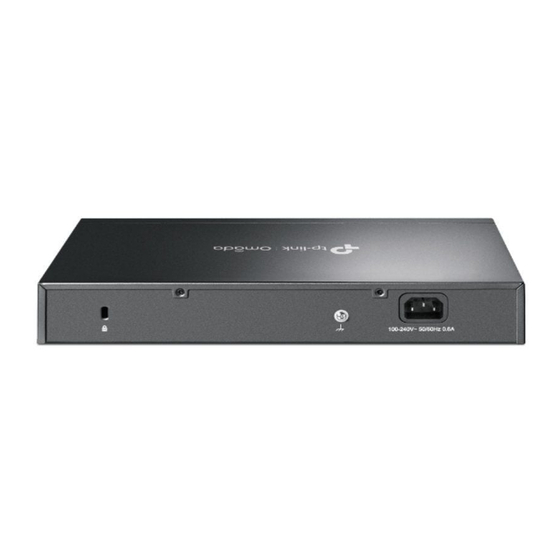
Back Panel
Kensington
Grounding Terminal
Security Slot
Indication
On: Power is on.
Off: Power is off.
Slow Flashing: System is running normally.
Quick Flashing: The router is being reset.
On/Off: System is starting up or running abnormally.
On: Running at 1000 Mbps, but no activity.
Off: No device is linked to the corresponding port.
Flashing: Running at 1000 Mbps, and transmitting or receiving data.
For USB Modem:
Flashing: A modem is connected, and it is initializing.
On: The modem is loaded.
Off: No modem is inserted, or it is corrupted or incompatible.
For USB Storage:
On: A USB storage device is inserted and identified.
Off: No USB storage device is inserted, or it is corrupted or incompatible.
For 2.5G Port:
Green On: Running at 2.5 Gbps, but no activity.
Green Off: No device is linked to the corresponding port.
Green Flashing: Running at 2.5 Gbps, and transmitting or receiving data.
Yellow On: Running at 1000/100/10 Mbps, but no activity.
Yellow Off: No device is linked to the corresponding port.
Yellow Flashing: Running at 1000/100/10 Mbps, and transmitting
or receiving data.
For Gigabit Port:
Green On: Running at 1000 Mbps, but no activity.
Green Off: No device is linked to the corresponding port.
Green
Green Flashing: Running at 1000 Mbps, and transmitting or receiving data.
Yellow On: Running at 100/10 Mbps, but no activity.
Yellow Off: No device is linked to the corresponding port.
Yellow
Yellow Flashing: Running at 100/10 Mbps, and transmitting or receiving data.
2.5G WAN
WAN/LAN
Power Socket
Use the charger provided in the
package to power on the router
Advertisement

Related Manuals for TP-Link Omada OC200


Summary of Contents for TP-Link Omada OC200
- Page 1 Installation Guide Omada Multi-Gigabit VPN Router To ask questions, find answers, and communicate with TP-Link users or engineers, please visit https://community.tp-link.com to join TP-Link Note: The image may differ from the actual product. Community. For technical support and other information, please visit https://www.tp-link.com/support, or simply scan the QR code.
- Page 2 Launch a web browser and enter https://omada.tplinkcloud.com in the address c. Enter your TP-Link ID and password to log in. A list of controllers that have been bar. Enter your TP-Link ID and password to log in. Click + Add Controller and bound with your TP-Link ID will appear.
Need help?
Do you have a question about the Omada OC200 and is the answer not in the manual?
Questions and answers