
Related Manuals for MuginUAV EV350


Summary of Contents for MuginUAV EV350
- Page 1 EV350 Quick Installation Guide V1.0 Copyright © Mugin Limited, 2023 - https://www.muginuav.com...
-
Page 2: Table Of Contents
Table of Contents Safety Precautions ........................................3 Product Features ......................................... 3 Transportation ..........................................3 Specifications ..........................................4 Structure ............................................5 Contents of the Box ........................................6 List of Parts ........................................... 6 List of Contents ........................................7 Accessories ........................................... 8 Structural Installation Instruction ....................................9 Preparation of Equipment .................................... -
Page 3: Safety Precautions
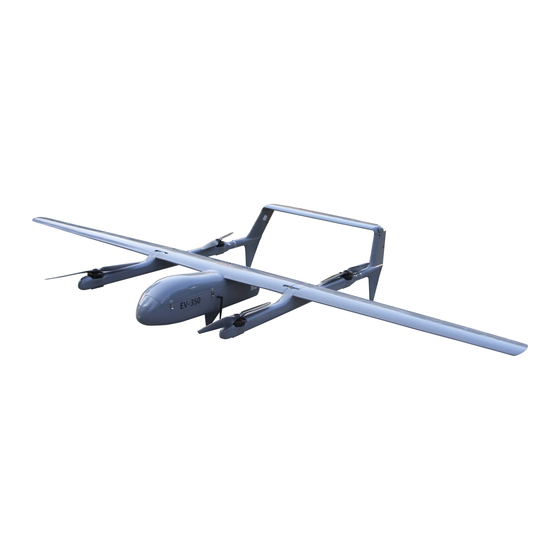
Product Features EV350 is a new electric-powered VTOL drone with a wingspan of 3500mm. It features a quick-disassembly design that allows for assembly and disassembly in just 5 minutes. The aircraft's belly fin landing gear is aerodynamically designed to reduce wind resistance. The unique three landing feet design saves space and weight, and its stability is ensured by the triangular structure during takeoff and landing. -
Page 4: Specifications
Specifications Wingspan 3500mm Flight Endurance (w/o Payload) 3 Hours Length 1860mm Flight Range 180km Empty Weight Grade of Wind Resistance Cruise Mode Grade 5, VTOL Grade7 Maximum Take-off Weight 22kg Flight Altitude 5000 meters Payload Flight Radius 80km Propulsion System Full Electric GPS Accuracy <0.1m... -
Page 5: Structure
Structure The EV350 is primarily composed of a fuselage, a center wing, a left wing, a right wing, a horizontal stabilizer, two vertical stabilizers and two VTOL booms. Fuselage: It carries the battery, mission equipment, control system, and the tail propulsion system, and it also serves as the mounting base for the wing components. -
Page 6: Contents Of The Box
Contents of the Box List of Parts — 6 —... -
Page 7: List Of Contents
List of Contents Description Fuselage Center Wing Left Wing Right Wing Horizontal Stabilizer Vertical Stabilizer Carbon Tube VTOL Boom CG Board Accessories (Optional) Propulsion System (Optional) EV350 Quick Installation Guide Installation Manual — 7 —... -
Page 8: Accessories
Accessories — 8 —... -
Page 9: Structural Installation Instruction
Structural Installation Instruction Preparation of Equipment Body Platform Installation 1. Installation of Center Wing. Connect the wiring between center wing and fuselage, then insert the center wing into the corresponding position of fuselage, and tighten the screws by hand to secure the center wing. Insert the center wing into the corresponding position of fuselage. -
Page 10: Installation Of Carbon Tubes
2. Installation of Carbon Tubes. Insert two carbon tubes into the carbon tube holes of the drone's mid-wing respectively, and the reserved length of the two carbon tubes must be consistent. — 10 —... -
Page 11: Installation Of Booms
3. Installation of Booms. Install the left boom into the carbon tube and attach it to the center wing, then lock the quick-release buckle. Install the right boom in the same way. Please correctly identify the left and right booms. —... -
Page 12: Installation Of Vertical Stabilizers
4. Installation of vertical stabilizers After tightening the wiring interface between the vertical stabilizer and the boom, the flange ring can be tightened clockwise to complete the installation of the boom. Install the other vertical stabilizer in the same way and tighten the flange nut. —... -
Page 13: The Connection Of Horizontal Stabilizer And Vertical Stabilizers
5. The connection of horizontal stabilizer and vertical stabilizers. Connect the connector plug between the horizontal stabilizer and the vertical stabilizer, ensuring it is fully inserted and then lock it with the latch to complete the installation of the horizontal and vertical stabilizers. —... -
Page 14: Installation Of Left Wing And Right Wing
6. Installation of left wing and right wing. Insert the carbon tube hole on the left wing into the corresponding carbon tube on the left strut, and install it by connecting it to the boom. After tightening the electrical connectors between the wing and the boom, lock it with a latch to complete the installation of the left wing. Repeat the same process for the right wing. -
Page 15: Installation Of Vtol Propellers
7. Installation of VTOL propellers. Put the washer into the motor slot and secure the screw tightly with your hand after installing the propeller. After installation, check whether the propeller installation direction is correct. Note: Identify the front and back sides of the propeller, do not install it backwards, and the two diagonally opposite blades are the same. Ensure that the propeller rotates in the correct direction. -
Page 16: Installation Of Pusher Propeller
8. Installation of Pusher Propeller. Install the pusher propeller onto the motor shaft, making sure that the blades are not installed backwards. Place the washer and nut, and tighten the nut with a hex socket wrench. Check whether the propeller direction is correct. Note: Ensure that the propeller rotates in the correct direction. -
Page 17: Installation Of Pitot Tube
9. Installation of Pitot Tube Screw the pitot tube into the corresponding hole on the fuselage, cover it with the canopy, and lock it with the latch. 10. Placement of batteries. Check the battery voltage before placing them. Remove the battery compartment cover at the front end of the fuselage, then plug the batteries into the drone battery port and place them in the battery compartment. -
Page 18: Field Flight
Field Flight Pre-flight Check 1. Check if all aircraft components are securely installed and if screws are tightened; 2. Check if the tower buckle is fastened and if the circuit connection is normal; 3. Power on the ground station radio and connect to the computer; 4. -
Page 19: Take-Off
Take-off The flight process of a drone is to complete the flight of preset waypoints in self-control mode. If necessary, the waypoints can be changed during the flight to alter the set flight plan until the mission is completed and the drone returns. Return &...
Need help?
Do you have a question about the EV350 and is the answer not in the manual?
Questions and answers