Advertisement
Quick Links
+
Electrical Warnings / Advertencias Eléctricas
Failure to follow these precautions could result in serious injury or death. Replace the fl oat
switch immediately if cable becomes damaged or severed. Keep these instructions with
warranty after installation. This product must be installed in accordance with National Electric
Code, ANSI/NFPA 70 so as to prevent moisture from entering or accumulating within boxes,
conduit bodies, fi ttings, fl oat housing, or cable.
ELECTRICAL SHOCK HAZARD
Disconnect power before installing or servicing
this product. A qualifi ed service person must
install and service this product according to
applicable electrical and plumbing codes.
No obedecer estas precauciones podría resultar en lesiones serias o mortales. Reemplace el
interruptor de flotador de inmediato si el cable está dañado o partido. Después de la instalación,
guardar estas instrucciones junto con la garantía. Este producto debe ser instalado siguiendo
el Código Eléctrico Nacional de EE.UU., ANSI/NFPA 70, para evitar la entrada o acumulación de
humedad en cajas de conexión, conductos, acoples, carcaza del interruptor (flotador) o el cable.
RIESGO DE CHOQUE ELÉCTRICO
Desconecte el cable de alimentación antes
de instalar este producto o de hacerle
mantenimiento. La instalación y el mantenimiento
de este producto deben ser efectuados por
personal idóneo siguiendo las normas aplicables
en cuanto a instalaciones eléctricas y plomería.
Wiring Diagrams
ALARM TERMINAL BLOCK
NOTE:
1
2
3
4
5
INFEED ALARM POWER MUST
MATCH VOLTAGE RATING ON
THE FRONT OF THE ALARM.
INFEED POWER
120 VAC ONLY
L1
AUX ALARM CONTACTS
240VAC MAX/30VDC MAX
1.5 AMPS MAX
v ORDERABLE OPTION v
PUMP TERMINAL BLOCK
INFEED POWER
1
L2/N
120/208/240 VAC
L1
2
NOTE:
INFEED PUMP POWER MUST
3
MATCH PUMP VOLTAGE.
4
PUMP L1
PUMP
CSI CONTROLS
®
FIVE-YEAR LIMITED WARRANTY
Five-Year Limited Warranty.
For complete terms and conditions, please visit www.csicontrols.com.
GARANTÍA LIMITADA DE CINCO AÑOS DE CSI CONTROLS
Cinco años de garantía limitada.
Para consultar los términos y condiciones, visite el portal www.csicontrols.com.
EXPLOSION OR FIRE HAZARD
Do not use this product with fl ammable liquids.
Do not install in hazardous loca ons as defi ned
by Na onal Electrical Code, ANSI/NFPA 70.
RIESGO DE INCENDIO O EXPLOSIÓN
No u lice este producto con líquidos infl amables.
No lo instale en lugares peligrosos defi nidos como
tales en el Código Eléctrico Nacional de Estados
Unidos, ANSI/NFPA 70.
NOTE:
6
7
AUX ALARM CONTACTS USED
TO TRIGGER SECONDARY
REMOTE DEVICE IF NEEDED.
NON POWERED DRY CONTACT
ALARM
FLOAT
PUMP FLOAT
PUMP GROUND
PUMP L2/N
Voltage
120 VAC Model
Primary: 120 VAC, 50/60 Hz,
3.8 watts max. (alarm condition)
Secondary: 9 VDC
Enclosure
Indoor/Outdoor
®
Items Needed / Elementos Necesarios
Included with CSION
3R Alarm
®
Viene con la alarma CSION
3R Alarm
®
Included with Optional Float Switch
Viene con el interruptor de fl otador opcional
Not included
No incluido
G
Specifi cations
Especifi caciones
Voltaje
Modelo de 120 V CA
Primario: 120 V CA, 50/60 Hz,
3,8 watts máx. (estado de alarma)
Secundario: 9 V CC
Gabinete
Interior/Exterior
CSION
3R
®
Alarm / Alarma
Installation Instructions / Instrucciones de instalación
English
Este sistema de alarma vigila la altura del líquido
This alarm system monitors liquid levels in lift
en cámaras de bombas aspirantes, en cubetas de
pump chambers, sump pump basins, holding tanks,
sewage, agricultural, and other water applications.
bombas de sumidero, en tanques de retención, y
en aplicaciones como aguas residuales, agricultura
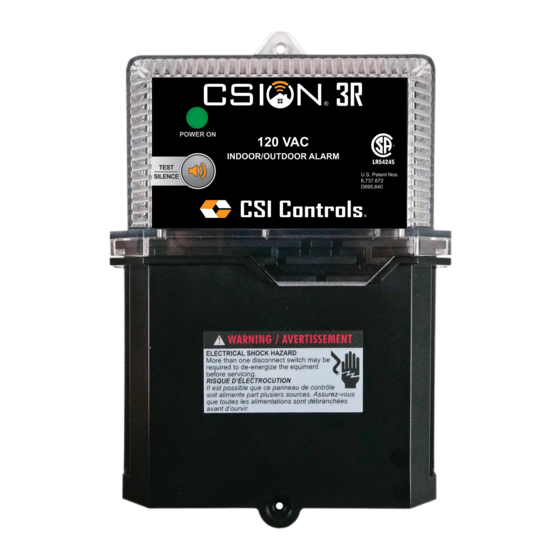
The CSION
®
3R indoor/outdoor alarm can serve as a
y otros sistemas de aguas.
high or low level alarm depending on the fl oat switch
model used. This easy-to-install alarm features an
La alarma para uso interior y exterior CSION
innovative, sleek 2-color molded enclosure which
puede utilizarse como alarma de nivel alto o bajo,
dependiendo del modelo del interruptor de nivel. Esta
integrates the LED translucent beacon (LED
available in red or yellow).
alarma es fácil de instalar y trae una innovadora
caja moldeada de dos colores, que integra la luz
The alarm sounds and the upper half of the housing
LED roja translúcida de aviso (y también una luz
de aviso de color amarillo.
illuminates when a potentially threatening liquid
level condition occurs. The audible alarm can be
silenced by pressing the Test/Silence button, but
Ante una condición potencialmente peligrosa del
the alarm light will remain on until the condition is
nivel de líquido, la bocina de la alarma suena y
la parte superior de la caja se ilumina. La alarma
remedied. Once the condition is cleared, the alarm
will automatically reset. A green "power on" light
audible se silencia pulsando el botón de prueba/
indicates power to the alarm panel.
silencio (Test/Silence) quedando encendida la luz
hasta que se resuelva la situación. La alarma retorna
automáticamente a su condición inicial una vez se
resuelva la condición que la activó. La luz verde de
encendido ("power on") indica que hay alimentación
al panel de la alarma.
+ 1-800-746-6287
techsupport@sjeinc.com
www.csicontrols.com
Technical Support Hours: Monday - Friday, 7 A.M. to 6 P.M. Central Time
Soporte técnico, Horario: lunes a viernes, 7 A.M. a 6 P.M. hora del Centro
Español
®
3R
PN 1072479A 03/22
© 2022 SJE, Inc. All Rights Reserved.
CSI CONTROLS is a trademark of SJE, Inc.
Advertisement

Related Manuals for CSI Controls CSION 3R


Summary of Contents for CSI Controls CSION 3R
- Page 1 Enclosure Indoor/Outdoor Gabinete Interior/Exterior GARANTÍA LIMITADA DE CINCO AÑOS DE CSI CONTROLS ® www.csicontrols.com Cinco años de garantía limitada. Technical Support Hours: Monday - Friday, 7 A.M. to 6 P.M. Central Time Soporte técnico, Horario: lunes a viernes, 7 A.M. a 6 P.M. hora del Centro Para consultar los términos y condiciones, visite el portal www.csicontrols.com.
- Page 2 Remove screw from front of lower cover. Lift bottom of lower cover out slightly. Mount the alarm enclosure using existing upper and lower mounting Install fl oat switch at desired activation level. Slide lower cover down until it is clear of the upper cover and remove. Determine tabs.
Need help?
Do you have a question about the CSION 3R and is the answer not in the manual?
Questions and answers