Table of Contents
Advertisement
Quick Links
Advertisement
Table of Contents

Related Manuals for BARDOMED CarePump Lite 6

Summary of Contents for BARDOMED CarePump Lite 6
- Page 1 User Manual Lymph Drainage Therapy Device (Pressotherapy Device) UM_EN_CPLITE6_04...
-
Page 2: Table Of Contents
Table of contents Basic device configuration 5.1. Main screen 5.2. Work mode setting Safety warnings 5.3. Pressure level 1.1. Energy security 5.4. Treatment time 1.2. Possibility of injuries 5.5. Speed of filling the chambers 1.3. Safe use and maintenance 5.6. Turning off individual chambers 1.4. - Page 3 Warnings 10. Troubleshooting 11. Maintenance and storage 12. Utilization...
-
Page 4: Safety Warnings
Safety warnings Before starting work with the device, please read the follow- ing manual. It is recommended to use the device after con- sulting a doctor. CarePump series of devices has been designed in compli- ance with all safety standards and norms that allow them to be used. -
Page 5: Energy Security
1.1. Energy security 1.2. Possibility of injuries It is forbidden to use the device on patients: CarePump series is powered by the mains voltage of 100- 240V. Before connecting the device, make sure that the pa- ▶ with an implanted artificial heart and other heart rameters of the transmission network are consistent with the prostheses, data provided on the rating plate at the bottom of the case. -
Page 6: Safe Use And Maintenance
1.3. Safe use and maintenance 1.4. Correct use of the cuffs The device’s operating environment should meet the follow- Safe use of the device cuffs contains the following principles: ing conditions. Non-compliance with them may result in per- ▶ Before putting on the cuffs, remove your watch, jew- sonal injury or permanent damage of the device. -
Page 7: Basic Characteristic Of The Device
Basic characteristic of the device 2.1. CarePump pressotherapy devices CarePump is a series of pressotherapy devices designed and manufactured as a result of many years of experience and research conducted by physiotherapy masters. Consul- tations with our clients regarding necessary functions, ex- ploitation and comfort of use allowed us to create a diversi- fied line of devices adjusted to every need of medical staff, patients, athletes and all other users. - Page 8 The basic set that allows you to perform the treat- ment with CarePump device includes: – used to set parameters such as: Central unit (device) time, program, speed of pumping the chambers in the cuffs or pressure. Air ducts – used to supply air through independent chan- nels to the individual cuff chambers.
-
Page 9: Pressotherapy (Lymphatic Drainage Massage) And Its Function
2.2. Pressotherapy Possible side effects of pressotherapy include: (lymphatic drainage massage) ▶ short-term pain exacerbation, and its function ▶ petechiae, ▶ hematomas and bruises. Pressotherapy consists of sequential and directional pres- sure on a part of the body, where dedicated cuff is placed. 2.3. -
Page 10: Contraindications To Pressotherapy
2.4. Contraindications to pressotherapy ▶ pain or numbness of unknown origin, ▶ severe atherosclerosis or ischemia, ▶ vascular diseases are a relative contraindication to pressotherapy, ▶ pregnancy, ▶ hypertension, ▶ pacemaker, ▶ thrombophlebitis, ▶ skin diseases, moles, ▶ lymphangitis, ▶ dermatitis, wounds, ▶... -
Page 11: User Manual
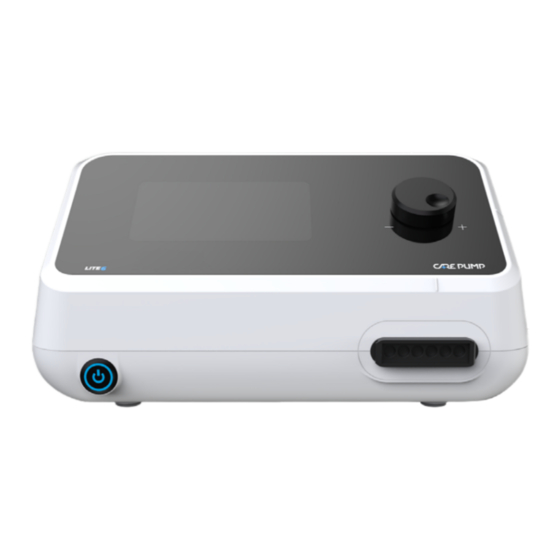
User manual It is absolutely necessary to read following user manual be- fore starting work with the device. 3.1. CarePump Lite6 device – front view main power switch input to connect the air ducts adjustment knob touch screen display 3.2. CarePump Lite6 device –... -
Page 12: Installation And Starting The Device
Installation and starting the device Before starting the device, check the completeness of the set and make sure if it has no defects or mechanical dam- age. In case of any noticed damage, contact the distribu- tor or manufacturer of the device. Do not proceed with the installation and starting the machine if the packaging is damaged. -
Page 13: How To Connect The Power Supply
4.1. How to connect the power supply Connect the power cord into the input on the back of the device. The cable should be fully inserted, please make sure it is firmly connected. Plug the other end of the cord into a power socket. -
Page 14: How To Connect The Air Ducts
4.2. How to connect the air ducts Connect the plug of a single air duct or the air duct splitter (in case you need to connect two cuffs at the same time) to the input located on the front of the case. When connect- ing the air duct or the splitter, pay attention to the notch which indicates proper connection of them. - Page 15 The next step is connecting the air duct to the cuff. The sep- arate ends of the air duct should be clipped into the individ- ual chambers of the cuff with correct order. The proper con- nection is indicated by a dark gray plug. The separate ends should be connected in following order: from the longest to the shortest one.
-
Page 16: Basic Device Configuration
Basic device configuration 5.1. Main screen mmHg To start the device, press the power button on the left side mmHg of the case. The blue diode will light up when the button is pushed. The device will start up and CarePump logo will ap- pear on the display. -
Page 17: Pressure Level
5.3. Pressure level To set the pressure level, press the circle with the number “0” next to the pressure unit „mmHg” . The pressure val- mmHg ue must be set using the adjustment knob. By turning to the right in the direction of “+”, the pressure will increase. By turning to the left in the direction of “-”, the pressure lev- el will decrease. -
Page 18: Treatment Time
5.4. Treatment time To set the treatment time, press the circle next to the time unit . The treatment time is default for each of the „min” work modes. The treatment time range that can be set in mmHg the device is 1-120 minutes. -
Page 19: Turning Off Individual Chambers
mmHg level 5.6. Turning off individual chambers The device allows you to turn off the chambers in the cuff level mmHg that need to be bypassed (they will not be inflated with air) during the treatment. By default, all chambers are turned on. -
Page 20: How To Start/Pause/Stop The Treatment
5.8. How to start/pause/stop the treatment After setting the parameters, you can start the treatment. To mmHg start the treatment, press the icon in the center “play” mmHg of the display. After pressing it, the treatment will start and this will be shown by the blinking chamber on the graphic image of the cuff and the elapsing time. -
Page 21: Provided Programs
5.9. Provided programs The device has four provided work/massage modes. Mode A The course of the treatment: Single filling of consecutive chambers while keeping the pressure in previously inflated chambers. ▶ Time: 50 min. ▶ Interval: ▶ Hold: Mode B The course of the treatment: Simultaneous filling of two consecutive chambers while keeping the pressure in the previously inflated chambers. -
Page 22: Mode C
Mode C The course of the treatment: Single filling of consecutive chambers while keeping the pressure in the previous inflated chambers, with the ex- ception of the first inflated chamber, which deflates during pumping of the third one. ▶ Time: 60 min. -
Page 23: Mode E
Mode E The course of the treatment: The chambers pump up one after another. After the second chamber is inflated, the third one begins to inflate and the first one deflates at the same time. When filling the fourth chamber, the second one deflates. The cycle ends when the sixth chamber is filled in this sequence. -
Page 24: Technical Parameters
Technical parameters Economic line Number of chambers Max. pressure [mmHg] Number of proprietary therapeutic pre-programs of the medical organization Precise regulation of pressure and time in steps of 1 Number of independent channels Adjustment of the speed of the treatment Cuffs system overlapping Display... -
Page 25: Contents Of The Package
Contents of the package The basic CarePump set includes: Central unit (device) Power cord... -
Page 26: Additional Accessories
Additional accessories The basic CarePump Lite6 set can be expanded with the following accessories. Air ducts are provided with the cuffs. arm cuff arm, shoulder and chest cuff double cuff for arms, shoulders and chest with extenders leg cuff leg cuff extension zipper waist cuff short pants short pants extension zippers (2 pcs.) - Page 27 Warnings Before starting work with the device, it is obligatory to read the manual and follow all the recommendations. Making technical changes to the device or using it in a man- ner inconsistent with the manual may result in the loss of warranty and in case of the need for intervention by an au- thorized service, may result in treating it as a commercial service.
- Page 28 10. Troubleshooting In case of a failure, we recommend you to perform a few simple steps before contacting the service. This will elimi- nate the situation in which the device will not be damaged or it will be easier to receive help from an authorized ser- vice center.
- Page 29 THE FUSE REPLACEMENT Attention! Before proceeding with checking the fuse, it is absolutely necessary to disconnect the device from the power supply! To check or replace the fuse, locate the power input on the back of the case. Below the socket for the power cord, there is a fuse drawer .
- Page 30 Maintenance and storage ▶ If the device is used as intended, the machine does not re- quire any special maintenance. ▶ Try to keep the cuffs clean and regularly wipe the main screen of the device. ▶ In case of a failure, first perform the actions described in the previous section.
- Page 31 Recommendations for transporting the device: Cleaning and disinfection ▶ CarePump devices do not require any special pre- Clean the device from dust and dirt with a soft, linen cloth. cautions. More difficult stains should be washed with a damp ▶ It is recommended to store and transport the devices sponge with a cleaning liquid based on water and alcohol in the packed, original box with foam moldings.
- Page 32 Utilization The product is regulated by WEEE, regarding waste segre- gation, as indicated by the following symbol on the label of the device: The product should be disposed of in dedicated places and points for electronic waste and in accordance with the pre- vailing law in the country where the device was used.
- Page 33 Declaration of Conformity and that the technical standards referenced below have been applied: Bardomed Sp. z o.o ul. Konecznego 6/66 PN-EN 61000-4-2:2011, PN-EN 61000-4-3:2021, PN-EN 61000-4-4:2013-05, Postal-code: 31-216 Kraków PN-EN 61000-4-5:2014-10/A1:2018-01, PN-EN 61000-4-6:2014-10, https://www.bardomed.pl PN-EN 61000-4-8:2010, under own responsibility hereby declare that the follow-...
- Page 34 Manufacturer BardoMed Sp. z o.o. ul. Konecznego 6/66 31-216 Kraków NIP: 945217693...