
Related Manuals for BARDOMED Care Pump EXPERT8

Summary of Contents for BARDOMED Care Pump EXPERT8
- Page 1 User Manual Lymph Drainage Therapy Device (Pressotherapy Device) UM_EN_CPEXPERT8_01...
-
Page 2: Table Of Contents
Table of contents 4.2.3. User programs 4.2.4. Favorite programs 4.2.5. Create a program Basic characteristic of the device 4.3. Pressure level 1.1. CarePump pressotherapy devices 4.4. Treatment time 1.2. Pressotherapy (lymphatic drainage massage) 4.5. Speed of filling the chamber and its function 4.6. - Page 3 10. Cellulite Advanced Troubleshooting 11. Regeneration Maintenance and storage 12. Prevention, Relaxation 13. All-Chamber Massage Utilization 4.13. Create a new program 4.13.1. Name the new program Terms of warranty 4.13.2. Setting parameters: time, speed, interval, hold 4.13.3. Chamber selection Safety warnings 5.1.
-
Page 4: Basic Characteristic Of The Device
Basic characteristic of the device CarePump pressotherapy 1.1. devices CarePump is a series of pressotherapy devices designed and manufactured as a result of many years of experience and research conducted by physiotherapy masters. Consul- tations with our clients regarding necessary functions, exp- loatation and comfort of use allowed us to create a diversi- fied line of devices adjusted to every need of medical staff, patients, athletes and all other users. -
Page 5: Pressotherapy (Lymphatic Drainage Massage)
The basic set that allows you to perform the treat- ment with CarePump device includes: Central unit (device) – used to set parameters such as: time, program, speed of pumping the chambers in the cuffs or pressure. Air ducts – used to supply air through independent chan- nels to the individual cuff chambers. -
Page 6: Indications To Pressotherapy
in with air in specified time and accordingly to programmed Indications to pressotherapy 1.3. cycle. This causes a sequential pressure effect which turns into a rhythmic wave. Lymphatic drainage massage is pos- It is recommended to perform pressotherapy every day. itively perceived as a very pleasant and effective way to re- Work mode, time of the treatment and drainage / massage generate and relax. -
Page 7: Contraindications To Pressotherapy
Contraindications 1.4. to pressotherapy ▶ pain or numbness of unknown origin, ▶ severe atherosclerosis or ischemia, ▶ vascular diseases are a relative contraindication to pressotherapy, ▶ pregnancy, ▶ hypertension, ▶ pacemaker, ▶ thrombophlebitis, ▶ skin diseases, moles, ▶ lymphangitis, ▶ dermatitis, wounds, ▶... -
Page 8: User Manual
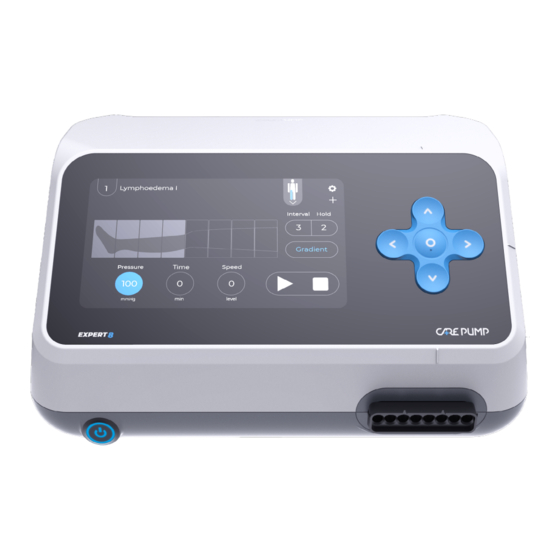
User Manual It is absolutely necessary to read following user manual be- fore starting work with the device. CarePump Expert8 device – 2.1. front view main power switch input to connect the air ducts control keyboard touch screen display CarePump Expert8 device – 2.2. -
Page 9: Installation And Starting The Device
Installation and starting the device Before starting the device, check the completeness of the set and make sure if it has no defects or mechanical dam- age. In case of any noticed damage, contact the distribu- tor or manufacturer of the device. Do not proceed with the installation and starting the machine if the packaging is damaged. -
Page 10: How To Connect The Power Supply
How to connect 3.1. the power supply Connect the power cord into the input on the back of the device. The cable should be fully inserted, please make sure if it firmly connected. Plug the other end of the cord into a power socket. -
Page 11: How To Connect The Air Ducts
How to connect the air ducts 3.2. Connect the plug of a single air duct or the air duct splitter (in case you need to connect two cuffs at the same time) to the input located on the front of the case. When connect- ing the air duct or the splitter, pay attention to the notch which indicates proper connection of them. - Page 12 The next step is connecting the air duct to the cuff. The sep- arate ends of the air duct should be clipped into the individ- ual chambers of the cuff with correct order. The proper con- nection is indicated by a dark gray plug. The separate ends should be connected in following order: from the longest to the shortest one.
-
Page 13: Basic Device Configuration
Basic device configuration Main screen 4.1. To start the device, press the power button on the left side of the case. The blue diode will light up when the button is pushed. The device will start up and CarePump logo will ap- pear on the display. -
Page 14: User Programs
▶ 4.2.2.2. Setting using the touch screen PROGRAMS Press the icon “Programs” in the upper left corner of the display. Then following screen will appear, where you can Existing programs select: “provided programs”, “user programs”, “favorite pro- User programs grams”, “create a program”. Favourite programs PROGRAMS To select one of the thirteen defined programs, press “pro-... -
Page 15: Pressure Level
Pressure level 4.3. To select the pressure level, press the circular area with Lymphodema a number in it, named “Pressure”. Lymphodema After clicking on the icon, a scrolling list with a pressure Interval Hold range of 20-220 mmHg will be displayed on the screen. Val- ues on the list can be displayed with an accuracy of 1, 5 and Interval Hold... -
Page 16: Treatment Time
Treatment time 4.4. To set the treatment time, press the circular area with Lymphodema a number in it, named “Time”. After clicking on the icon, a scrolling list with values 5-105 minutes will be displayed on Lymphodema Interval Hold the screen. Values on the list can be displayed with an ac- curacy of 1, 5 and 10. -
Page 17: Type Of The Cuff
Type of the cuff 4.6. CarePump devices allows to use the cuffs dedicated to dif- Lymphodema ferent parts of the body during the treatment. The course of the treatment can be displayed on a graphical image of the arm, leg, abdomen, hip and buttock area. To select the Interval Hold appropriate part of the body, click the “human body”... -
Page 18: Particular Chamber Selection
Particular chamber selection 4.7. The user of the device can freely configure the number and Lymphodema sequence of air-filling chambers. Each chamber can be turned off and each can be set to the same or lower pres- Lymphodema Interval Hold sure value than the pressure in the previous chamber. -
Page 19: Pressure Gradient
Pressure gradient 4.8. According to the methodology of lymphatic drainage mas- Lymphodema sage, the pressure value in each subsequent chamber should be lower than the value in the preceding chamber. Interval Hold „gradient” CarePump series of devices has function which allows the user to precisely set the pressure drop in the subsequent chambers. -
Page 20: Interval/Hold Function
Interval/Hold function 4.9. “Interval” The parameter allows you to precisely de- Lymphodema fine the time between subsequent cycles of filling the “Hold” chambers. The parameter allows you to pre- Interval Hold cisely set the time of keeping the maximum set pressure by the chambers. -
Page 21: Settings
Lymphodema Settings 4.10. Interval Hold SETTINGS To configure the settings, use the gear icon in the upper Gradient right corner of the screen Language Pressure Time Speed Sounds The settings menu allows you to select the language, modi- fy the sound, change the password, manage the end of the Password management mmHg level... - Page 22 Sounds – this option allows you to modify the voice mes- sages and sounds of the device. SOUNDS voice communicates/operation sounds, To disable/enable Voice communicates 100 % click the slider on the right. When the slider is highlighted, Device ready 96 % the device’s voice messages/sounds are turned on.
- Page 23 CHANGE PASSWORD Password management – clicking on this option will ac- Password protected tivate a menu that allows you to protect the device with Password **** a password. “password pro- To activate the password, click the option tected” in the slider on the right. “pass- To set or enter a new password, click on the option word”.
- Page 24 Other – folder containing additional functions that allow OTHER you to adjust the device interface to your own needs. End of therapy After finished cycle End of treatment ▶ – function that allows you to choose whether the treatment should end after the Entry screen Therapy view treatment time or after the end of the full cycle.
-
Page 25: How To Start/Pause/Stop The Treatment
How to start/pause/stop 4.11. the treatment After setting the parameters, you can start the treatment. Lymphodema “►” To start the treatment, press the icon in the lower right corner of the display. After pressing it, the treatment will start and this will be shown by the blinking chamber on Interval Hold the graphic image of the cuff and the elapsing time. -
Page 26: Provided Programs
Provided programs 4.12. CarePump series of devices has a list of provided programs, dedicated to regeneration, relaxation, various diseases etc. A detailed description of provided programs is presented below. 1. LYMPHOEDEMA I The course of the treatment: Single filling of consecutive chambers while keeping the pressure in previously inflated chambers. -
Page 27: Lymphoedema
3. LYMPHOEDEMA III The course of the treatment: Single ascending wave. The chambers inflate one at a time. While the third chamber is pumping, the first one deflates and the second one keeps the pressure. The sequence is repeated for consecutive pumped chambers. Always one chamber keeps the pressure. -
Page 28: Venous Oedema I
5. VENOUS OEDEMA I The course of the treatment: Single filling of consecutive chambers while keeping the pressure in the previously inflated chambers. ▶ Time: 45 minutes ▶ Speed: ▶ Interval: 3 sec ▶ Hold: 2 sec ▶ Gradient: 3 mmHg 6. -
Page 29: Lipoedema I
7. LIPOEDEMA I The course of the treatment: Single filling of consecutive chambers while keeping the pressure in the previous inflated chambers, with the ex- ception of the first inflated chamber, which deflates during pumping of the third one. ▶ Time: 60 minutes ▶... -
Page 30: Post-Injury Therapy
9. POST-INJURY THERAPY The course of the treatment: Single chamber filling while keeping the pressure in previ- ously inflated chambers. ▶ Time: 30 minutes ▶ Speed: ▶ Interval: 2 sec ▶ Hold: 2 sec ▶ Gradient: 4 mmHg 10. CELLULITE ADVANCED The course of the treatment: The treatment is divided into three sections, during which 2/4/6 chambers keep the pressure and the next two cham-... -
Page 31: Regeneration
11. REGENERATION The course of the treatment: Double ascending wave. Simultaneous inflation of two con- secutive chambers, while keeping the pressure in the two previously inflated chambers. Always two chambers keep the pressure. ▶ Time: 45 minutes ▶ Speed: ▶ Interval: 2 sec ▶... -
Page 32: All-Chamber Massage
13. ALL-CHAMBER MASSAGE The course of the treatment: All chambers inflate simultaneously and keep the pres- sure, performing a global massage. ▶ Time: 30 minutes ▶ Speed: ▶ Interval: 3 sec ▶ Hold: 2 sec ▶ Gradient: 0 mmHg... -
Page 33: Create A New Program
mmHg level Create a new program 4.13. Expert8 device can create and save 100 new user programs. PU2. THE NEW PROGRAM To create a new program, select “Programs” from the main Enter created program name menu and then the option “create a program”. Interval Hold 4.13.1. -
Page 34: Chamber Selection
4.13.3. Chamber selection Then select the chambers that will inflate during each treat- ment cycle. The selection can be made by pressing the field with the number of the particular chamber. After pressing, PU2. THE NEW PROGRAM the field will be highlighted in blue, which means that the selected chamber will be pumped in a given sequence. -
Page 35: Safety Warnings
Safety warnings CarePump series of devices has been designed in compli- ance with all safety standards and norms that allow them to be used. Please read the following chapter carefully, be- cause it will allow you for safe and hygienic use of the device in accordance with its intended purpose. -
Page 36: Possibility Of Injuries
Possibility of injuries 5.2. of atmospheric discharges and storms, immediately stop the treatment and disconnect the device’s power supply as It is forbidden to use the device on patients: mentioned above. ▶ under the age of 15, as the cuffs and doses are adapt- When disconnecting the power supply, pull it by the plug, ed to adults. -
Page 37: Safe Use And Maintenance
Safe use Correct use 5.3. 5.4. and maintenance of the cuffs The device’s operating environment should meet the follow- Safe use of the device cuffs contains the following principles: ing conditions. Non-compliance with them may result in per- ▶ Before putting on the cuffs, remove your watch, jew- sonal injury or permanent damage of the device. -
Page 38: Technical Parameters
Technical Advanced line parameters Number of chambers Max. pressure [mmHg] Number of proprietary therapeutic pre-programs of the medical organization Features for visually impaired / blind people voice assistant + special keyboard Smart Gradient' function mmHg, %, final pressure Hold function 1-50 Interval function 1-50... -
Page 39: Contents Of The Package
Contents of the package The basic Carepump set includes: Central unit (device) Power cord... -
Page 40: Additional Accessories
Additional accessories The basic Carepump set can be expanded with: wrist cuff with air duct lower limb cuff with air duct hip and abdomen cuff with air duct short pants cuff with air duct safety button with a cable for the patient, allowing him to stop the treatment at any time air duct splitter for simultaneous connection of two cuffs to the device. -
Page 41: Warnings
Warnings Before starting work with the device, it is obligatory to read the manual and follow all the recommendations. Making technical changes to the device or using it in a manner inconsistent with the manual may result in the loss of warranty and in case of the need for intervention by an authorized service, may result in treating it as a com- mercial service. -
Page 42: Troubleshooting
10. Troubleshooting In case of a failure, we recommend you to perform a few sim- ple steps before contacting the service. This will eliminate the situation in which the device will not be damaged or it will be easier to receive help from an authorized service center. PROBLEM CHECK Device turns on and there is a pump-... - Page 43 THE FUSE REPLACEMENT Attention! Before proceeding with checking the fuse, it is absolutely necessary to disconnect the device from the power supply! To check or replace the fuse, locate the power input on the back of the case. Below the socket for the power cord, there is a fuse drawer .
-
Page 44: Maintenance And Storage
Maintenance and storage ▶ If the device is used as intended, the machine does not re- quire any special maintenance. ▶ Try to keep the cuffs clean and regularly wipe the main screen of the device. ▶ In case of a failure, first perform the actions described in the previous section. - Page 45 Recommendations for transporting the device: Cleaning and disinfection ▶ CarePump devices do not require any special pre- Clean the device from dust and dirt with a soft, linen cloth. cautions. More difficult stains should be washed with a damp ▶ It is recommended to store and transport the devices sponge with a cleaning liquid based on water and alcohol in the packed, original box with foam moldings.
-
Page 46: Utilization
Utilization The product is regulated by WEEE, regarding waste segre- gation, as indicated by the following symbol on the label of the device: The product should be disposed of in dedicated places and points for electronic waste and in accordance with the pre- vailing law in the country where the device was used. -
Page 47: Terms Of Warranty
Terms of warranty Terms of warranty: CarePump device is covered by a 24-month warranty from the date of issue of the sales document. The above men- ▶ The starting date of the warranty period is the date of tioned warranty period applies to the unit of the device. issue of the sales document In case of accessories (air ducts, cuffs), it is 12 months. - Page 48 Declaration of Conformity Bardomed Sp. z o.o ul. Konecznego 6/66 31-216 Kraków https://www.bardomed.pl under own responsibility hereby declare that the following product(s): Type of equipment: massage device Type designation/models: Carepump Compact 4, Carepump Expert 8, Carepump Lite 4, Carepump Lite 6.
- Page 49 Manufacturer BardoMed Sp. z o.o. ul. Konecznego 6/66 31-216 Kraków NIP: 945217693...