Advertisement
Quick Links
®
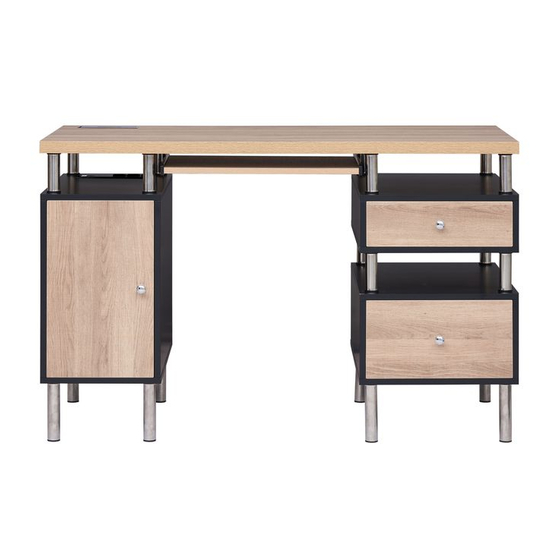
Elani Contemporary Two-Tone Desk
Assembly Instructions
Product Dimensions:
43.98"L×20"D×45"H
Please take a moment to read through the entire instruction booklet before assembly to
familiarize yourself with this product. Once you feel ready to start, follow the instructions
step by step and this should make this process as easy as we could make it for you.
If you need help or have damaged or missing parts, contact customer service at
www.NaomiHome.com.
© 2020 Naomi Home, Inc. - All Rights Reserved.
Page 1 of 20
Advertisement

Related Manuals for Naomi Home Elani Contemporary


Summary of Contents for Naomi Home Elani Contemporary
- Page 1 If you need help or have damaged or missing parts, contact customer service at www.NaomiHome.com. © 2020 Naomi Home, Inc. - All Rights Reserved. Page 1 of 20...
- Page 2 WARNING CAUTION ADULT ASSEMBLY REQUIRED CHOKING HAZARD This product includes small parts, sharp points and sharp edges in its unassembled state. • Keep unassembled parts away from children under 3 years of age, and animals. SAFETY WARNINGS Follow the information on the warnings appearing on table and on the •...
- Page 3 ASSEMBLY AT A GLANCE Please take a moment to read through the whole instruction booklet before assembly to familiarize yourself with this product. Once you feel ready to start, follow the instructions step by step and this should make this process as easy as we could mak e it for you. This drawing is to give you an overall idea only of how this assembly will go together and does not replace the assembly instructions.
-
Page 4: Component Parts
COMPONENT PARTS Please check that you have all the parts listed below 1. Top Panel ×1 2. Left Desk Top Panel×1 3. Left Desk Left Side Panel×1 4. Left Desk Right Side Panel×1 5. Left Desk Bottom Panel×1 6. Left Desk Door×1 7. - Page 5 ASSEMBLY HARDWARE 4×40mm Wood Dowel Cam Lock ×18 Screw ×20 Bolt ×24 ×26 Bolt ×8 4×18mm D CR 3×14mm Bolt ×8 Bolt ×3 Screw ×2 Drawer Slide ×2 ×3 Bolt ×8 Drawer Handle Bolt ×2 Page 5 of 20...
- Page 6 ASSEMBLY INSTRUCTIONS Select 25×1,D×1,E×1 and C×6. Insert D×1 into the 25 with the C×3.Repeat the steps for the E and 25. Select the F×4. Insert E into the B×2 with F×2. Repeat for the D. Page 6 of 20...
- Page 7 ASSEMBLY INSTRUCTIONS Insert the B×2 into one side of 1 with A×4.Repeat for another B×2. Page 7 of 20...
- Page 8 ASSEMBLY INSTRUCTIONS Select the H×8, G×8,R×8. Insert the H×4 and R×4 into the G×4 into the four holes of one side of 1. Repeat for the other side of 1. Select 8×2, 2×1, C×2,J×1, the Q×1,the S×2. Insert I×4 into 8. Repeat for the other 8.
- Page 9 ASSEMBLY INSTRUCTIONS Select the G×8, H×8, K×8. Insert the K×4 into four corner holes of 8 into the G×4 into the H×4. Repeat for Select 3×1, 4×1, the L×4 and the M×4. Insert 4 into 2 with L×2.Insert the M×2 into two bottom holes of 4.Repeat for the 3.
- Page 10 ASSEMBLY INSTRUCTIONS Install 7 into the grooves of 3 and 4. Insert K×4 into four corner holes of 5 into G×4 into N×4. Turn 5 upside down. Insert the 5 into 3 and 4 with O×4 and L×4. Install W×4 into N×4.
- Page 11 ASSEMBLY INSTRUCTIONS Insert the P into 9 with C×3. Repeat the steps for to 13. Insert the P into 10 with C×3. Repeat the steps for to 14. Select 8×1,9×1,10×1,L×4 and M×4. Insert M×2 into the two holes of 10.Insert 10 into 8 with L×2.
- Page 12 ASSEMBLY INSTRUCTIONS Install 12 into the grooves of 9 and 10. Select 11×1,G×4,K×4,L×4, O×4 and H×4. Insert K×4 into the four holes of 11into G×4 into H×4. Turn 11 upside down. Insert 11 into 9 and 10 with O×4 and L×4. Page 12 of 20...
- Page 13 ASSEMBLY INSTRUCTIONS Insert K×4 into 8 into G×4 into H×4 . Select 13×1,14×1,M×4,L×4. Insert M×2 into the two holes of 14. Insert 14 into 8 with L×2.Repeat for the 13. Page 13 of 20...
- Page 14 ASSEMBLY INSTRUCTIONS Install 15 into the grooves of 13 and 14 . Select 11×1,G×4,K×4,L×4, O×4,W×4 and N×4. Insert K×4 into the four holes of 11into G×4 into N×4. Turn 11 upside down. Insert 11 into 13 and 14 with O×4 and L×4. Install W×4 into N×4.
- Page 15 ASSEMBLY INSTRUCTIONS Insert V×2 into two sides of 6.Insert C×2 into J×1 into 6.Insert T×1 into U×1 into 6. Select V×2. Insert 6 into 2 and 5 with V×2. Page 15 of 20...
- Page 16 ASSEMBLY INSTRUCTIONS Select 17×1, 18×1,19×1,and O×4.Insert 17×1 into one side of 19×1 with O×2. Repeat for 18 into 19. Slide 20 along the grooves between 17 and 18.Insert 16 into 17 and 18 with I×2,L×2andM×2. Install the T and U into the hole of 16. Page 16 of 20...
- Page 17 ASSEMBLY INSTRUCTIONS Insert the P into 18 with C×3. Insert the P into 17 with C×3. Select 22×1, 23×1,24×1,and O×4.Insert 22×1 into one side of 24×1 with O×2. Repeat for 23 into 24. Page 17 of 20...
- Page 18 ASSEMBLY INSTRUCTIONS Slide 20 along the grooves between 22 and 23.Insert 21 into 22 and 23 with I×4and- M×4. Install the T and U into the hole of 21. Insert the P into 23 with C×3. Insert the P into 22 with C×3.
- Page 19 ASSEMBLY INSTRUCTIONS Put X onto the hole of 1. Put the two drawers in the cabinet of desk. Access the power panel by opening the top cover in the desk and reaching in to plug in devices. Page 19 of 20...
- Page 20 ASSEMBLY COMPLETE CONGR TUL TIONS, OUR NAOMI HOME ELANI CONTEMPORARY TWO-TONE DESK IS COMPLETE! Product Packaging Information Model #: ________________________________ Color: __________________________________ Shipment Ref. #: _________________________ ® www.NaomiHome.com Date: __________________________________ MADE IN CHINA Page 20 of 20...
Need help?
Do you have a question about the Elani Contemporary and is the answer not in the manual?
Questions and answers