Table of Contents
Advertisement
Quick Links
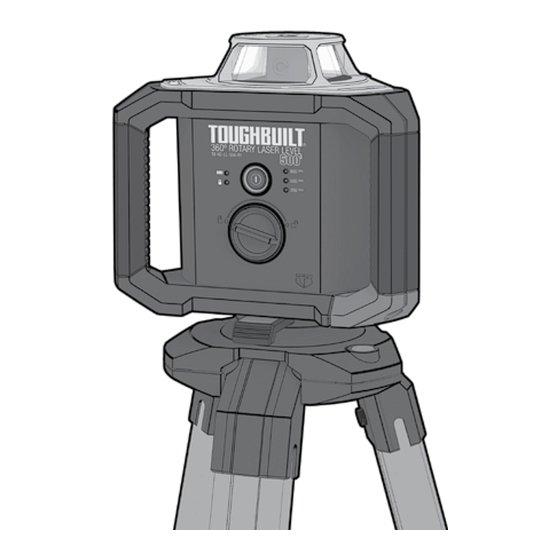
500' 360° ROTARY LASER LEVEL
TB-H2-LL-500-R1
Y
13
X
12
14
5
6
4
7
8
3
2
1
10
11
9
1
Battery Compartment/Lid
2
Power ON/OFF Push Button
3
Pendulum Lock/Unlock Switch
4
Pendulum Locked Indicator
5
Battery Charge Level Indicator
6
800 RPM LED Indicator
7
500 RPM LED Indicator
8
200 RPM LED Indicator
9
Dove Tail Slide Mount
10
5/8"-11 Tripod Mount
11
1/4"-20 Tripod Mount
12
"X" Axis Indicator
13
"Y" Axis Indicator
14
Laser Beam Outlet
ROLLING LASER RECEIVER
TB-H2-LLA-30
22
20
27
23
24
25
16
17
18
19
26
21
15
15
Battery Compartment/Lid
16
Power ON/OFF Push Button
17
Audio Signal Indicator Button
18
Accuracy Button
19
Attachment Magnet
20
Accuracy Level Indicator
21
Brake Release Pads x 2
22
LED Screen
23
Audio Volume Level Indicator
24
Battery Charge Level Indicator
25
Audio Speaker
26
Guide Rollers x 4
27
Centering Reference Marker x 2
QUICKSET TRIPOD
®
TB-H2-LLA-01
28
29
28
Bubble Level
29
Locking Legs
30
30
Rubber Caps
36
31
35
32
33
34
31
0 to 2' Subsection
32
Black - 2 to 4' Subsection
33
Yellow - 4 to 6' Subsection
34
White - 6 to 8' Subsection
35
Locking Detent
36
Hook-and-Loop Strap
TABLE OF CONTENTS
1.
SAFETY AND PRECAUTIONS
1
2.
PRODUCT INFORMATION
Intended Use
7
Features and Benefits
7
What is Included
8
9
3.
11
12
13
14
15
4.
16
17
17
19
20
5.
®
TRIPOD
21
22
6.
23
25
7.
27
8.
30
9.
30
31
31
Before using this product, review and familiarize
yourself with the contents of this manual.
The specifications and general appearance
of the instrument are subject to change without
notice and without obligation by ToughBuilt
®
Industries, Inc. and may differ from those
appearing in this manual.
Advertisement
Table of Contents
Troubleshooting

Related Manuals for TOUGHBUILT TB-H2-LL-500-R1


Summary of Contents for TOUGHBUILT TB-H2-LL-500-R1
-
Page 1: Table Of Contents
5/8"-11 Tripod Mount of the instrument are subject to change without Battery Charge Level Indicator 1/4"-20 Tripod Mount Yellow - 4 to 6' Subsection notice and without obligation by ToughBuilt ® Audio Speaker White - 6 to 8' Subsection “X” Axis Indicator Industries, Inc. - Page 2 Applicable when marking LASER LEVEL KIT reference points. + ROLLING LASER RECEIVER TB-H2S4-LL-500-R1 ToughBuilt Industries, Inc. 6671 S. Las Vegas Blvd. Leveling Outdoors Building D, Suite 210 Las Vegas, NV 89119 USA In outdoor scenarios over long distances,...
- Page 3 1. SAFETY AND PRECAUTIONS The label on your instrument may include the following symbols: Symbol Meaning General Safety Rules Volts This instrument is a sensitive, precision instrument and Milliwatts should be treated as such. WARNING! Read, understand and memorize all safety Laser Warning warnings and instructions listed below.
- Page 4 ƒ DO NOT use any optical instruments such as, but not ƒ Under abusive conditions, liquid may be ejected from the battery, avoid contact. If contact accidentally limited to, telescopes or transits to view the laser beam. occurs, flush with water. If liquid contacts eyes, Serious eye injury could result.
- Page 5 Yet, the possibility of causing interference in other manual. Use of unauthorized parts or failure to follow devices cannot be totally excluded. Maintenance instructions may create a risk of injury. IMPORTANT! ToughBuilt does not recommend ® FCC Cautions nor encourage the use of third-party accessories on this instrument.
- Page 6 2. PRODUCT INFORMATION What is Included 1 x 500' 360° Rotary Laser Level - TB-H2-LL-500-R1 Intended Use 1 x Rolling Laser Receiver - TB-H2-LLA-30 This instrument is a self-leveling rotating laser that projects 1 x QuickSet Tripod - TB-H2-LLA-01 ®...
-
Page 7: 8' Grade Rod
Material Aluminum Weight (without batteries) 3.47 lb (1,57 kg) Modular (4 sub- Type sections with push- *Range achieved only with ToughBuilt ® Receiver, model TB-H2-LLA-30. type lock detents) Stacked and secured by Storage built-in magnets and a hook-and loop strap... -
Page 8: 0' 360° Rotary Laser Level
3. 500' 360° ROTARY LASER LEVEL Powering ON Installing the Batteries The instrument can be used in either a Self-leveling Mode or Pendulum Locked Mode. Before installing or replacing batteries: Power-ON in the Self-Leveling Mode: CAUTION! ALWAYS make sure to turn the power OFF. In this mode, the laser level checks the horizontal position Ensure the Pendulum Lock/Unlock Switch is in the... -
Page 9: Powering Off
Important Tips LED Indicators on the Control Panel LED Indicator Setting LED Light Locked Solid RED Pendulum Lock/ Unlocked Unlock Switch Sufficient run Solid GREEN capacity Prior to removal or relocation of the instrument, ALWAYS Replace batteries Solid RED rotate the Pendulum Lock/Unlock Switch to the LOCKED Replace batteries Flashing RED... -
Page 10: Troubleshooting
2. Lower the lid and push it down to snap into place. Pendulum Cannot Lock/Unlock Rotate the Lock/Unlock Switch the Switch is in Switch switch to the Unit OFF the UNLOCKED LOCKED position position Contact ToughBuilt Customer Service for additional ® support (US): 1 (800) 228-4695... -
Page 11: Powering On
Powering ON ƒ To turn OFF the backlight completely, press and hold the Audio and Accuracy Buttons simultaneously Press the Power ON/OFF Button once to turn the for 2 seconds. instrument ON. Audio Volume Adjustments ƒ Display screen will light up briefly. ƒ... -
Page 12: Important Tips
Push the Audio Button setting. turned OFF ƒ Pressing the Accuracy Button again will switch back to fine setting. Contact ToughBuilt Customer Service for additional ® NOTE: support (US): 1 (800) 228-4695 Course setting allows faster detection and centering of the laser beam. -
Page 13: Quickset
5. QUICKSET TRIPOD Assembly ® Mounting Rotary Laser Level to Tripod ToughBuilt tripod has two-stage extendable Locking Legs ® and Rubber Caps for use on multiple surfaces. IMPORTANT! Before mounting the instrument to the tripod, stabilize the tripod to reduce the chance of tipping. -
Page 14: Grade Rod
6. 8' GRADE ROD 4x Subsections Assembled CAUTION! Take care not to deface the graduations on the grade rod. The 8' grade rod consists of four 2' subsections, which are slip-fitted onto one another and locked in place by Locking Detents . -
Page 15: Assembly
Assembly 3. To reposition the rolling receiver over the grade rod, squeeze the two brake release pads and proceed. You may release the two brake pads to lock the receiver onto the grade rod. To Mount the Receiver to the Grade Rod The receiver will remain secured on the grade rod. -
Page 16: Accuracy Check
7. ACCURACY CHECK 5. Find the directional planes of the X and Y Axis marked on the top side of the instrument. IMPORTANT! Laser beam widens over distance; therefore, ALWAYS take measurements at the center of the beam. However, for the sole purpose of accuracy check, since the distance between the instrument and the target remains constant, you may use the lower edge of the beam as reference. -
Page 17: Maintenance
CHEMICALS. Laser reflectors shall be wiped with a lint free support. cloth only. DO NOT USE PAPER TOWEL. Accessories IMPORTANT! To reduce the risk of injury, only ToughBuilt ® accessories should be used with this product. Storage ƒ ALWAYS store the instrument in its original container. -
Page 18: Warranty And Registration
(Proof of purchase is required to register the product). IMPORTANT! Alkaline batteries that ship with the tool are not warranted by ToughBuilt ® For warranty details, visit: www.toughbuilt.com Online Registration 1. Visit: https://toughbuilt.com/register-your-product or scan the QR code below to begin the product registration.
Need help?
Do you have a question about the TB-H2-LL-500-R1 and is the answer not in the manual?
Questions and answers