Table of Contents
Advertisement
Advertisement
Table of Contents

Related Manuals for Blaupunkt BTV3TB


Summary of Contents for Blaupunkt BTV3TB
- Page 1 Instruction Manual Full HD Digital Set Top Box - BTV3TB...
-
Page 3: Table Of Contents
CONTENTS General Safety Product Overview Remote Control First Time Setup EPG (Electronic Program Guide) / Recording Schedule List Record List Menu Installation Channel Preference Setting AV (Picture) Media Centre Troubleshooting Specifications Support Last Page... -
Page 4: General Safety
GENERAL SAFETY Read this manual thoroughly before you start using the Set Top Box. Store this manual, the completed warranty card, your receipt and the product packaging. The safety precautions instructions reduces the risk of fire, electric shock and injury when correctly complied to. - Page 5 GENERAL SAFETY (CONT.) IMPORTANT INFORMATION • Do not expose this appliance to rain or moisture as it may result in fire or an electric shock hazard • Do not temper or change or modify the product in any way. • Only use Accessories outlined and recommended by the manufacturer. •...
- Page 6 GENERAL SAFETY (CONT.) Please make sure upon positioning this product, the place is: • Not wet or damp and Well ventilated • Away from direct sunlight or heaters. • Away from splashes or food. • Protected from excessive dust or grease. •...
-
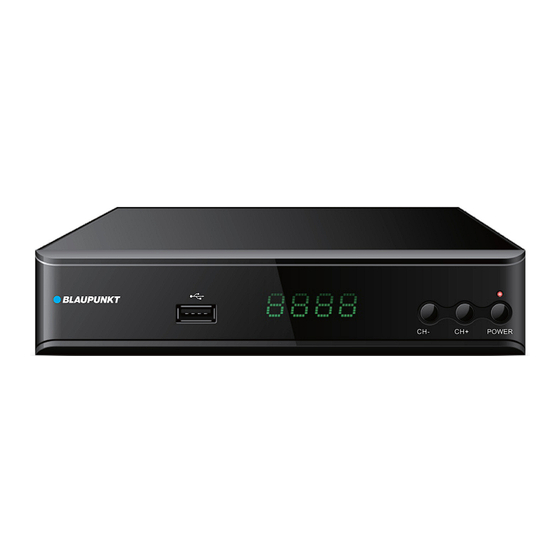
Page 7: Product Overview
PRODUCT OVERVIEW USB Input RF (ANTENNA) LED Display RF (ANTENNA) Look through CHANNEL DOWN Coaxial CHANNEL UP Composite (Video/Audio L and R) Power On/Off... -
Page 8: Remote Control
REMOTE CONTROL Power ON/OFF MUTE/UNMUTE PREVIOUS/REWIND FASTFORWARD/NEXT PREVIOUS CHANNEL REPEAT MULTIMEDIA FILE ZOOM IN/OUT TV UI ADJUST VIDEO FORMAT STOP SCHEDULED RECORDINGS PLAY/PAUSE GOTO TIME IN MULTIMEDIA FILE FAV CHANNELS TELETEXT SUBTITLES ON/OFF AUDIO MODE EXIT MENU DISPLAY MENU SELECT/OK DIRECTION KEYS CHANNEL LIST INFORMATION... -
Page 9: First Time Setup
First Time Setup Initial install Select desired language (default English) Country: Australia. Default: On Select Next. TV will commence Tuning... -
Page 10: Epg (Electronic Program Guide) / Recording
EPG (Electronic Program Guide) / Recording EPG (Electronic Program Guide) is used to view all channel programs and times. Set reminders, schedule or commence recording a TV Program immediately. NOTE: To allow recording/PVR functions to work, you must have a USB DRIVE inserted into the front of the Set Top Box. -
Page 11: Schedule List
Schedule List Press TIMER on the Remote control to display SCHEDULE LIST. Once you have set a “Scheduled Recording” from the EPG menu, you can then view all your upcoming recordings via the SCHEDULE LIST. Manage all your upcoming recordings, delete edit or delete. Record List To access the recorded list, press USB button on the remote control to bring up the device list, press OK to select the folder and the below will... -
Page 12: Installation
MENU - Installation Press MENU on your remote control to access the above settings. Access this MENU if you want to search for a missing Program or manual search to find a channel. Navigate using LEFT or RIGHT direction keys on your remote control, Press OK or UP direction key to enter the desired MENU. -
Page 13: Channel
MENU - Channel Navigate using LEFT or RIGHT direction keys on your remote control, Press OK or UP direction key to enter the desired MENU. Press EXIT key to go back to previous MENU option. -
Page 14: Preference
MENU - Preference OSD Language - Langauge text of the Set Top Box. OSD Timeout - Timing of a menu (volume) will appear for when used. OSD Transparency - Lighten the menu, higher the % more you can see through the menu displayed. 1st and 2nd Subtitle - Set extra langauge subtitles set as default which can be accessed while watching TV. -
Page 15: Setting
MENU - Setting Timers - Countdown timer. Child Lock - Lock the Set Top Box with a password to prevent use. NOTE: please write down the password and put in safe place. Date Time - Set the date and time of your Set Top Box, be sure to set correctly to it works alongside PVR and EPG viewing. -
Page 16: Av (Picture)
MENU - AV (Picture) Aspect Ratio - To select the aspect ratio of the Set Top Box (Full Screen or 16 : 9 recommended). Video Output - Select the video cable output connected from the set top box to the TV. Video Resolution - Select the Video resolution output to match that of your tv (up to 1080p). -
Page 17: Media Centre
MENU - Media Centre Multimedia - Select this to access videos, photos or audio files through USB drive inserted into the Set Top Box. PVR Config - Adjust the settings of your PVR recording options. -
Page 18: Troubleshooting
TROUBLESHOOTING... -
Page 19: Specifications
SPECIFICATIONS VHF: 170-230MHz Tuner UHF: 470-860MHz Output: 480i/480p/576i/576p/720p/ Video 1080i/1080p Audio Coaxial, L & R Audio up to 500GB supported Video: avi. mpg, .dat, .vob, .div, .mov, .mkv Audio: WMA,MP3,AAC Photo: JPEG, BMP, PNG, GIF Power Supply 220-240V ~ 50/60Hz Power Consumption 10W Max. - Page 20 CUSTOMER HELPLINE: info@ayonz.com DISTRIBUTED BY: Ayonz Pty Ltd...
Need help?
Do you have a question about the BTV3TB and is the answer not in the manual?
Questions and answers
How do I change the time
To change the time on a Blaupunkt BTV3TB, go to the MENU, navigate to "Setting," and select "Date Time" to set the date and time of the Set Top Box. Use the remote control to make selections.
This answer is automatically generated
How do I get back to another chanel when it taping and the channel taping is playing
The Blaupunkt BTV3TB does not mention the ability to switch channels while recording. Typically, single-tuner set-top boxes can only record the channel currently being viewed.
This answer is automatically generated
Cannot tune any channels from new hiscence smart tv
To tune channels on a Blaupunkt BTV3TB Set Top Box connected to a Hisense smart TV:
1. Use the remote control for the Blaupunkt BTV3TB.
2. Press the OK or UP direction key to enter the MENU.
3. Navigate to the "Channel" menu using the LEFT or RIGHT direction keys.
4. Follow on-screen instructions to scan or tune channels.
5. Use the EXIT key to go back to the previous menu if needed.
Make sure the Set Top Box is properly connected to the TV input and the TV is set to the correct source (e.g., HDMI).
This answer is automatically generated
It says it's recording but when we press the usb button to bring up the program to play, nothing happens
The Blaupunkt BTV3TB may not be playing recordings when the USB button is pressed due to the following reasons:
1. Incorrect Navigation – After pressing the USB button, the user must select the correct folder and confirm with the OK button to access the recorded files.
2. Unsupported File Format – The recorded files must be in a supported video format such as .avi, .mpg, .dat, .vob, .div, .mov, or .mkv.
3. USB Drive Issues – The USB drive may not be properly inserted, faulty, or not supported (ensure it is up to 500GB).
4. Corrupt Recordings – If the recordings are incomplete or corrupted, they may not play.
5. Schedule List Misconfiguration – The recording may not have been successfully scheduled or completed.
Checking these factors should help resolve the issue.
This answer is automatically generated
can I watch tv on another channel whilst recording?
can I watch all other channels during recording a program?
how do i connect the Blaupunkt set top box to my 2006 Pioneer tv model PDP-427XDA. Antenna? cables?
How to change channels using numeric keypad on remote? Channel up and down works .
initial set up not appearing on screen????
when i put usb with photos into box and move to photos at top the machine it goes crazy