
Related Manuals for Numark CDN-34S


Summary of Contents for Numark CDN-34S
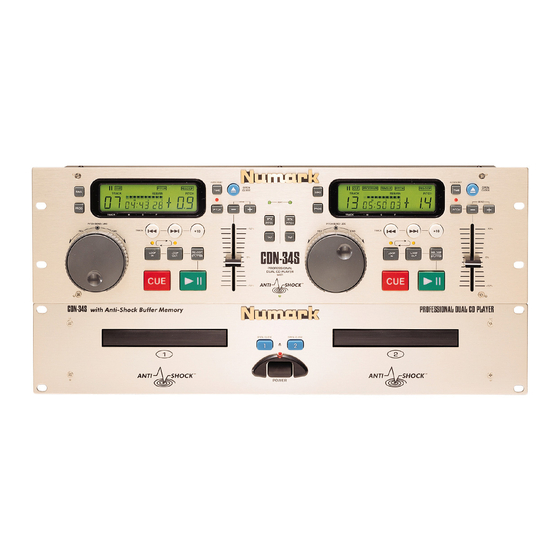
- Page 1 ® Professional Disc Jockey Products CDN-34S PROFESSIONAL DUAL CD PLAYER with Buffered memory OPERATING MANUAL ©1999 Industries http://www.numark.com...
-
Page 2: Safety Instructions
6. Heat - Avoid placing this product to close to any high heat sources such as radiators. ©1999 Numark Industries 7. Ventilation - The appliance should be situated so that it’s location or position does not interfere with it’s proper ventilation. For example, the appliance should not be situated on a bed, sofa, rug, or similar surface that may block the ventilation opening;... -
Page 3: Line Voltage Selection
Please return the enclosed warranty card to register your CD player with us. MODEL: ___________________________ SERIAL NUMBER: __________________ ©1999 Numark Industries NOTICE CONCERNING FCC REGULATIONS This equipment generates and uses radio frequency energy and may cause interference to radio and... - Page 4 PROFESSIONAL DUAL CD PLAYER CONGRATULATIONS... You have just purchased the worlds first dual-transport CD player with anti shock memory, seamless looping, and stuttering, designed specifically for the professional DJ. This unit has been designed to provide total ease in CD mixing with ultimate creativity. Please take a few moments to familiarize yourself with the unique features of the CDN-34 by reading the following information before attempting to operate the unit.
- Page 5 Looping Explained Stuttering Fun Before Switching off the Power Troubleshooting Guide Information and Specifications Warranty ©1999 Numark Industries TABLE OF CONTENTS CHECK TO BE SURE THE FOLLOWING ITEMS ARE IN THIS BOX: 1) DUAL-TRANSPORT PLAYER UNIT 1) REMOTE CONTROL UNIT...
- Page 6 6 seconds per side and not stop. When the CD is first placed in the tray and a track is selected, the CD player quickly reads the beginning of the track and stores it into a buffer memory, the same way a computer stores information in RAM.
-
Page 7: Mounting Your Cd Player
DIGITAL OUTPUTS: This CD player is specially equipped with digital outputs. The format is type 2, form 1, also known as S/PDIF (Sony/Phillips Digital Interface Format). In order to use the digital output you must activate the rear panel switch. - Page 8 10. SEARCH WHEEL (OUTER RING) - This wheel has 3 forward and 3 reverse speed positions for searching ©1999 Numark Industries through songs. The more you turn the wheel in either direction, the faster you search through the music.
-
Page 9: Lcd Display Features
14. SECONDS - Shows the seconds elapsed or remaining depending on mode setting. 15. FRAMES - The CD Player breaks down a second into 75 frames for accurate cueing. This shows the frames elapsed or remaining depending on mode setting. - Page 10 Note: If the “LOOP IN” button is depressed during play for any reason as explained in LOOPING and STUTTERING, a new cue point will be set on the fly. ©1999 Numark Industries - The Leader in DJ Technology - 10 -...
-
Page 11: Matching The Beats Per Minute (Bpm)
Match the tempo by monitoring the music of both PLAYER 1 and PLAYER 2 by ear and adjusting the pitch. When the tempo of the music of the selected CD player is slow compared to the tempo of the other player, move the slider to the (+) side and match the tempo. -
Page 12: Relay Play
2. Hold down the time button for 1-2 seconds to activate the fader start capability. 3. Follow the directions in your mixer manual Typically if you move the crossfader toward the active channel, the attached CD player will activate. When it is moved away that side will cue, (similar to pressing the cue button). - Page 13 EXAMPLE OF MIXING USING BOTH PLAYERS OF YOUR CD PLAYER While playing a disc on PLAYER 1 load a disc into PLAYER 2 and select your next track, match its pitch to the track playing on PLAYER1 and when you are ready use the crossfader on your mixer to fade from PLAYER 1 to PLAYER 2.
- Page 14 LOOP IN LED will turn off. This indicates that the CD player has stored a “LOOP IN” point but the point is not accessible until the CD player plays through the “LOOP IN” point. The ”CUE” button will return you to the start position until you play through the “LOOP IN”...
- Page 15 The LEDs will flash during the loop and then become solid following the loop. The second function of this button is described in the section called “STUTTERING FUN” - The Leader in DJ Technology ©1999 Numark Industries http://www.numark.com - 15 -...
- Page 16 DO NOT USE THE TRACK BUTTONS**. If the CD player is presently in play mode, the song will return to the “LOOP IN” point and continue playing the LOOP.
- Page 17 Carefully read all of the following conditions to fully understand this button’s operation. Don’t forget this button serves two functions depending upon the CD player’s state of play. 1. If the CD is paused either at the beginning of a track or at some other “CUE”...
-
Page 18: Before Switching Off The Power
CDN-34S BEFORE SWITCHING OFF THE POWER: When you have finished using the CD player, be sure that the disc tray is closed with the “OPEN/CLOSE” button before switching off the power. DO NOT switch off the power when the disc holder is open. -
Page 19: Specifications
(Track 1 ->Track 20) Instant start Pitch control range Pitch bend Digital Output S/PDIF (Sony/Phillips Digital Interface Format) CONTROL UNIT 132mm 482mm 74mm 60mm ©1999 Numark Industries GENERAL Dimensions: 16-bit 8 times 20Hz-20KHz 86dB 0.01% Weight: 94dB 2.0Vrms Power Supply: less than 1.7sec... -
Page 20: Limited Product Warranty
NUMARK dealer and continuing for the following period of time after that date for (2) Years. The warranty is extended to (3) Years with the completion of the warranty card provided that the warranty card is completed and returned within (30) days from the date of purchase.