Advertisement
Quick Links
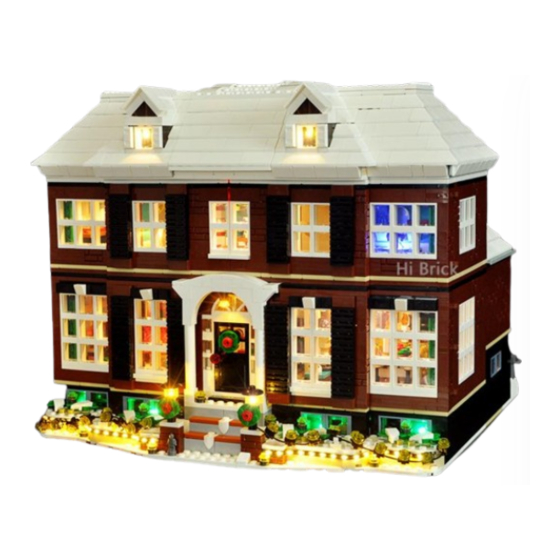
21330 Home Alone(classic style)
Product List:
Part Name
4-Port Expansion Boards
6-Port Expansion Boards
8-Port Expansion Boards
15CM Bit Light Green
30CM Bit Light Green
30CM Bit Light Red
15CM Bit Light Warm White
30CM Bit Light Warm White
30CM Bit Light Blue
Connecting Cobles 15CM
Connecting Cobles 30CM
15CM Enhanced Bit Light Warm White 5
LED Strip Lights Warm
LED Strip Lights Warm White
Battery box AA (USB port)
USB Connecting Cables
Parts Package
LED Light Kits
quantity
1
3
2
2
2
3
6
3
1
3
4
1
3
1
1
1
1
Advertisement

Related Manuals for LEGO Home Alone 21330


Summary of Contents for LEGO Home Alone 21330
- Page 1 21330 Home Alone(classic style) LED Light Kits Product List: Part Name quantity 4-Port Expansion Boards 6-Port Expansion Boards 8-Port Expansion Boards 15CM Bit Light Green 30CM Bit Light Green 30CM Bit Light Red 15CM Bit Light Warm White 30CM Bit Light Warm White 30CM Bit Light Blue Connecting Cobles 15CM Connecting Cobles 30CM...
- Page 2 Precautions: Route wires above and below the baseplate The wires can be placed between the building block and the board or under the block, but they should be placed between the studs correctly Install dot lights on the building blocks Please make sure they are placed correctly (yellow LED components are exposed).
- Page 3 Connect the connecting cables to the strip lights Put the battery into the battery box Several battery boxes have different specifications, please pay attention to the positive and negative poles of the battery.
- Page 4 Installation Notes Take out the button cell box and insert 2 CR2032 coin cells correctly (Sorry, because the battery is dangerous, we can’t provide it, you need to buy it at a convenience store) Take out the button cell box and 8-Port Expansion Boards...
- Page 5 Take : 1pcs-15cm dot lights warm white After the test, turn off the power, pull out the dot lamp,leave the 8-port expansion boards on the power supply If you want to keep the light on, you can turn on the USB power supply...
- Page 6 Begin Separate the upper and lower floors of the building...
- Page 7 Remove the ground string lights, and remove the parts shown by the arrow...
- Page 8 Remove the parts indicated by the arrow one by one...
- Page 9 Here can be operated with the aid of the starter...
- Page 12 With the help of a lifter, pry a gap between the bottom of the first floor and prepare to remove the window...
- Page 13 In the same way, pry open the bottom plate above the other window Remove the two windows...
- Page 14 Remove the black plate shown by the arrow...
- Page 15 Tack:1pcs-30CM Bit Light Green,1pcs-Double-sided tape, Put the light-emitting side of the lamp chip outwards and paste it on the double-sided tape...
- Page 16 Paste the lamp pellet to the position as shown, with the wire facing outward Arrange the wires and pass along the gaps between the raised particles Restore the black plate, fix the wire...
- Page 17 Take: 1pcs-30CM Bit Light Green, In the same way, install the lamp pellets to the position shown in the figure and arrange the wires...
- Page 18 还原黑色平板,固定导线 Restore the black plate, fix the wire In the same way, restore another window and compact the gap...
- Page 19 Arrange the wires and pass along the gaps between the raised particles...
- Page 20 Restore the white parts, fix the wires, and continue to organize the remaining wires Restore the removed parts...
- Page 21 Remove the parts indicated by the arrow...
- Page 22 Take: 1pcs-LED Strip Lights Warm, Start the installation from the end shown by the arrow Tear off the adhesive tape...
- Page 23 Paste the light strip to the position shown As shown, attach the wire to the edge...
- Page 24 Restore the parts, fix the wires Arrange the wires to bypass the raised particles...
- Page 25 Restore the plate, fix the wires, and continue to organize the remaining wires Restore the parts, fix the wires...
- Page 26 Take out the lighting in front of the house and disassemble it Take:1pcs-15CM Bit Light Warm White...
- Page 27 Place the light-emitting surface of the lamp chip on the black bump, pay attention to the direction of the wire...
- Page 29 Remove the parts indicated by the arrow one by one...
- Page 31 In the same way as before, remove the 2 windows with the help of a lifter...
- Page 32 Remove the black plate under the window...
- Page 33 Take:1pcs-15CM Bit Light Green,1pcs-Double-sided tape, Put the light-emitting side of the lamp chip outwards and paste it on the double-sided tape...
- Page 34 Paste the lamp pellet to the position shown in the figure, and guide it along the middle of the raised pellet Restore the plate, fix the wire...
- Page 35 Take:1pcs-15CM Bit Light Green, In the same way, install the lamp pellets to the position shown in the figure and arrange the wires Restore the plate, fix the wire...
- Page 36 Restore 2 windows and restore the gap Arrange the wires and pass along the gaps between the raised particles...
- Page 38 Take:1pcs-8-Port Expansion Boards,Divide the lamp pellets into 8 in turn, and wrap them appropriately...
- Page 39 Insert the light strip plug into 8-Port Expansion Boards Take:1pcs-15CM Bit Light Warm White,Insert 8-Port Expansion Boards...
- Page 40 Turn on the power, the test light is on normally After the test, turn off the power and unplug the USB cable...
- Page 41 Take:1pcs-Connecting Cobles 30CM,Insert 8-Port Expansion Boards Place 8 seats in the gap as shown in the figure, with the lamp pellets and connecting wires on the left...
- Page 42 Remove the parts indicated by the arrow Paste another piece of light strip to the position shown...
- Page 43 Arrange the wires and fit the parts through Restore the parts, fix the wires...
- Page 44 Continue to organize the wires, pass along the middle of the raised particles, and stuff the excess wires into the gap below Restore the parts, fix the wires...
- Page 45 Remove the lampshade and prepare to install the warm light pellets on the 8 seat Place the light-emitting surface of the lamp particle on the black raised particle, paying attention to the direction of the wire...
- Page 46 Restore the lampshade and fix the lamp pellets Place the lighting close to the building and plug the excess wires into the...
- Page 47 The lamp wire is completely plugged into the gap and avoids the raised particles Restore the parts, fix the wires...
- Page 48 Restore lighting Pull the connecting line into the room along the gap in the wall...
- Page 49 Restore the white step parts Take:15CM Bit Light Warm White,Draw out the parts as shown and disassemble...
- Page 50 Pass the lamp pellet plug through the side of the big black hole Bend the light bulb 90 degrees with the light-emitting side facing up...
- Page 51 Wear it to the end, so that the lamp pellet is just in the center of the part Restore the parts and fix the lamp pellets...
- Page 52 Restore the part, pay attention to the direction of the wire Remove the black plate...
- Page 53 Organize the wires and bypass the raised particles Restore the black plate, fix the wire...
- Page 54 Restore the part as a whole Lift up the beam and remove it...
- Page 55 Remove the white part shown by the arrow Take:1pcs-15CM Enhanced Bit Light Warm White...
- Page 56 Place the light-emitting surface of the lamp on the garland with the light-emitting side facing down, and the wire will pass through the corner of the part Restore the white parts and fix the wires...
- Page 57 Attach the lamp pellet to the white part with the light-emitting side facing out Remove the black plate shown by the arrow...
- Page 58 Organize the wires and bypass the raised particles in an S-shape...
- Page 59 Restore the plate to fix the wires, and continue to organize the wires Restore the parts, fix the wires...
- Page 60 Restore the beam With the help of the lifter, remove the parts shown on the right side of the door...
- Page 61 Organize the connecting lines and bypass the raised particles Restore the parts, fix the wires...
- Page 62 Take:1pcs-Connecting Cobles 15CM,1pcs-LED Strip Lights Warm White Insert the connecting wire at the wall into the socket on the other end of the light bar...
- Page 63 Tear off the light strip adhesive Paste the light bar to the position shown in the figure, pay attention to the free 15cm connecting line on the left...
- Page 64 Remove the black plate shown by the arrow...
- Page 65 Pass the socket cable on the right side of the light bar around the raised particles Restore the plate, fix the wire...
- Page 66 Continue to organize the left connection, bypassing the raised particles Restore the black plate, fix the wire...
- Page 67 As shown in the picture, pass the connecting wire around the raised particles Restore the black plate, fix the wire, and remove the parts shown by the arrow...
- Page 68 Remove the watch cover...
- Page 69 Take:1pcs-15CM Bit Light Warm White Put the light-emitting surface of the lamp particle down and place it in the position shown in the figure, and the wire will pass through the middle of the raised particle...
- Page 70 Restore the upper cover, fix the lamp pellet Restore the clock and attach the wire to the corner...
- Page 71 As shown in the picture, arrange the wires Restore the plate, fix the wire...
- Page 72 Restore the left slab Go to the back of the building and remove the parts indicated by the arrow in turn...
- Page 74 Remove the indoor fireplace as a whole...
- Page 75 Remove the flame Take:2pcs-30CM Bit Light Red...
- Page 76 Place the light-emitting surface of the lamp chip on the black bump Restore the parts and fix the lamp pellets...
- Page 77 In the same way, install another flame lamp pellet Restore the flame...
- Page 78 Pull the 2 wires to the left side of the fireplace Restore the fireplace...
- Page 79 Attach the wire to the edge of the part and pass along the gap between the raised particles...
- Page 80 Restore the windows, fix the wires, and remove the wall shown by the arrow...
- Page 81 Pull the wire back into the room along the middle of the raised particles Restore the wall, fix the wire...
- Page 82 Restore the removed parts one by one...
- Page 83 Take:1pcs-8-Port Expansion Boards,,Insert all the 6 plugs in the room into 8 sockets Remove the 8-seater adhesive...
- Page 84 Wrap the excess wire on the 8 seat appropriately Take 2 double-sided tapes. Paste on both sides of the back of seat 8...
- Page 85 Take:1pcs-Connecting Cobles 5CM, Paste 8 seats to the position shown...
- Page 86 Take:1pcs-6-Port Expansion Boards,Insert the USB cable into 6 sockets Insert the 5cm cable on the 8 seat into the 6 seat...
- Page 87 Turn on the power, the test light is normally on, after the test, turn off the power, and temporarily place the building aside Take out the kitchen building...
- Page 88 Break down the building Lay the second floor on its side...
- Page 89 Take:1pcs-15CM Enhanced Bit Light Warm White,1pcs:1x2 parts(The color is subject to actual receipt and does not affect the installation) Place the light-emitting surface of the lamp chip outward, install it in the position shown in the figure, and fix the wire with 1x2 parts...
- Page 90 将建筑回正,拆下箭头所示底板零件...
- Page 91 Pass the wire along the included angle Restore the bottom plate, fix the wire, and remove the parts shown by the arrow...
- Page 92 Take:1pcs-4-Port Expansion Boards,Insert the wires into the 4 sockets...
- Page 93 Turn to the other side and remove the parts indicated by the arrow in turn...
- Page 95 Take:1pcs-15CM Bit Light Warm White,Place the light-emitting surface of the lamp chip on the black bump Restore the lampshade, fix the lamp pellet, and remove the parts shown by the arrow...
- Page 96 Take:1pcs-30CM Bit Light Warm ,WhiteDisassemble the removed wall lamp...
- Page 97 Place the light-emitting surface of the lamp particle on the raised particle, paying attention to the direction of the wire Restore the lampshade and fix the lamp pellets...
- Page 98 Restore the wall lamp Restore the door...
- Page 99 Organize the wire and pull it to the left, bypassing the raised particles Restore the parts, fix the wires...
- Page 100 Pass the right wall lamp wire around the raised particles Restore the L-shaped parts to fix the wires, and remove the parts shown by the arrow...
- Page 101 Continue to organize the wire of the left wall lamp, and it is S-shaped to bypass the raised particles...
- Page 102 Restore the black parts and fix the wires Remove the microwave...
- Page 103 Take:1pcs-Connecting Cobles 15CM,1pcs-LED Strip Lights Warm White...
- Page 104 Insert the spare lamp pellet plug into the socket on the other end of the light bar Tear off the light strip adhesive...
- Page 105 Paste the light bar at the position shown on the roof and the connecting line on the right...
- Page 106 Take:1pcs-Connecting Cobles 30CM, Temporarily place the 4 seats at the position shown in the figure, and twist the excess wires together properly...
- Page 107 Place the 4 seats in the position shown in the figure, and pull the 2 connecting lines to the outside along the wall Restore the microwave oven, fix the wire, and remove the black plate shown by the arrow...
- Page 108 Pass the 30cm connecting line along the included angle of the part...
- Page 109 Restore the black plate, fix the wire Restore the removed parts...
- Page 110 Prepare to restore the roof, arrange the excess wires and attach them to the roof Restore the roof...
- Page 111 Restore the substructure Combine the kitchen with the first floor...
- Page 112 Attach the 30cm cable of the kitchen to the wall Insert the cable into the 6 sockets connected to the USB cable...
- Page 113 Turn on the power, the test light is normally on, and the test is complete, turn off the power...
- Page 114 Take out the superstructure and decompose Open the wall...
- Page 115 Remove the parts indicated by the arrow one by one...
- Page 116 Remove the vanity mirror as shown in the figure...
- Page 117 Take:1pcs-30CM Bit Light Blue,1pcs-Double-sided tape, Put the light-emitting side of the lamp chip outwards and paste it on the double-sided tape Paste the lamp pellets into the water basin, and the wire will pass through the middle of the raised pellets...
- Page 118 Restore the wall, fix the wire Continue to restore the wall...
- Page 119 Pass the wire around the raised particles Restore the parts, fix the wires...
- Page 120 Take:1pcs-Connecting Cobles 15CM,1pcs-LED Strip Lights Warm White Insert the blue light pellet into the socket on the other end of the light...
- Page 121 Tear off the light strip adhesive Paste the light bar to the position shown, the connecting line is on the left...
- Page 122 The lamp particle wire is S-shaped, bypassing the protruding particles Restore the white plate, fix the wires, as shown in the figure, continue to organize the wires...
- Page 123 Restore the white plate, fix the wires, and twist the excess wires together Attach the wires to the wall...
- Page 124 Remove the white plate shown by the arrow Remove the wreath shown by the arrow...
- Page 125 Take:1pcs:30CM Bit Light Red,1pcs-1x1 hollow transparent red circle...
- Page 126 Pass the lamp pellet plug through the side of the transparent red round small hole Wear it to the end, attach the lamp pellet to the protrusion, with the light-emitting surface facing outward...
- Page 127 Pass the plug through the raised side of the green disc Install the transparent red circle on the part...
- Page 128 Organize the wires and bypass the raised particles in an S-shape...
- Page 129 Restore the white plate and fix the wire Put the lamp wire and the connecting wire on the light bar together and stuff them into the gap in the wall...
- Page 130 Remove the lamp indicated by the arrow...
- Page 131 Take:1pcs-30CM Bit Light Warm White,1pcs-1X1 hollow transparent circle Disassemble the removed desk lamp...
- Page 132 Insert the lamp pellet plug through one end of the small hole of the part shown in the figure Wear it to the end, attach the lamp pellets to the part with the light-emitting side facing outward...
- Page 133 Install the hollow transparent circle to fix the lamp pellet Restore the white lampshade...
- Page 134 Restore the lamp post, pay attention to the direction of the wire Remove the parts shown...
- Page 135 As shown in the picture, arrange the wires Restore the parts, fix the wires...
- Page 136 Restore the lamp, pull the wire up along the wall, and remove the parts shown by the arrow Continue to remove the parts indicated by the arrow...
- Page 137 The table lamp wire is S-shaped, bypassing the raised particles...
- Page 138 Restore the parts, fix the wires Take:1pcs-15CM Enhanced Bit Light Warm White...
- Page 139 Place the light-emitting surface of the lamp particles facing down and fit them to the position shown in the figure, and the wire will go around the raised particles Restore the white plate and fix the wire...
- Page 140 Continue to wrap the wire around the white bump in an S shape Restore the white plate and fix the wire...
- Page 141 Find the lamp particle line at the corner Pass the wire around the white bump...
- Page 142 Restore the parts, fix the wires As shown in the picture, pass the connecting wire around the raised particles...
- Page 143 Restore the plate, fix the wire Take:1pcs-6-Port Expansion Boards,Insert the longest wire into 6 Port Expansion Boards...
- Page 144 Remove the 6-seater adhesive Wrap the wire around the socket properly and insert the remaining plugs in turn...
- Page 145 Insert all plugs into 6-Port Expansion Boards and wrap them appropriately...
- Page 146 Take:1pcs-Connecting Cobles 30CM Paste the 6-Port Expansion Boards to the position shown in the figure, and remove the white plate shown by the arrow...
- Page 148 Pull the 30cm connecting line to the right along the included angle of the part Restore the plate, fix the wire...
- Page 149 Lift the building and pull out the connecting wire from below Place the upper layer in a staggered position, and take out the connecting line from below...
- Page 150 Insert the connecting wire into 6-Port Expansion Boards Turn on the power, the test light is normally on, and the test is complete, turn off the power...
- Page 151 Take:1pcs-Connecting Cobles 30CM,Insert 6-Port Expansion Boards Place 6-Port Expansion Boards at the position shown in the figure, and remove the plate shown by the arrow...
- Page 152 Pull the USB cable out of the outdoor Restore the tablet and fix the USB cable...
- Page 153 Pass the newly inserted connecting cobles 30CM on the 6-Port Expansion Boards through the upper layer Restore the upper layer...
- Page 154 Take out the roof and open it, and remove the white plate shown by the arrow...
- Page 155 Remove the top cover upwards Remove the parts indicated by the arrow one by one...
- Page 156 Remove the roof as a whole Continue to remove the parts shown by the arrow...
- Page 157 Remove the bed Can be operated with the aid of a starter...
- Page 158 Remove the windows...
- Page 159 Take:1pcs-30CM Bit Light Warm White,Stick the light-emitting side of the lamp chip on the double-sided tape...
- Page 160 Paste the lamp pellets above the window As shown in the picture, restore the windows and arrange the wires...
- Page 161 Restore the roof and fix the wires Restore the removed parts one by one...
- Page 162 As shown in the picture, arrange the wires to bypass the raised particles on the ground...
- Page 163 Restore the bed, fix the wires, and remove the white plate shown by the arrow...
- Page 164 Remove the roof as a whole Take:1pcs-15CM Enhanced Bit Light Warm White,Stick the light-emitting side of the lamp chip on the double-sided tape...
- Page 165 Paste the lamp pellet to the middle of the arch, pay attention to the direction of the wire Pull the wire along the corner of the part to the room...
- Page 166 Restore the roof fixing wire Restore the white tablet Restore the removed parts...
- Page 167 Remove the lamp Take:1pcs-15CM Enhanced Bit Light Warm White,1pcs-1 1X1 hollow transparent yellow round...
- Page 168 Pass the lamp pellet plug through the side of the hollow transparent yellow round hole...
- Page 169 Bend the light bulb 90 degrees with the light-emitting side facing up Wear it to the end, so that the lamp pellet is just in the center of the part...
- Page 170 Put the yellow circle back into the lamp, pay attention to the direction of the wire Restore the lamp...
- Page 171 Remove the parts indicated by the arrow one by one...
- Page 173 Take:1pcs-15CM Bit Light Warm White,1pcs- double-sided tape, stick the light-emitting side of the lamp chip to the double-sided tape As shown in the picture, paste the lamp pellets on the window...
- Page 174 As shown in the picture, restore the windows and arrange the wires Restore the roof and fix the wires...
- Page 175 Restore the removed parts one by one...
- Page 176 Take:1pcs-6-Port Expansion Boards,Insert all 4 plugs into 6-Port Expansion Boards Before restoring the roof, first pass the 30cm cable out of the roof...
- Page 177 Restore the roof Insert the connecting wire into 6-Port Expansion Boards...
- Page 178 Place in the position shown 6-Port Expansion Boards Restore the top cover...
- Page 179 Restore the white tablet Turn on the power and test that all lights are on normally Close the roof, and now this set of lighting is installed 合上房顶,至此本套灯...
- Page 180 Turn on the power and enjoy it!
- Page 181 If you want to keep the light on, you can turn on the USB power supply 如果想让灯光长亮,可接通 USB 电源 祝您玩的开心!...
Need help?
Do you have a question about the Home Alone 21330 and is the answer not in the manual?
Questions and answers