
Related Manuals for Lynx Studio Technology LT-ADAT


Summary of Contents for Lynx Studio Technology LT-ADAT
- Page 1 User Manual Lynx Studio Technology, Inc. www.lynxstudio.com support@lynxstudio.com...
-
Page 2: Table Of Contents
Optional Equipment............................1 Operation Requirements ............................. 1 Nomenclature used in this manual ..........................2 Warranty Registration ..............................2 Locating the Serial Number of Your LT-ADAT ....................2 Installation Procedure ..............................3 External Connections ..............................5 Aurora Routing ................................6 Clock Settings ................................6 Aurora as clock master, ADAT device slaves to wordclock ................ -
Page 3: Introduction
Please refer to the support section at the end of this manual for support contact information. The LT-ADAT is a 16-channel ADAT LStream™ interface that is designed for use with the Aurora professional audio AD/DA converters. The devices communicate via Lynx’s proprietary LSlot multi-channel interface. -
Page 4: Nomenclature Used In This Manual
Once you are registered you will automatically receive notifications of new products and upgrades. Locating the Serial Number of Your LT-ADAT To register your LT-ADAT, you must supply its serial number. The serial number is located on a label attached to the component side of the card and on the shipping carton... -
Page 5: Installation Procedure
Remove the LSlot Expansion Port cover above the AES I/O Ports by removing the two mounting screws. Set these two screws aside, as they will be used to install the LT-ADAT. Remove the screw from the Aurora circuit board that is adjacent to the JP1 connector and the white serial number/barcode label. - Page 6 LT-ADAT is properly aligned, then tighten snugly, but do not overtighten. Plug in and power up the Aurora using the front panel standby switch. If the green LED on the LT-ADAT lights up, proceed to step 10. If the LED does not light, unplug Aurora and check the cable connections to and from the LT-ADAT.
-
Page 7: External Connections
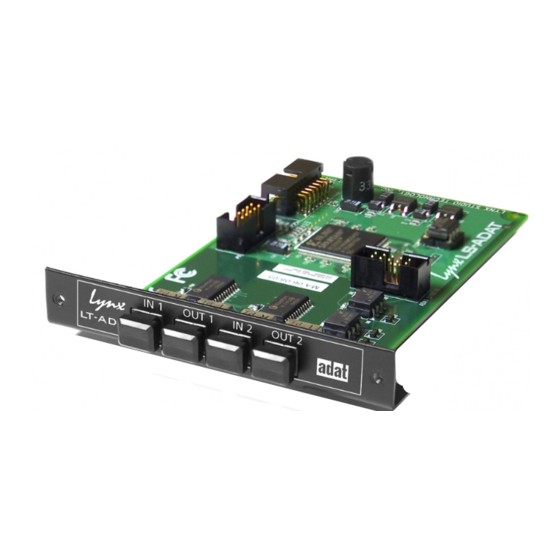
7 External Connections The photo below details LT-ADAT connectors. The LT-ADAT provides two ADAT optical inputs and outputs. They are labeled on the mounting bracket and in the figure above. The ADAT channels corresponding to each port are as follows:... -
Page 8: Aurora Routing
ADAT Lightpipe device to determine how to change its clock source (most devices default to Internal). The Aurora can also slave to the clock signal from the LT-ADAT inputs. To do so, simply choose “LSLOT” with the SYNC SOURCE button on the Aurora front panel, and make sure that the ADAT Lightpipe device is operating off of its Internal clock. -
Page 9: Aurora As Clock Master, Adat Device Slaves To Wordclock
The figures below detail three common clock schemes: Aurora as clock master, ADAT device slaves to wordclock Aurora SYNC SOURCE: INT ADAT Device Clock Source: Wordclock Aurora slaves to ADAT device via Lightpipe connection Aurora SYNC SOURCE: LSLOT ADAT Device Clock Source: Internal Aurora and ADAT device slave to house clock Aurora SYNC SOURCE: EXT ADAT Device Clock Source: Wordclock... -
Page 10: Adat Channel Mapping And S/Mux
“automatic” re-mapping to avoid mixing and routing problems. When the Aurora has the SYNC SOURCE set to LSLOT, the LT-ADAT cannot determine if an incoming signal is using S/MUX. Because of this, the user must manually set the SAMPLE RATE on the front panel of the Aurora to match the sample rate of the ADAT device. -
Page 11: Specifications
11 Specifications ADAT O PTICAL Number / Type Two inputs and two outputs, compatible with Alesis ADAT Type I and Type II Optical Digital Interface Protocol, up to 24-bit data Channels 16 @ 44.1kHz 48 kHz sample rates 8 @ 88.2 kHz and 96 kHz sample rates, S/MUX enabled 4 @ 176.4 kHz and 192 kHz sample rates, SMUX enabled Fast-locking phase-locked loop with 30 kHz to 55 kHz lock range Input Receiver... -
Page 12: Support
12 Support We are devoted to making your experience with the LT-ADAT trouble-free and productive. If the troubleshooting and operational sections of this manual did not help resolve your questions, several support options are available to you: 12.1 Lynx Website Support Resources Logging on to http://www.lynxstudio.com/support.html will provide several options for resolving your support... -
Page 13: Warranty Information
Lynx Studio Technology, Aurora and the Aurora Logo are trademarks of Lynx Studio Technology, Inc. All other product or company names are the trademarks or registered trademarks of their respective owners.
Need help?
Do you have a question about the LT-ADAT and is the answer not in the manual?
Questions and answers