Advertisement
Quick Links
Advertisement

Related Manuals for Kilews KL-WSCBSN-PTM

Summary of Contents for Kilews KL-WSCBSN-PTM
- Page 1 PTM Power Screwdriver Control Display User Manual Model: KL–WSCBSN-PTM Please scan the following QR code or download the operation manual from KILEWS website https://www.kilews.com.tw/tc/download-list.php KILEWS INDUSTRIAL CO., LTD. http://www.kilews.com.tw Y2F216Q-3-001...
-
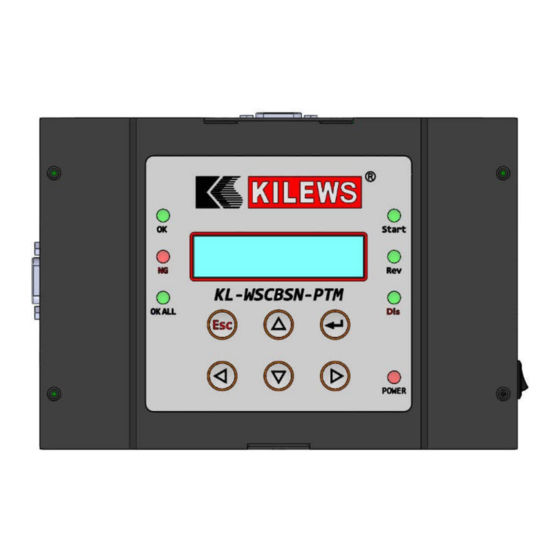
Page 2: Panel Function
I. Panel Function Display Screen: Boot Version: (Ver 1.xxx) 16X2 LCM Display Setting Function,WSCBSN connected to PTM picture: S99-99-19: Display Sequence--(Program)-(Tool)。 03/05: Display Count Value C: Display Screwdriver Action Number of Turns OKALL: Display status (OK, NG, OKALL) ... - Page 3 1. OUTPU: External output control,The OUTPUT pin define is customized. Please go to CTRL Setting [9]Ext Output for setting. 2. INTPU: External input control,The OUTPUT pin define is customized. Please go to CTRL Setting [8]Ext Input for setting. 3. PORT1 (RS232): Connect to DAS or wifi module. 1.
- Page 4 II. Status It shows status of WSCBSN connected to PTM. Press Up/Down to show current status #1~#5 of Program and Sequence: #1 Show status of Program: AT1.0: OKALL signal holding time n05: Screw count. F01: Impact Force. H10: Impact parameter. L00: Limit rotation number setup u00: Ignore Rundown Friction.
- Page 5 III. Set Function Options and Operating Instructions 1. After switching on the power, to enter into the function menu, press the “Esc” key on the panel for 3 seconds, following which password input is required to enter the menu. 2. Open Bluetooth of PTM and connect PTM to WSCBSN. 3.
- Page 6 [3] SEQ Numbers S 00~99 The first (S xx) and the last (E xx) sequence. For example S OFF = S 01 E 00~99(≧S) S01→E05 means WSCBSN will let PTM run a sequence from program 1 to program 5; If select S00, it will set S S 00=OFF(S01) Off and only run one program.
- Page 7 [8] Ext Input I-1~I-5 Output signal pin define setting. There are 4 section. Press <- I-1 -> <- I-1 -> View Enter to go into 1 section and press ESC to back. (Read Only) Pin 1,3,5,7,9, (1).Select section: Left/right could select I-1~I-5 5 sets of 11,13 signal number.
- Page 8 (9).SEQbit0~4: SEQbit0 is LSB, bit4 is MSB, there is 31 unit for sequence S01~S31. For example Pin as setting as below picture: Set Pin3 as select enter, while signals show as above, it will switch to S10 sequence (binary 1010 is equal 10.) [9] Ext Output O-1~O-5 Output signal pin define.
- Page 9 [11] Ext SEQ Ctrl No use. [12] Operator Standard No use. Standard Standard [13] Password 0000~9999 Password to enter setting. 0000 0000 [14] Default Val Factory default setting. It is able to select Controller or LAN Only Ctrl? module, or Both. Only Eth? Both? [15] Data Port...
- Page 10 [6] Limit L00,L02~L99 The setting value is L00, L02~L99, during fasten operation, the PTM completes the fastening before reach request setting thread. [7] Ignore u00~u99 Ignore Rundown Friction: Even there is resistance between Rundown Friction tightening, the PTM will keep hit until reach setting thread. The setting value is [u00]~[u99].
-
Page 11: Function Description
IV. Set Function Options and Operating Instructions 1) After switching on the power, to enter into the function menu, press the “Esc” key on the panel , following which password input is required and press key to enter the menu 2) Press UP or DOWN key to select the setting page to enter;... - Page 12 VI. External Output Control Function Description Connector No. Definition Function Description Start signal output 1. When (CN1+CN2) is closed, the screwdriver then start running. CN 1 START (Motor) 2. When (CN1+CN2) is open, the screwdriver then stop running. CN 2 This pin refers to the START signal connection negative end Brake signal output 1.
-
Page 13: Confirm Mode
2.1. CRTL Setting > [3]SEQ Numbers sets OFF, and set CRTL setting > [4]Sequence for each program and PTM, and then it is able to use barcode scanner to switch different Sequence. 1.Use Kilews default barcode to switch Sequence (CMD.S01-CMD.S99) Description: 1. - Page 14 2.2. Barcode scanner could be confirm/enter for AS or NS When set AS or NS, it disable PTM. It could use barcode Scanner to enable PTM. It is same as Confirm/Enter. Use KILEWS barcode format: CMD.C03 to release AS (okAll Stop) &NS(NG Stop) command Description: As WSCNBS set AS or NS, it disable PTM.
- Page 15 IX. LAN port instruction (1) Set computer interface. Connect LAN to WSCBSN Ethernet port, another side connect to Computer Ethernet port. Set computer IP to 192.168.0.X, due to WSCNSN deault IP is 192.168.0.7. Step 1: Right Click On computer and click “open network & internet settings”.
- Page 16 Step 3: WSCBSN and computer have connected to the same network (LAN). In WSCBSN > CTRL Setting > [24]IP Address will show assign IP address. Enter this IP on browser in the computer will connect to WSCBSN. Step 4:Enter static IP and DNS (follow 192.168.0.xxx)then click OK. 【※】If computer is static IP, please check its IP address is different as WSCBSN.
- Page 17 (2)Log in website setting Step 1:In WSCBSN CTRL Setting > [15]Data Port set Ethernet or Ethernet(ACK). CTRL Setting > [24]IP Address will show default IP. And enter IP 192.168.0.7 in browser of computer. Account: admin // Password: admin Press Log-in.
- Page 18 Step 2: IP Type select DHCP/Auto IP and press save, and press 「Restart Module」 a「OK」, WSCBSN will be assign a dynamic IP.
- Page 19 Step 3: WSCBSN and computer have connected to the same network (LAN). In WSCBSN > CTRL Setting > [24]IP Address will show assign IP address. Enter this IP on browser in the computer will connect to WSCBSN. Step 4: ...
Need help?
Do you have a question about the KL-WSCBSN-PTM and is the answer not in the manual?
Questions and answers