
Subscribe to Our Youtube Channel
Related Manuals for AW TrachFlush UK

Summary of Contents for AW TrachFlush UK
- Page 1 Operators Manual TrachFlush UK Revision #1.0 of 01.08.2020 Document no. AWT-1030 AW Technologies ApS, Amalienborgvej 57, 9400 Noerresundby, Denmark...
-
Page 2: Table Of Contents
5.2 Cleaning the TrachFlush device ................... 20 5.3 Disposal of the TrachFlush Cuff Pressure and Airway tube set ..........20 6 Parts and accessories ....................21 7 Specifications ....................... 22 Copyright, AW Technologies ApS, Doc. AWT1030, rev. #1.0 01.08.2020 Page 2 of 22... -
Page 3: Introduction
Nothing in this document shall limit or restrict in any way AW Technologies’ right to revise or otherwise change or modify the equipment (including its software) described herein, without notice. -
Page 4: Document Conventions
CAUTION • Use only AW Technologies disposable tubing with filter, valve and lock. Use of any other tubing may results in malfunction of TrachFlush or the immediate loss of cuff pressure if disconnected on the ventilator end. Use of any other tubing without a filter may result in the device being contaminated. -
Page 5: Symbols And Markings
Do not reuse Do not use if packaging is damaged Use-by-date Not made with natural rubber latex Temperature limits Class II Equipment (product has 2xMOPP) Ingress Protection Copyright, AW Technologies ApS, Doc. AWT1030, rev. #1.0 01.08.2020 Page 5 of 22... -
Page 6: Trachflush Overview
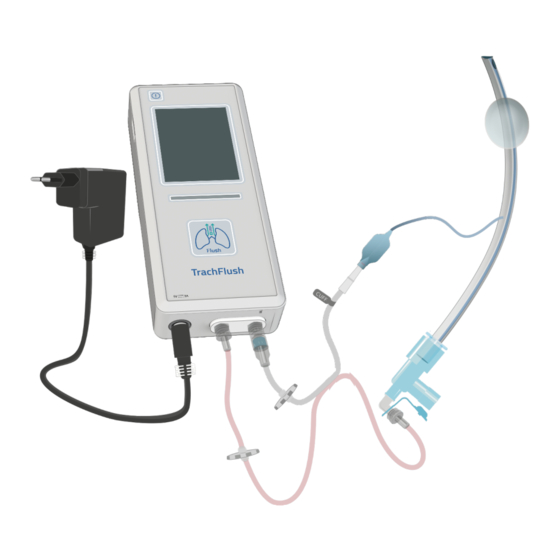
NOTICE: Only #1, #2, #3 and #4 above is a part of the TrachFlush Device. The elbow connector (#5) and the endotracheal tube (#6) is not a part of the TrachFlush device, but is shown here for connectivity overview Copyright, AW Technologies ApS, Doc. AWT1030, rev. #1.0 01.08.2020 Page 6 of 22... -
Page 7: Trachflush Operations
Step 2: Connect the Airway Tube (pink tube) connector to the airway inlet socket of the TrachFlush by twisting it on as shown on figure 3. Figure 2: Device connectivity, connecting Airway Tube Copyright, AW Technologies ApS, Doc. AWT1030, rev. #1.0 01.08.2020 Page 7 of 22... - Page 8 Step 2: Connect the Cuff Pressure Tube (transparent tube) connector (labelled “Cuff”) to the ETT or TT cuff connector by pushing it in as shown on figure 6. Figure 6: Patient connectivity, connecting Cuff Pressure Tube Copyright, AW Technologies ApS, Doc. AWT1030, rev. #1.0 01.08.2020 Page 8 of 22...
-
Page 9: Turning On Trachflush
NOTICE: On the mainscreen, the Actual Cuff Pressure measured ( ) will be shown. When powering up, the Set Cuff Pressure ( ) will be the same as the measures Cuff Pressure. Copyright, AW Technologies ApS, Doc. AWT1030, rev. #1.0 01.08.2020 Page 9 of 22... -
Page 10: Setting Cuff Pressure
Step 2: To accept the new cuff pressure changes and apply a new pressure setting to the cuff, press (accept) as shown on figure 12 below. The cuff will now be inflated until the Actual and Set cuff pressure is the same. Copyright, AW Technologies ApS, Doc. AWT1030, rev. #1.0 01.08.2020 Page 10 of 22... - Page 11 Following the cuff pressure changes, TrachFlush will automatically enable the Cuff Control functionality To cancel the new changes, press (cancel) as shown on figure 13 below. Figure 13: Cancel increased cuff pressure Copyright, AW Technologies ApS, Doc. AWT1030, rev. #1.0 01.08.2020 Page 11 of 22...
- Page 12 Actual and Set cuff pressure is the same. . Figure15: Accept decreased cuff pressure Following the cuff pressure changes, TrachFlush will automatically enable the Cuff Control functionality Copyright, AW Technologies ApS, Doc. AWT1030, rev. #1.0 01.08.2020 Page 12 of 22...
- Page 13 Operators Manual UK To cancel the new changes, press (cancel) as shown on figure 16 below. Figure 16: Cancel decreased cuff pressure Copyright, AW Technologies ApS, Doc. AWT1030, rev. #1.0 01.08.2020 Page 13 of 22...
-
Page 14: Flush Control
WARNING: Only adjust the ICU Ventilator setting if it is clinically safe for the patient. Step 1: Press and hold the Flush button for more than 3 seconds as shown on figure 17 below. Figure 17: Performing a Flush Copyright, AW Technologies ApS, Doc. AWT1030, rev. #1.0 01.08.2020 Page 14 of 22... - Page 15 Figure 19: Flush Complete Once complete, TrachFlush reverts to Cuff Controller mode, goes back to main screen and the LED-bar stops flashing cyan as shown in Figure 20. Copyright, AW Technologies ApS, Doc. AWT1030, rev. #1.0 01.08.2020 Page 15 of 22...
- Page 16 Following the flush, TrachFlush will automatically enable the Cuff Control functionality Step 3 (OPTIONAL): Re-adjust the ventilator settings of pressure (P-insp), PEEP and T-insp back to original settings (see Section 3.4 above). Copyright, AW Technologies ApS, Doc. AWT1030, rev. #1.0 01.08.2020 Page 16 of 22...
-
Page 17: Turning Off Trachflush
• the airway conector from the elbow or t-piece connector • the cuff pressure and airway connector from the TrachFlush device Step 3: Dispose the cuff pressure and airway tube as described in section 5.3 Copyright, AW Technologies ApS, Doc. AWT1030, rev. #1.0 01.08.2020 Page 17 of 22... -
Page 18: System Alarms
Airway tube cannot maintain Change Cuff Pressure cuff and Airway tube if pressure needed Disconnect device Cuff Pressure Low Medium-priority Cuff pressure is Increase cuff pressure alarm <5cmH2O Copyright, AW Technologies ApS, Doc. AWT1030, rev. #1.0 01.08.2020 Page 18 of 22... - Page 19 Wait until the device Control is ready before activating Flush Control. Service Information signal Service for the device Disconnect the device is required and send to service. Copyright, AW Technologies ApS, Doc. AWT1030, rev. #1.0 01.08.2020 Page 19 of 22...
-
Page 20: Cleaning And Maintenance
• is a single use device, which shall not be cleaned, disinfected or re-processed in any way. should be disposed in accordance with local regulations for contaminated and • biologically hazardous items. Copyright, AW Technologies ApS, Doc. AWT1030, rev. #1.0 01.08.2020 Page 20 of 22... -
Page 21: Parts And Accessories
Operators Manual UK 6 Parts and accessories Name AW Technologies Part number Cuff Pressure and Airway Tube set TFSACO010001 TrachFlush Mounting bracket TFSAB010001 Power Supply incl. adaptors TFSAPSU010001 Copyright, AW Technologies ApS, Doc. AWT1030, rev. #1.0 01.08.2020 Page 21 of 22... -
Page 22: Specifications
45 Environmental conditions Relative humidity 30% to 75% Operating temperature 5°C to + 40°C Operating atmospheric pressure range 70,0 kPa to 106,0 kPa Operational noise level >80dB(A) Copyright, AW Technologies ApS, Doc. AWT1030, rev. #1.0 01.08.2020 Page 22 of 22...
Need help?
Do you have a question about the TrachFlush UK and is the answer not in the manual?
Questions and answers