
Related Manuals for Arista Q6EWL

Summary of Contents for Arista Q6EWL
- Page 1 Quick Start Guide Edge Threat Management Appliance CCA-ETM-Q6EWL Arista Networks www.arista.com DOC-06005-01...
- Page 2 The trademarks, logos and service marks ("Marks") displayed in this documentation are the property of Arista Networks in the United States and other countries. Use of the Marks are subject to Arista Network Term of Use Policy, available at http://www.arista.com/en/terms-of-use. Use of marks belonging to other parties is for...
-
Page 3: Table Of Contents
Contents Contents Chapter 1: Overview................1 1.1 Scope............................1 1.2 Receiving and Inspecting the Equipment................1 1.3 Installation Process.........................2 1.4 Safety Information........................3 1.5 Obtaining Technical Assistance..................... 3 1.6 Specifications.......................... 4 Chapter 2: Preparation................5 2.1 Site Selection..........................5 2.2 Tools and Parts Required for Installation................6 2.3 Electrostatic Discharge Precautions.................. -
Page 5: Chapter 1: Overview
Chapter 1 Overview This guide is intended for properly trained service personnel and technicians who need to install selected Arista Appliances. The following topics are covered in this section: • Scope • Receiving and Inspecting the Equipment • Installation Process •... -
Page 6: Installation Process
Installation Process The following tasks are required to install and use the appliance: 1. Select and prepare the installation site (Site Selection). 2. Assemble the installation tools listed (Tools and Parts Required for Installation). 3. Install the appliance (Mounting the Appliance). -
Page 7: Safety Information
Refer to the Arista Networks document Safety Information and Translated Safety Warnings available at: https://www.arista.com/en/support/product-documentation. Obtaining Technical Assistance Any customer, partner, reseller, or distributor holding a valid Arista Service Contract can obtain technical support in any of the following ways: •... -
Page 8: Specifications
Specifications Table 1: Appliance Specifications (Dimensions and Weights) Appliance Size (W x D x H) Weight CCA-ETM-Q6EWL 232mm x 174mm x 42mm 1.4 kg Table 2: Appliance Specifications (Operational and Storage) Appliance Operating Temperature Storage Temperature and Operating Altitude and Relative Humidity... -
Page 9: Chapter 2: Preparation
Chapter 2 Preparation The following topics are covered in this section: • Site Selection • Tools and Parts Required for Installation • Electrostatic Discharge Precautions Site Selection The following criteria should be considered when selecting a site to install the appliance. •... -
Page 10: Tools And Parts Required For Installation
Tools and Parts Required for Installation The following tool(s) are required for installation: • Philips #2 screwdriver Electrostatic Discharge Precautions Observe these guidelines to avoid ESD damage when installing or servicing the appliance • Assemble or disassemble equipment only in a static-free work area. •... -
Page 11: Chapter 3: Mounting The Appliance
Mounting the Appliance on a Wall Desktop Installation To install the CCA-EMT-Q6EWL on a desktop, complete the following steps. 1. Remove the four screws on the wall mount bracket on the bottom of the appliance. 2. Remove the wall mount bracket from the bottom of the appliance. -
Page 12: Rack Mounting The Appliance
Rack Mounting the Appliance To mount the appliance onto a two-post rack, mount the power supply unit, assemble the mounting brackets to the chassis, and then attach the brackets to the rack posts. The following topics are covered in this section: •... - Page 13 Mounting the Appliance Figure 1: CCA-ETM-Q6EWL Mounting Parts Kit Rack mounting bracket Power supply bracket Rack mounting bracket Fastening plate Mounting screws Power supply Mounting screws...
-
Page 14: Mounting The Power Supply
3.2.1 Mounting the Power Supply The following describes the process for mounting the power supply unit. 1. Line up the power supply bracket (1) with the holes on the side of the appliance. 2. Insert screws (2, 7) through the power supply bracket into the appliance. 3. -
Page 15: Attaching Mounting Brackets To The Chassis
Mounting the Appliance 3.2.2 Attaching Mounting Brackets to the Chassis This procedure attaches mounting brackets to the appliance chassis. 1. Remove the four screws on the wall mount bracket on the bottom of the appliance. 2. Remove the wall mount bracket from the bottom of the appliance. 3. -
Page 16: Inserting The Appliance Into The Rack
3.2.3 Inserting the Appliance into the Rack This procedure attaches the appliance to the rack. 1. Lift the chassis into the rack. Position the brackets against the rack posts at the same level. 2. Select mounting screws that fit your equipment rack. Note: Screws required to attach the chassis to the posts are not included. -
Page 17: Chapter 4: Cabling The Appliance
Chapter 4 Cabling the Appliance For all installations: 1. Plug in the power adapter to a power source and connect it to the DC 12V power input on the rear panel. 2. Connect an Ethernet cable from your Internet modem or router to WAN Port 1. 3. -
Page 19: Chapter 5: Configuring The Appliance
You can manage your appliance using the Edge Threat Management Dashboard or from the local network. From Edge Threat Management Dashboard 1. Navigate your web browser to https://edge.arista.com/cmd. 2. Log in with your Edge Threat Management Dashboard account, or click Create Account to set up an account. -
Page 21: Appendix A: Status Indicators
Appendix A Status Indicators The following topics are covered in this section: • Front Indicators Front Indicators 1 Speed status 5 Power 2 LTE 6 WAN/SFP connections 3 WiFi 7 LAN Gb Ethernet connections 4 Data 8 Connection status... -
Page 23: Appendix B: Parts List
Appendix B Parts List Package Contents The CCA-ETM-Q6EWL package includes: 1 Power adapter 4 WiFi antennas (2) 2 Power cable 5 Rubber feet (4) 3 LTE antennas (2) -
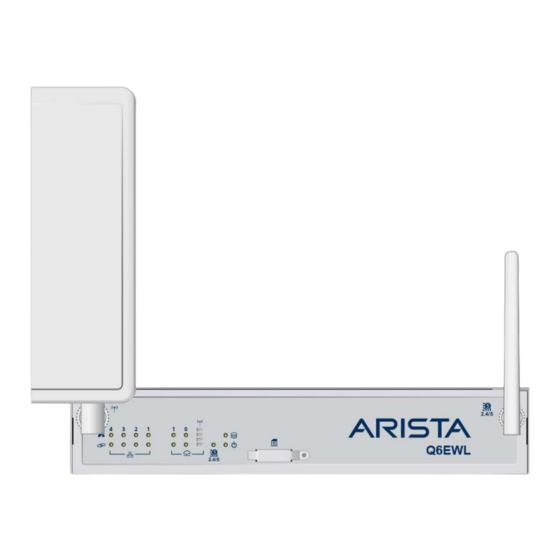
Page 25: Appendix C: Front Panel
Appendix C Front Panel This appendix displays the front panel of all appliances covered by this guide. Figure 2: Q6EWL Front Panel 1 LTE antenna 2 SIM card slot 3 WiFi antenna... -
Page 27: Appendix D: Rear Panel
Appendix D Rear Panel This appendix displays the rear panel of all appliances covered by this guide. 1 WiFi antenna 6 Console port 2 LAN Ethernet port 7 Power button 3 SFP WAN ports 8 LTE antenna 4 Ethernet WAN ports 9 Power adapter port 5 3.0 USB ports... -
Page 29: Appendix E: Regulatory Model Numbers
Appendix E Regulatory Model Numbers This appendix covers the Regulatory Model Number for the appliance in this guide. Table 4: Regulatory Model Numbers and Product Numbers Regulatory Model Numbers (RMN) Product Numbers AN2208, CAF-0262-5621-E92 CCA-ETM-Q6EWL... -
Page 31: Appendix F: Taiwan Rohs Information
Appendix F Taiwan RoHS Information This appendix provides Taiwan RoHS information for appliances covered by this guide. For Taiwan BSMI RoHS Table, go to https://www.arista.com/assets/data/pdf/AristaBSMIRoHS.pdf.
Need help?
Do you have a question about the Q6EWL and is the answer not in the manual?
Questions and answers