Table of Contents
Advertisement
Quick Links
Advertisement
Table of Contents

Related Manuals for MHS Boilers IC 700-1100/24

Summary of Contents for MHS Boilers IC 700-1100/24
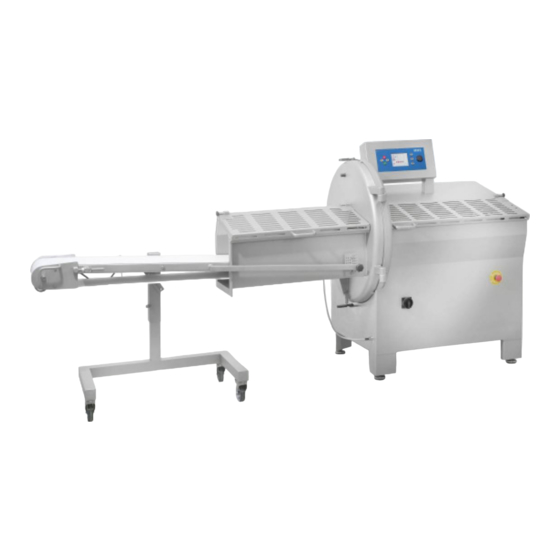
- Page 1 OPERATION- AND MAINTENANCE MANUAL INDUSTRIAL SLICING- AND PORTIONING MACHINE TYPE IC IC 700-1100/24 IC 700-1100/24B IC 700-1100/24BS IC 700-1100/24BSL IC 700/36 IC 700/36B Ma. No. 030914 Type IC Version 2014-1_Translation of the original manual Page 1-56...
-
Page 2: Table Of Contents
Table of Contents General Warranty information Field of application Final danger Table of comparison Copyright Safety and safety installations Safety symbols General safety regulations Safety installations Daily safety inspection Technical description Dimensions Technical Data Description of function Controls 3.4.1 Keypad / Display 3.4.2 Icons 3.4.3... - Page 3 Operation Trial operation Positioning of product Cutting process Programming 5.4.1 Creating a program 5.4.2 Open program 5.4.3 Copy program 5.4.4 Rename program 5.4.5 Delete program Product menu Input error messages Switching to double-blade operation Inspecting the blades Slicing with frame 5.10 Rectifying faults 5.11...
- Page 4 EC declaration of conformity As defined by machinery directive 2006/42/EC, Annex IIA 1. Machine manufacturer MHS SCHNEIDETECHNIK GMBH Seestraße 7 D- 74232 Abstatt 2. Device type: Description: INDUSTRIAL SLICING AND PORTIONING MACHINE Type: Machine No.: 030914 Herewith we declare that the supplied model of INDUSTRIAL SLICING AND PORTIONING MACHINE Type IC complies with the following provisions applying to it: EC- directives - EC- Machinery Directive 2006/42/EC, Annex 1...
-
Page 5: General
GENERAL Dear customer, This operation and maintenance manual makes it easy for you to get to know the Slicing and Portioning machine IC and how to use it properly. This manual contains important information and instructions which help make it possible to operate the Slicing and Portioning machine safely, correctly, and economically. -
Page 6: Warranty Information
1.1 WARRANTY INFORMATION The warranty period is 12 months from time of commissioning or 3,000 hours of operation. It excludes wear parts. Compliance with the terms of the warranty assumes servicing by MHS every 1,000 hours of operation, at the owner's expense. Wear parts, such as the blades, belts, rollers (see Spare part list), are not covered by the warranty. -
Page 7: Table Of Comparison
1.4 TABLE OF COMPARISON The following table shows you the model which was delivered to you. Comments in the chapters to follow will help you when operating and servicing the machine. Model Model IC 700/24 IC 1100/24 IC 700/24B IC 1100/24B IC 700/24BS IC 1100/24BS IC 700/24BSL... -
Page 8: General Safety Regulations
2.2 GENERAL SAFETY REGULATIONS The Slicing and Portioning Machine IC are operationally safe according to the guideline of the council of the European community (2006/42/EG) and according to the requirements of the valid accident prevention regulations. The Slicing and Portioning Machine can be dangerous when used improperly and applied unduly in a way in a way contrary to instructions. - Page 9 Work to be performed on the electrical control and switching unit and/or electrical installation work on the machine may only be carried out by an authorized electrician. After such work is complete, the function of all safety equipment must be checked by this specialist and the unit approved for use.
-
Page 10: Safety Installations
If the operator notices changes in the operating behaviour of the machine/unit, they are obliged to bring it to an immediate stop and to inform the person responsible of the fault. Additions or modifications which alter the technical characteristics of the machine/system or impair the function of safety equipment may only be made following written approval from the manufacturer. -
Page 11: Daily Safety Inspection
The machine is equipped with protective covers (1+2) in the vicinity of the cutting chamber, which prevent the user from unintentional interference and immediately put the machine out of action when opened. The STOP button (3) on the machine's display (see 3.4) allows operation to be interrupted at any point in the cutting process. - Page 12 Function check: In preparation for the function check, switch on the machine at the master switch. Close all flaps and doors, unlock EMERGENCY STOP. Activate EMERGENCY STOP, start the machine with the Start button. EMERGENCY STOP! EMERGENCY STOP message appears. Locked Unlock EMERGENCY STOP –...
-
Page 13: Technical Description
3. TECHNICHAL DESCRIPTION 3.1 DIMENSIONS Type Width Height Height Input Output Machine Machine length length with without belt belt IC 700/24 970 mm 1100 mm 1420 mm 1020 mm 900 mm 1920 mm IC 700/24B 970 mm 1100 mm 1420 mm 1020 mm 900 mm 1920 mm... -
Page 14: Technical Data
3.2 TECHNICAL DATA Data IC 700/24B IC 1100/24B IC 700/36B Dimension slices/minute Throughput: up to 10 mm thickness Dimensions: (Length x Width x See ch. 3.1 Height) Recommended space: 2,5-3,5 Weight: Max. input length: 1100 Cross section: 250 x 220 250 x 220 360 x 220 mm min. -
Page 15: Description Of Function
3.3 DESCRIPTION OF FUNCTION The IC-type slicing and portioning cutter allows you to cut meat, chops, bacon, fish, cheese and sausage products into slices of a predetermined thickness. Depending on the application, this is performed with a rotating, straight or serrated, single or double blade. In addition, the machine/unit is divided into various areas/components: 1- Transport of the cutting product with the product gripper 2- Cutting zone with rotating blade... - Page 16 1. Transport of the cutting product by the gripper. The cutting product which has been inserted into the cutting chamber is held by the gripper. The gripper moves towards the cutting zone. A light barrier detects the leading edge of the cutting product and the control unit calculates the total length from the distance to the gripper.
-
Page 17: Controls
3.4 CONTROLS When the machine is switched on at the master switch, the following screen appears on the display: 3.4.1 TASTATUR / ANZEIGE LEFT SIDE RIGHT SIDE Start program 3x function keys (depending on the icons on screen) Stop program Rotary pulse encoder (DIG) Advance infeed belt Reverse infeed belt... -
Page 18: Icons
3.4.2 ICONS Working menu button Programming Service menu menu button button Update Confirm button Cancel button program button Next page button Previous page button Save button Create program Open program Copy program Rename program Delete program Screen settings Machine settings Statistics Hardware settings Password protection... -
Page 19: Environmental Influences
ENVIRONMENTAL INFLUENCES This machine can be used in meat processing companies without any kind of restrictions. INSTALLATION The MHS-service personnel is responsible for the transport, set-up, and installation of the Slicing and portioning machine as described in the Installation manual. The machine has to be operated with all safety equipment intact as described in the safety instructions (see section 1.2). -
Page 20: Electrical Connection
4.2 ELECTRICAL CONNECTION The machine is configured ex factory to an operating voltage of 400 V, 50 Hz AC three phase current (clockwise field of rotation). Check the field of rotation of the mains connection! For further information regarding protection of the connection refer to the type plate. The machine must be connected to a protective system in order to protect against hazardous electric shocks which could lead to life- threatening injuries or death! -
Page 21: Service Menu
4.3 SERVICE MENU A wide range of machine settings can be made from the Service menu. The menu is accessed by pressing the “Service menu” button. SERVICE MENU BUTTON Single cut Page backward Functions in the Service menu: Display settings Machine settings Statistics Hardware settings... -
Page 22: Display Settings
4.3.1 DISPLAY SETTINGS Language Brightness 4.3.2 MACHINE SETTINGS A wide range of machine parameters can be set up from the Machine settings menu. The menu can be protected against unauthorized access with a password. Cut rate knife max./min. Blade break delay Single cut pre-empt time Minimum slice thickness Distance light barrier from cutting... - Page 23 The value “Brake delay” (Delay Initiator) is used to modify the braking point of the blade drive for different blade geometries, in order to prevent the blade from coming to a stop in the cutting chamber. This is achieved by entering one braking time for the minimum blade speed and one for the maximum.
-
Page 24: Statistics
4.3.3 STATISTICS Various information on the hours of operation, servicing, and blade usage times can be accessed from the Statistics menu. Total operating hours: Total hours of operation of the machine in hours Cut counter: Number of cuts made by the blade since last blade replacement Service interval counter: Operating hours since last service Blade exchange interval: Number of cuts between blade replacements... -
Page 25: Hardware Settings
4.3.4 HARDWARE SETTINGS The equipment features of the machine can be selected from the Hardware settings menu, e.g. select or deselect light barrier. In addition, feed types can be selected or deselected (disabled). The menu can be protected against unauthorised access with a password. Machine equipment Clocked operation Continuous operation... -
Page 26: Password Protection
4.3.5 PASSWORD PROTECTION Password protection for a number of submenus can be selected or deselected from the “Password protection” menu. It is also possible to modify the individual passwords from here, though this requires you to know the old password. 1. -
Page 27: Operation
OPERATION The machine may only be operated in compliance with all safety requirements, and when safety equipment is fully functional. If such regulations are not observed, the user risks being injured by the blade. In order to rule out a risk to life and limb for the user, a function check of protective devices must be performed on a daily basis, before the machine is used. -
Page 28: Cutting Process
5.3 CUTTING PROCESS In order to use the machine, it is first necessary to select a program. To do this, select the Working menu button. Working programs can be created and modified in the Programming menu NOTE! (see chap. 5.4). Smaller changes, i.e. slice thickness or blade speed, can also be carried out from the Working menu. - Page 29 When scrolling through the pages of the working menu, the screens appear as follows. Blade-drive and feed-type settings Feed type: Selection of the feed technique and cutting type (Continuous, Clocked, Single cut) Operating mode: Blade form Light barrier: For measuring the product before cutting (active/inactive) Cuts/min.:...
- Page 30 By turning the DIG, you can select a setting to modify. Then by pressing the DIG, you can modify the setting. Pressing the DIG again accepts the value. To save changes to one or more settings in the program, you must press the “Save” button.
-
Page 31: Programming
5.4 PROGRAMMING In order to use the machine, working programs must be created. New programs can be created, or changes made to existing programs in the Programming menu. To do this, select the “Programming menu” button. The menu can be protected against unauthorised access with a password (see chap. 4.3.5) In order to use the machine, the appropriate programs must be called up and activated in the Working menu. -
Page 32: Creating A Program
By turning the DIG, you can select a stored program in the program selection area. Pressing the DIG again confirms the program selection. The working program can now be used for production. The quick overview makes it easier for you to locate the right working program. - Page 33 When it comes to the feed type, there are three different techniques. • Continuous operation Constant blade speed with constant product feed, e.g. for cutting at smaller slice thicknesses (< 10mm) and a higher blade speed (>200 rpm), for bacon, etc. •...
- Page 34 If parameters “Slice thickness” and “Number” are set to 0, the NOTE! corresponding section is not active. For example: Section: Slice thickness Number Distribute remaining slice 10.0mm deactivated 14.0mm activated 200.0mm deactivated deactivated deactivated Section 1: One slice of 10.0mm (first cut) Section 2: X slices of 14.0mm, Distribute remaining slice active X can be obtained from a calculation based on the measured total product...
- Page 35 Additional discharge belt data Belt base speed: Belt run-on time: Time that the discharge belt runs on for after the machine has been stopped. 5.4.2 OPEN PROGRAM - Opens an existing program for editing and modifying the parameters. First use the DIG to select the program to be opened. Then move the cursor to the “Open program”...
- Page 36 5.4.3 COPY PROGRAM -Copies an existing program. First use the DIG to select the program to be copied. Then move the cursor to the “Copy program” icon and confirm by pressing the DIG. The existing program is copied and stored in the next available storage slot. Then you can give the new program a name.
-
Page 37: Open Program
5.5 PRODUCT MENU In the product menu different products could be saved with their typical shape. Product menu Product number / Name Product shape Functions available for selection: Create program Open program Copy program Rename program Delete program By turning the DIG, you can select a stored program in the program selection area. Pressing the DIG again confirms the program selection. - Page 38 Input of the product shape The product shape (Product diagram) is diagramed in 25 sections: 0- Line Sections Sum of the sections By turning the DIG, you can select the section. By pressing the DIG the sections will be chosen. The value can be changed from 60 – 140%.
-
Page 39: Input Error Messages
5.6 INPUT ERROR MESSAGES The following messages are displayed after incorrect parameter values are entered! Display / Fault Cause MESSAGE! Insert a longer product or Product length to short for Product too short for adjust the entered processing with the this program! parameters to match the parameters entered... -
Page 40: Inspecting The Blades
5.8 INSPECTING THE BLADES Each time before the machine is switched on, and after each change of product, the blades must be inspected for damage, sharpness and NOTE! dirt. A good and straight cut surface can only be achieved on the slices of meat with a blade which is ground sharp and cleanly whetted. -
Page 41: Rectifying Faults
The outward conveyor belt has to be fixed at position A in relation to the positions H1 and H3. The corresponding height depends on the angle of inclination of the outward conveyor belt in relation to the difference between outward conveyor belt and cutting bay. Position B with its regulation device H1 - H6 of the outward conveyor belt was designed for the use without frame. -
Page 42: Fault Messages
5.11 FAULT MESSAGES Display / Fault Cause Remedial measure EMERGENCY Unlock EMERGENCY STOP EMERGENCY STOP STOP! button and confirm with the DIG button pressed Locked (rotary pulse encoder) Protective cover on Open protective cover on FLAP OPEN! insertion side / infeed belt insertion side / infeed belt and Insertion side open or not properly... - Page 43 Fault on the drum motor FAULT! of the discharge belt Please contact MHS or your Discharge-belt and/or on the frequency specialist retailer drum motor convertor Product is not fed in Feed belt or feed motor Inspect feed belt defective Please contact MHS or your specialist retailer Fault on “Description”...
-
Page 44: Cleaning And Care Of The Appliance
CLEANING AND CARE OF THE APPLIANCE ATTENTION! Imminent danger of electric shock 6.1 PREPARING FOR CLEANING Before starting cleaning and disinfecting the main and the main/danger switches must be off and locked. Plug off all connectors of the forward feed conveyor belt and out feed belt and lock it at the backside of the machine. -
Page 45: Cleaning And Disinfection
6.2 CLEANING AND DISINFECTION Note the proper concentration, required reaction time and temperature of the cleaning agents and disinfectants as well as the associated care instructions for applying the solutions (see Cleaning agent datasheets in Appendix). Always store items NOTE! required for cleaning (brushes) in a clean and dry place. -
Page 46: Care
Acidic cleaning Spray, Low-pressure device, Perform if necessary approx. 15 min. spray bottle, instead of alkaline reaction time, brush for removing cleaning manual, mechanical limescale deposits Rinse Low pressure Low-pressure device, Whole machine and < 30 bar water hose small parts temperature 50-60°... -
Page 47: Maintenance And Inspection
7. MAINTENANCE AND INSPECTION No modifications may be carried out on the safety equipment during care or maintenance work. Care or maintenance work may only be performed when the machine is switched off and safeguarded against being switched back on without permission. Such work may only be carried out by trained personnel (fitter or electrician). -
Page 48: Greasing The Knife Shaft Bearings
7.2 GREASING OF THE KNIFE SHAFT BEARINGS The pedestal bearings have to be greased every 1000 elapsed hours or twice a year at the grease nipples. Grease nipple back bearing Grease nipple front bearing 7.3 MAINTENANCE OF FEED When changing or readjusting the guide rail or the runner block the machine has to be locked and switched off. -
Page 49: Changing Forward Belt
7.4 CHANGING FORWARD BELT The belt tension has to be checked once a month. The belt tension can be corrected using the eccentric. The belt tension is correct when the belt has give on its longest side. When changing or readjusting the guide rail or the runner block the machine has to be locked and switched off. -
Page 50: Exchanging Of The Conveyor Belt
7.5 EXCHANGING OF THE CONVEYOR BELT After the outward leading conveyor belt has been moved outside the machine the transmission roller is moved upwards or downwards. Then the belt is released and can be removed sideward’s. Type IC Version 2014-1_Translation of the original manual Page 50-56... -
Page 51: Maintenance Of The Electrical System
7.6 MAINTENANCE OF THE ELECTRICAL SYSTEM Only authorized electricians are allowed to carry out work on the electrical control and switching units or on any other electrical parts of the machine. All safety elements must be tested for complete functionality upon completion of the maintenance or service. -
Page 52: Adjustment Of The Motor Brake
7.7 ADJUSTMENT OF THE MOTOR BRAKE Brake replacement: Dismantling: Dismantle the fan cover (35), the locking ring (62) and the fan (36). Dismantle the terminal box cover and remove the brake cable from the rectifier. Loosen the screws (900) and remove the brake from the end plate. - Page 53 Checking the air gap: The nominal gap (A) is preset in the new brake. Therefore, you only have to carry out a check for the correct size (see table) using a feeler gauge and a check for uniformity after assembly. Dismantle the fan cover (35).
-
Page 54: Special Features
8. SPECIAL FEATURES INLAY BELT The inlay belts for the forward feed are made for supporting the feed of fragile products. The inlay belts can be removed for cleaning. AUTOMATIC FLAP OPENER 1. Adjusting the end-of-stroke damping for flap close. 2. - Page 55 3. Adjusting the end-of-stroke damping for flap open 4. Adjustment of cylinder speed when opening protection flap 5. Pressure regulation valve for adjusting of the system pressure. 6. Air-Water separator: remove water frequently (see gauge glass) from the separator by opening the fitting.
-
Page 56: Spare Part List (Enclosure)
9. SPARE PART LIST Enclosed, please find the spare part list including the corresponding pictures of the machine. Type IC Version 2014-1_Translation of the original manual Page 56-56...
Need help?
Do you have a question about the IC 700-1100/24 and is the answer not in the manual?
Questions and answers