
Related Manuals for bergmann 4010

Summary of Contents for bergmann 4010
- Page 1 Bergmann Dumper 4010 Operating instructions 1.0 | © 2/15/2017 50-020-1011-900_EN...
-
Page 2: Table Of Contents
Contents Basic data..........................19 Manufacturer.......................... 19 Machine data.......................... 19 Scope of the documentation (constituent part of the machine)..........20 General........................... 21 Preface........................... 21 About this documentation....................... 21 2.2.1 Target group........................... 22 2.2.2 Explanations of terms......................23 2.2.3 Usage/storage........................24 50-020-1011-900_EN 1.0 - ©... - Page 3 Contents 2.2.4 Text formats........................... 24 Signs on the machine......................25 2.3.1 Type plate..........................25 2.3.2 Chassis number........................27 2.3.3 Position of the signs....................... 28 CE declaration of conformity....................29 Declaration on noise emissions....................29 Information about vibrations....................29 Warranty and liability......................30 2.7.1 Warranty..........................
- Page 4 Contents Disposal..........................32 2.10 Regional regulations....................... 33 Safety............................. 34 Safety concept in the documentation..................34 Required personnel qualification.................... 34 Designated use........................37 3.3.1 Application limits........................40 Use not in accordance with the designated use..............41 Applied standards........................44 Possible residual hazards...................... 44 3.6.1 Overview of residual hazards....................
- Page 5 Contents 3.6.2 Countermeasures........................48 3.6.3 Organizational measures by the owner/user................48 Safety instructions in the documentation................49 3.7.1 Structure of safety instructions....................49 3.7.2 Hazard classes........................51 3.7.3 Note............................52 Pictograms used........................52 3.8.1 Warning symbol........................52 3.8.2 Prohibition symbol........................54 3.8.3 Mandatory symbol........................
- Page 6 Contents 3.10.1 Position of the safety signs..................... 57 3.11 General safety regulations..................... 64 3.12 Safe working when exposed to noise and vibration............... 65 3.13 Safe working on mechanical systems..................65 3.14 Safe working on hydraulic systems..................67 3.15 Safe working on electrical systems..................68 3.16 Safe working when driving and tipping...................
- Page 7 Contents 3.20 EMERGENCY STOP devices....................83 3.21 Responsibility of the owner/user.................... 84 3.22 Machine status........................84 3.23 Selection of personnel......................85 3.24 Test by an technical expert....................86 3.25 Fire protection........................86 3.26 Environmental protection......................87 Technical data........................88 Machine..........................88 4.1.1 Diesel engine..........................
- Page 8 Contents 4.1.3 Hydraulic system........................99 4.1.4 Track undercarriage......................102 4.1.5 Air-conditioning system......................103 Optional accessories......................104 4.2.1 Central lubrication device..................... 104 Structure and function......................106 Technical description of the machine................... 106 Technical description of the basic machine (series production equipment)......108 5.2.1 Track undercarriage......................
- Page 9 Contents 5.2.4 Electrical system........................118 5.2.5 Operator's cab........................120 Technical description of the bodies..................128 5.3.1 Rear tipping trough....................... 128 5.3.2 Round tipping trough......................130 5.3.3 Platform..........................132 Technical description of the optional equipment..............132 5.4.1 Crane (optional)........................133 5.4.2 Swiveling operator stand (optional)..................
- Page 10 Contents 5.4.6 Electrical filling pump (optional).................... 136 5.4.7 ECO mode (optional)......................137 5.4.8 Central lubrication device (option)..................138 5.4.9 Reversing camera (option)....................139 5.4.10 Reverse warning device (option)..................140 5.4.11 Rear window roller blind (option)..................140 5.4.12 Radio (option)........................140 5.4.13 Electrical filling pump......................
- Page 11 Contents Packing..........................142 Transport inspection......................143 Storage..........................144 Transportation of the subassemblies................... 144 Transporting on low loader and by railway................145 Lifting the machine....................... 148 6.7.1 Hand signals for guidance....................150 6.7.2 Transport components......................150 Installation, initial startup and function test................151 Safety instructions for installation and initial startup.............
- Page 12 Contents Initial startup and function test of the machine..............153 7.3.1 Preparatory activities......................153 7.3.2 Carrying out the function test/initial startup................155 7.3.3 Checks after initial startup/function test................157 Operation..........................159 Safety instructions........................ 159 Operation of the machine..................... 162 8.2.1 Opening and closing......................
- Page 13 Contents 8.2.5 Instrument panel and display....................176 8.2.6 Driving and control elements....................191 8.2.7 Storage and useful information.................... 202 8.2.8 Optional equipment......................205 Checks before starting work....................208 Switching on the machine....................209 8.4.1 Warming up the machine..................... 211 Travel mode......................... 212 8.5.1 On-road driving........................
- Page 14 Contents Checks during operation...................... 222 Refueling the machine......................223 8.10 Switching off the machine....................227 8.11 Recovering the machine....................... 229 Daily maintenance work....................... 230 Safety instructions........................ 230 Carrying out maintenance work.................... 232 9.2.1 Opening/closing the maintenance doors on the drive unit........... 233 Maintenance work to be carried out..................
- Page 15 Contents 9.3.3 Checking the fill levels......................249 Malfunctions and troubleshooting..................255 10.1 General safety instructions for troubleshooting..............255 10.2 Malfunctions......................... 256 10.2.1 General malfunctions......................257 10.2.2 Malfunctions of the electrical system..................261 10.2.3 Malfunctions of the hydraulic system................... 263 10.2.4 Display error codes......................
- Page 16 Contents Taking out of operation, putting back into operation and disposal........272 12.1 Taking out of operation......................272 12.2 Returning to operation......................273 12.3 Disposal..........................274 Spare part stocking and customer service................276 13.1 Spare part and customer service addresses................ 276 Appendix..........................
- Page 17 Contents 14.4 Diagrams in original scale....................284 50-020-1011-900_EN 1.0 - © 2/15/2017...
- Page 18 Contents 50-020-1011-900_EN 1.0 - © 2/15/2017...
-
Page 19: Basic Data
1 Basic data 1.1 Manufacturer Basic data Manufacturer Bergmann Maschinenbau GmbH & Co. KG Essener Strasse 7 D-49716 Meppen-Hüntel Germany Phone: +49 5932 7292-0 Fax: +49 5932 7292-92 E-mail: service@bergmann-mb.de Internet: www.bergmann-mb.de Machine data Name Bergmann Dumper Model 4010, cab, track Tab. -
Page 20: Scope Of The Documentation (Constituent Part Of The Machine)
1 Basic data 1.3 Scope of the documentation (constituent part of the machine) Validity of the documentation This documentation applies to machines with serial number(s): Serial number(s) from 16-4123 Scope of the documentation (constituent part of the machine) Part 1 - Operating instructions Part 2 - Maintenance/repair instructions Part 3 - Third-party documentation 50-020-1011-900_EN... -
Page 21: General
Relevant laws and regulations have been consistently applied. The purpose of these operating instructions is to make it easier to get to know the Bergmann Dumper and to use it within the possibilities of its des‐ ignated use. The operating instructions contain important information for operating the Bergmann Dumper safely, proficiently and efficiently. -
Page 22: Target Group
2 General 2.2 About this documentation 2.2.1 Target group The documentation is exclusively restricted to use by specialist personnel as well as personnel who have received training. The documentation must be read and applied by everyone who is assigned to at least one of the following activities: Transport Assembly and installation Initial startup and function test... -
Page 23: Explanations Of Terms
Personnel who have received training are personnel who can demonstrate that they have received training from Bergmann Maschinenbau GmbH & Co. KG or in accordance with the tech‐ nical documentation of Bergmann Maschinenbau GmbH & Co. KG. Per‐ sonnel who have received training are capable of carrying out the work assigned to them and of avoiding known hazards. -
Page 24: Usage/Storage
2 General 2.2 About this documentation Specialist personnel are personal employed by the owner/user or who have been authorized by the owner/user to carry out the work. Electrician An electrician is a person who, as a result of his/her technical training, pos‐ sesses knowledge and experience of electrical systems. -
Page 25: Signs On The Machine
2 General 2.3 Signs on the machine Symbol Explanation ► Denotes working steps Fig. 8.14 Numbering of figures (specification of the chapter and cumu‐ lative number in the chapter) Tab. 3.2 Numbering of tables (specification of the chapter and cumu‐ lative number in the chapter) Denotes item numbers in figures (1)/(2)/(3) - Page 26 2 General 2.3 Signs on the machine Fig. 2.1: Type plate Type Year of manufacture Chassis no. Maximum permissible weight kg Unladed weight kg Payload kg Engine power kW Permitted front axle pressure kg Permitted rear axle pressure kg Always specify items 1 and 2 when ordering spare parts and requesting technical support.
-
Page 27: Chassis Number
2 General 2.3 Signs on the machine 2.3.2 Chassis number The chassis number is used for identifying the unique machine. The 6-digit chassis number is made up of the following components: XXXX Last digits of year of manufacture Consecutive number combination 50-020-1011-900_EN 1.0 - ©... -
Page 28: Position Of The Signs
2 General 2.3 Signs on the machine 2.3.3 Position of the signs Fig. 2.2: Position of the signs on the machine - basic vehicle Chassis number Type plate The chassis number (1) is punched into the frame above the type plate (2). 50-020-1011-900_EN 1.0 - ©... -
Page 29: Ce Declaration Of Conformity
The CE declaration of conformity is located in the appendix to the documen‐ tation (→ 14.2). Declaration on noise emissions Bergmann Maschinenbau GmbH & Co. KG hereby declares that the test „Determination of sound power levels and according to DIN EN ISO 3744 sound energy levels of noise sources using sound pressure, and DIN EN ISO 11204 Noise emitted by machinery and equipment“... -
Page 30: Warranty And Liability
The "General terms and conditions of delivery and business" of Bergmann Maschinenbau GmbH & Co. KG apply in all cases. Bergmann Maschinenbau GmbH & Co. KG will not accept warranty and lia‐ bility claims for personal injury and damage to property if these are attribut‐... -
Page 31: Warranty
2.7 Warranty and liability 2.7.1 Warranty The "General terms and conditions of delivery and business" of Bergmann Maschinenbau GmbH & Co. KG apply in all cases. 2.7.2 Copyright This documentation is a document as defined by the law against unfair com‐... -
Page 32: Spare Parts/Spare Part Orders
The following applies when ordering and using spare parts: Defective components are only allowed to be replaced by genuine parts from Bergmann Maschinenbau GmbH & Co. KG. Use of products from other manufacturers will invalidate the warranty. Refer to the spare parts catalog for the spare part numbers. -
Page 33: Regional Regulations
The machine has been built in accordance with the state of the art, and was developed and tested according to European standards. The owner/user must notify Bergmann Maschinenbau GmbH & Co. KG about any regional or mining regulations to be complied with during the project planning phase. -
Page 34: Safety
3 Safety 3.1 Safety concept in the documentation Safety Safety concept in the documentation The safety concept in this documentation has the following structure: General safety instructions for the owner/user and the operator are listed in this chapter. Chapter-specific safety instructions are listed at the start of the chapter in question. - Page 35 3 Safety 3.2 Required personnel qualification Activity Personnel Initial startup Specialist personnel Operation Personnel who have received training Daily maintenance work Personnel who have received training Maintenance Specialist personnel Troubleshooting Specialist personnel Repair Specialist personnel Taking out of operation Personnel who have received training Disassembly, disposal Specialist personnel...
- Page 36 3 Safety 3.2 Required personnel qualification Exclusively employ specialist personnel or personnel who have received training. Not allowed by any persons whose reactions have been impaired such as by drugs, alcohol, medicines or the like. Comply with the age-regula‐ tions of the specific region. Comply with other nationally applicable regulations of the country in which the owner/user is based.
-
Page 37: Designated Use
3 Safety 3.3 Designated use Designated use The machine is used for transporting on consolidated roads and unconsoli‐ dated tracks. Closed construction sites or works premises are intended as the movement areas. The machine consists of a basic machine which is equipped with different bodies, depending on the application. - Page 38 The machine may only be operated using bodies/components approved by Bergmann Maschinenbau GmbH & Co. KG. The approved bodies/components are defined in the documentation. Approved bodies are:...
- Page 39 3 Safety 3.3 Designated use Rear tipping trough The rear tipping trough is used for holding, transporting and tipping loose bulk materials up to a max. 100 mm grit size. The loose bulk materials may only be dumped using the hydraulically operated dumping device. Any other use or application in addition to this is deemed as contrary to the designated use.
-
Page 40: Application Limits
3 Safety 3.3 Designated use Platform (crane optional) The platform is used for transporting work equipment, tools and materials. Any other use or application in addition to this is deemed as contrary to the designated use. The manufacturer accepts no liability within the framework of their warranty for any damages resulting from such use. -
Page 41: Use Not In Accordance With The Designated Use
3 Safety 3.4 Use not in accordance with the designated use Limitations in time The machine is designed for a service life of 10 years taking into account the machine maintenance stated in the documentation and maintenance/ repair instructions with a potential operation life of 24 h/day and 7 days per week. - Page 42 3 Safety 3.4 Use not in accordance with the designated use The following applies as not using the machine in accordance with its desig‐ nated use: Using the machine in closed rooms. Using the machine in stone quarries. Using the machine underground. Transporting people on the outside of the machine.
- Page 43 3 Safety 3.4 Use not in accordance with the designated use Claims of any type for damage resulting from not using the machine in accordance with its designated use are excluded. The owner/user is solely liable for any damage caused if the machine is not used in accordance with its designated use.
-
Page 44: Applied Standards
3 Safety 3.5 Applied standards The following applies as not using the platform (crane optional) in accord‐ ance with its designated use: Unsecured transporting work equipment, tools and materials. For information about the inappropriate use of the optional crane, see third- party documentation (→... -
Page 45: Overview Of Residual Hazards
3 Safety 3.6 Possible residual hazards 3.6.1 Overview of residual hazards Category Residual hazard Where Possible if Mechanical Moving parts In the entire working area any personnel are in of the machine the danger area Operating error without authority during operation. Use of unsuitable tools/ the specifications in aids... - Page 46 3 Safety 3.6 Possible residual hazards Category Residual hazard Where Possible if On bearings and the specifications in Operating error motors the documentation are not observed. On all parts and com‐ ponents in the the electrical installa‐ exhaust system tion loses its protec‐ tive effect through damage or a defect and ignites an explo‐...
- Page 47 3 Safety 3.6 Possible residual hazards Category Residual hazard Where Possible if components in the Lubricants/oils used hydraulic system become leaky due to damage or lack of maintenance. Noise Functioning of the In the entire working area the owner/user does machine of the machine not take any addi‐...
-
Page 48: Countermeasures
3 Safety 3.6 Possible residual hazards 3.6.2 Countermeasures Hazards arising from the machine must be blocked by the appropriate measures. 3.6.3 Organizational measures by the owner/user The hazards resulting from the risk assessment must be observed by the owner/user and the relevant safety regulations must be implemented. The relevant personal protective equipment needs to be put on for all work taking place on and with the machine. -
Page 49: Safety Instructions In The Documentation
3 Safety 3.7 Safety instructions in the documentation The manufacturer attaches instructions on the machine in the form of relevant pictograms. The owner/user must regularly check these picto‐ grams for legibility and replace illegible/damaged pictograms immedi‐ ately. The machine must constantly be observed during operation and must be immediately shut down in the event of a fault occurring, e.g. - Page 50 3 Safety 3.7 Safety instructions in the documentation DANGER Type and source of danger! Possible consequences of failure to comply and explanation of the source of danger. Measures to be carried out/activity instructions to prevent dangers and damage. Activity-specific safety instructions Required activity-specific safety instructions in the documentation are identi‐...
-
Page 51: Hazard Classes
3 Safety 3.7 Safety instructions in the documentation 3.7.2 Hazard classes The safety symbols in conjunction with signal words have the following meaning: DANGER DANGER indicates an immediate and imminent danger. This safety instruction warns about possible irreversible or fatal injuries. WARNING WARNING indicates a possibly imminent danger. -
Page 52: Note
3 Safety 3.8 Pictograms used ATTENTION ATTENTION warns about possible damage to property or malfunctions. 3.7.3 Note Identification of particular user tips/information for carrying out the following instructions and other especially useful or important information for efficient working and economic use. Pictograms used The pictograms used are divided into 3 groups: Warning symbol... - Page 53 3 Safety 3.8 Pictograms used Warning symbol Meaning/source of danger Warning symbol Meaning/source of danger Warning of danger (in general) Warning of machine rollover due to slope Warning of hot surface Warning of flammable materials Warning of hand injury due to belt Warning of a risk of crushing due drive to forces exerted from above...
-
Page 54: Prohibition Symbol
3 Safety 3.8 Pictograms used 3.8.2 Prohibition symbol The symbols prohibit specific actions. The details of the information are represented graphically in the symbol and described in the text. Prohibition Meaning symbol Off limits for unauthorized persons Tab. 3.4: Prohibition symbol 50-020-1011-900_EN 1.0 - ©... -
Page 55: Mandatory Symbol
3 Safety 3.9 Safety devices 3.8.3 Mandatory symbol The symbols demand that specific actions must be taken. The details of the information are represented graphically in the symbol and described in the text. Mandatory Meaning/course of action Mandatory Meaning/course of action symbol symbol Use the safety belt... -
Page 56: Safety And Information Signs
3 Safety 3.10 Safety and information signs 3.10 Safety and information signs Several safety and information signs are attached to the machine; failure to comply with these can result in serious or fatal injuries as well as damage to the machine. ►... -
Page 57: Position Of The Safety Signs
3 Safety 3.10 Safety and information signs 3.10.1 Position of the safety signs Basic machine Fig. 3.1: Position of the safety signs on the basic machine and in the cab 50-020-1011-900_EN 1.0 - © 2/15/2017... - Page 58 3 Safety 3.10 Safety and information signs List of the safety signs on the basic machine and in the cab Pos. Symbol Quantity Description and location Warning: Hazard of being crushed at the trough Attached on the side panel in the cab so as to be clearly visible Warning: Entanglement hazard! Attached on the outer side of the maintenance doors on the drive unit so as to be clearly visible...
- Page 59 3 Safety 3.10 Safety and information signs List of the safety signs on the basic machine and in the cab Pos. Symbol Quantity Description and location Caution: Risk of burns from hot surfaces! Attached on the inside of the maintenance doors on the drive unit so as to be clearly visible Information sign with safety pictograms Attached on the right next to the battery disconnection switch in the...
- Page 60 3 Safety 3.10 Safety and information signs Rear tipping trough BMD-00151 Fig. 3.2: Position of the safety signs on the rear tipping trough 50-020-1011-900_EN 1.0 - © 2/15/2017...
- Page 61 3 Safety 3.10 Safety and information signs List of the safety signs on the rear tipping trough Pos. Symbol Quantity Description and location Warning: Hazard of being crushed at the trough Attached on both sides of the trough, on the outer side and on the lower side respectively, so as to be clearly visible Tab.
- Page 62 3 Safety 3.10 Safety and information signs Round tipping trough Fig. 3.3: Position of the safety signs on the round tipping trough 50-020-1011-900_EN 1.0 - © 2/15/2017...
- Page 63 3 Safety 3.10 Safety and information signs List of the safety signs on the round tipping trough Pos. Symbol Quantity Description and location Warning: Hazard of being crushed at the trough Attached on both sides of the trough, on the outer side and on the lower side respectively, so as to be clearly visible Tab.
-
Page 64: General Safety Regulations
3 Safety 3.11 General safety regulations 3.11 General safety regulations The operating personnel must comply with the following when using the machine: Safety regulations of the manufacturer for safe use of the machine. Safety regulations of the owner/user. Regional specifications and regulations on safety in the workplace and for avoiding environmental pollution. -
Page 65: Safe Working When Exposed To Noise And Vibration
3 Safety 3.12 Safe working when exposed to noise and vibration 3.12 Safe working when exposed to noise and vibration The machine generates a high noise level during normal operation. As a result, ear defenders must be worn at all times outside the operator's cab. - Page 66 3 Safety 3.13 Safe working on mechanical systems ► Unless specified otherwise in this documentation, protective devices are never allowed to be removed, bypassed or rendered unusable. ► Only start the machine if you know how to switch it off again! ►...
-
Page 67: Safe Working On Hydraulic Systems
3 Safety 3.14 Safe working on hydraulic systems ► Screw connections must be attached correctly and tightened to the pre‐ scribed torque. ► Do not make any unapproved modifications to the settings of the machine, with the exception of the procedures described in the machine documentation. -
Page 68: Safe Working On Electrical Systems
3 Safety 3.15 Safe working on electrical systems ► In the event that hydraulic fluid gets onto parts of your body or clothing, immediately remove the clothing and take the safety precautions or appropriate measures as described in the safety data sheet for the hydraulic fluid and/or the company guidelines of the employer/owner/ user. -
Page 69: Safe Working When Driving And Tipping
3 Safety 3.16 Safe working when driving and tipping Bear in mind that capacitors require a certain length of time to discharge before you work on the electrical system. Only use suitable, adequately insulated and demagnetized tools, or tools that are protected against electrostatic discharge, when working on the electrical system. - Page 70 3 Safety 3.16 Safe working when driving and tipping ► Familiarize yourself with the operational environment before beginning work. ► Should faults or changes in the operating behavior occur during work, immediately stop all work with the machine, shut the machine down, and report the incident to the supervisor.
-
Page 71: Safe Working In The Vicinity Of Electric Cables
3 Safety 3.17 Safe working in the vicinity of electric cables 3.17 Safe working in the vicinity of electric cables When working in the vicinity of aboveground electrical cables and overhead lines, the safety distances must be complied with between the lines and the machine. - Page 72 3 Safety 3.17 Safe working in the vicinity of electric cables ► Take the machine or body out of the electrical danger area. For example, by lowering bodies. swinging the cantilever arms out of the way. driving the machine out. If this is not possible: ►...
-
Page 73: Machine-Specific Danger Notes
If procedures, devices and methods are used during the various jobs that are not expressly recommended by the manufacturer Bergmann Maschinenbau GmbH & Co. KG, it is essential to ensure that the work is always carried out with consideration for the personal safety of the person performing the work, as well as of all other persons involved in the work. -
Page 74: Danger Area During Operation
3 Safety 3.19 Danger areas on the machine 3.19.1 Danger area during operation Fig. 3.4: Danger area of the machine during operation Danger area Minimum distance 5 m Minimum distance 5 m Minimum distance 3 m Minimum distance 5 m Minimum distance 3 m 50-020-1011-900_EN 1.0 - ©... - Page 75 3 Safety 3.19 Danger areas on the machine The danger area (1) around the machine must not be entered during opera‐ tion. The danger area is made up of the movement area for the machine and the bodies. 50-020-1011-900_EN 1.0 - © 2/15/2017...
- Page 76 3 Safety 3.19 Danger areas on the machine 3.19.1.1 Danger area/space requirement for maintenance and repair work Fig. 3.5: Danger area/space requirement of the machine for maintenance and repair work Danger area/space requirement Minimum length 8.5 m Minimum width 7 m Minimum height 5 m 50-020-1011-900_EN 1.0 - ©...
- Page 77 3 Safety 3.19 Danger areas on the machine A minimum space requirement is required for maintenance and repair work in order to be able to carry out servicing work properly. Failure to observe this could mean a potential risk to the personnel working on the machine. 50-020-1011-900_EN 1.0 - ©...
-
Page 78: Danger Area Of The Bodies
3 Safety 3.19 Danger areas on the machine 3.19.2 Danger area of the bodies Rear tipping trough Fig. 3.6: Danger area when the rear tipping trough is raised Rear tipping trough Machine frame Supports 50-020-1011-900_EN 1.0 - © 2/15/2017... - Page 79 3 Safety 3.19 Danger areas on the machine The danger area when the rear tipping trough is raised is between the rear tipping trough (1) and the machine frame (3). The danger area may only be entered if the trough is secured with the supports (2) against unintentional movement.
- Page 80 3 Safety 3.19 Danger areas on the machine Round tipping trough Fig. 3.7: Danger area when the round tipping trough is raised Round tipping trough Holder Supports Machine frame Swivel frame 50-020-1011-900_EN 1.0 - © 2/15/2017...
- Page 81 3 Safety 3.19 Danger areas on the machine When the round tipping trough is raised, the danger area is between the round tipping trough (1), the machine frame (4), and the swivel frame (5). The danger area may only be entered if the trough is secured with the sup‐ ports (3) against unintentional movement.
- Page 82 3 Safety 3.19 Danger areas on the machine Platform with crane Fig. 3.8: Danger area of machine equipped with platform + crane Danger area around machine Danger area of crane Platform Crane Basic machine The danger area around the machine (1) depends on the position of the crane (3) or the area to be reached by the crane.
-
Page 83: Emergency Stop Devices
3 Safety 3.20 EMERGENCY STOP devices The danger area crane (2) is between the platform (3) and basic vehicle (5) and defines the area in which there is an increased risk of crushing/impact due to the crane movements. The danger areas defined here depend on each particular crane and the installation location. -
Page 84: Responsibility Of The Owner/User
3 Safety 3.21 Responsibility of the owner/user 3.21 Responsibility of the owner/user The owner/user must make sure that the operator has read and understood the documentation before initial startup. The owner/user must conduct a hazard analysis of the workplace, and repeat this at appropriate intervals. -
Page 85: Selection Of Personnel
3 Safety 3.23 Selection of personnel At least once each shift, check the machine for damage and defects that can be seen from the outside. This includes, for example, checking for leaks in the hydraulic system as well as the general cleanliness of the machine. Any changes that are found (including in the operating behavior) must be reported to the shift supervisor immediately. -
Page 86: Test By An Technical Expert
3 Safety 3.24 Test by an technical expert 3.24 Test by an technical expert The machine must be tested by an technical expert before the initial startup and at least once a year. An technical expert is someone who, by virtue of their technical training and experience, has sufficient knowledge in the field of the machines, devices and systems, and is sufficiently familiar with the relevant statutory occupa‐... -
Page 87: Environmental Protection
3 Safety 3.26 Environmental protection Instruction of the personnel regarding behavior in case of a fire and the use of small fire extinguishers (first response for extinguishing a fire). During work, the operator must continuously observe the machine, and pay attention to signs of fire or smoldering. All operating personnel must ensure that no highly flammable materials are placed against hot parts of the machine. -
Page 88: Technical Data
4 Technical data 4.1 Machine Technical data Machine Basic vehicle Name Technical data Dimensions Length approx. 5669 mm Width approx. 2900 mm approx. 3720 mm with mirrors Height approx. 3020 mm Dead weight 12750 kg Maximum permissible weight 22750 kg 10000 kg additional load Operating range 50-020-1011-900_EN... - Page 89 4 Technical data 4.1 Machine Name Technical data Operating temperature range -20℃...+35℃ Operating location Open area Operation in buildings, mining galleries, tunnels and the like is only permitted with adequate air extraction or fresh air supply Max. permitted water depth <...
- Page 90 4 Technical data 4.1 Machine Noise emissions Name Technical data Noise emissions when idling Sound power level 91.2 dB/1 pW Continuous sound pressure level 59.8/20 mpa in the workplace Noise emissions when driving Sound power level 107 dB/1 pW Continuous sound pressure level 79 dB/20 mPa in the workplace Tab.
- Page 91 4 Technical data 4.1 Machine Vibrations Name Technical data Whole body when driving 0.45 m/s Horizontal (x, y-direction) 1.5 m/s Vertical (z-direction) 1.8 m/s Tab. 4.3: Vibrations Basic vehicle with rear tipper Name Technical data Dimensions Length approx. 5963 mm Width approx.
- Page 92 4 Technical data 4.1 Machine Name Technical data Transport height approx. 3100 mm Clearance height approx. 3330 mm Ground clearance approx. 610 mm Dead weight 14250 kg Maximum permissible weight 24250 kg Trough - rear tipper Loading height approx. 1970 mm Trough capacity (level) 2000 liters Trough capacity (heaped)
- Page 93 4 Technical data 4.1 Machine Name Technical data Tipping angle trough approx. 62° Trough height dumped approx. 4840 mm Tab. 4.4: Technical data of basic vehicle with rear tipper Basic vehicle with round tipper Name Technical data Dimensions Length approx. 6315 mm Width approx.
- Page 94 4 Technical data 4.1 Machine Name Technical data Ground clearance approx. 610 mm Dead weight 14750 kg Maximum permissible weight 24750 kg Trough - Round tipper Loading height approx. 2076 mm Trough capacity (level) 2000 liters Trough capacity (heaped) 6.5 m Dumping height rear approx.
- Page 95 4 Technical data 4.1 Machine Basic vehicle with platform (crane optional) Name Technical data Dimensions Length approx. 6151 mm Width approx. 2960 mm approx. 3720 mm with mirrors Transport height approx. 3100 mm Clearance height approx. 3330 mm Ground clearance approx.
-
Page 96: Diesel Engine
4 Technical data 4.1 Machine If the machine is equipped with a crane, the total weight can deviate from the values specified here. In this case, the total weight must be increased by the weight of the crane itself. For more information about the technical data of the optional crane, see third-party documentation (→... - Page 97 4 Technical data 4.1 Machine Name Technical data Pollution class TIER IV Final Fuel type Diesel, sulfur-free Average consumption 16.5 l/h Tab. 4.7: Technical data of diesel engine For more information about the technical data of the diesel engine, refer to the third-party documentation (→...
- Page 98 4 Technical data 4.1 Machine Fuel system Name Technical data Fuel tank volume 215 l of which reserve 45 l Fuel pre-filter Type FS0106500 / Cummins Fuel main filter Type FF6300800MX / Cummins Tab. 4.9: Technical data of the fuel system 50-020-1011-900_EN 1.0 - ©...
-
Page 99: Electrical System
4 Technical data 4.1 Machine 4.1.2 Electrical system Name Technical data Operating voltage 24 V Number of batteries Battery voltage 12 V Battery capacity 143 Ah Tab. 4.10: Technical data of the electrical system 4.1.3 Hydraulic system Name Technical data Specification of the hydraulic fluid Tank volume 180 l... - Page 100 4 Technical data 4.1 Machine Name Technical data Return filter Type V3 0941-08 Argo Hytos Tab. 4.11: Technical data of the hydraulic system in general Hydraulic pumps Name Technical data Travel hydraulics Feed pump Variable displacement axial piston pump Number Feed rate 115 l/min Feed pressure...
- Page 101 4 Technical data 4.1 Machine Name Technical data Feed pump Geared pump Number Feed rate 73 l/min Feed pressure max. 270 bar System hydraulics Feed pump Tandem pump Number Feed rate 260 l/min Feed pressure max. 420 bar Tab. 4.12: Technical data of the hydraulic pumps 50-020-1011-900_EN 1.0 - ©...
-
Page 102: Track Undercarriage
4 Technical data 4.1 Machine 4.1.4 Track undercarriage Name Technical data Caterpillar track Type 750 66 150 SRT Width 750 mm Unloaded machine ground pres‐ 0.34 kg/cm sure Loaded machine ground pressure 0.46 kg/cm Travel drive Drive type Hydro mechanical, electronically controlled axial piston motor Operating pressure 420 bar... -
Page 103: Air-Conditioning System
4 Technical data 4.1 Machine Name Technical data Drive range stage Ⅱ 0...16 km/h (forward) 0...6 km/h (reverse) Brakes Service brake Hydraulically on travel drive motors Parking brake Hydraulic spring-loaded brake acting on planetary gear unit Tab. 4.13: Technical data of the track undercarriage 4.1.5 Air-conditioning system Name... -
Page 104: Optional Accessories
4 Technical data 4.2 Optional accessories Optional accessories 4.2.1 Central lubrication device Name Technical data Manufacturer BEKA MAX Output 85 watts Voltage 24 V DC Lubrication Feed rate 1.8 cm /min Maximum operating pressure 280 bar Tank volume 1.9 kg Tab. - Page 105 4 Technical data 4.2 Optional accessories For more information about the technical data of the central lubrication device, see third-party documentation (→ part 3 of the documentation). 50-020-1011-900_EN 1.0 - © 2/15/2017...
-
Page 106: Structure And Function
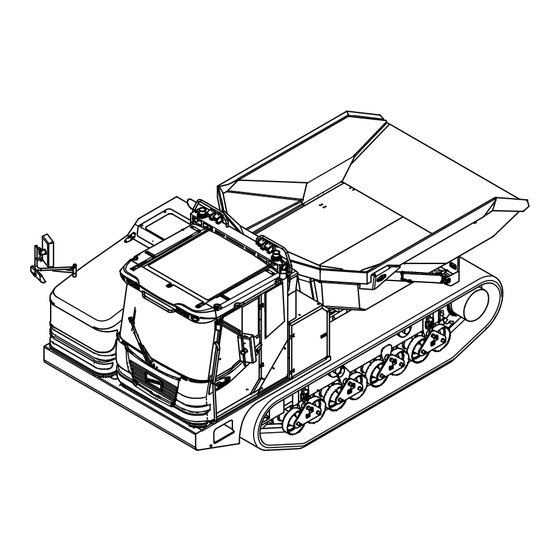
5 Structure and function 5.1 Technical description of the machine Structure and function Technical description of the machine Fig. 5.1: Technical description of the machine Basic machine Rear tipping trough Round tipping trough Platform Crane (optional) 50-020-1011-900_EN 1.0 - © 2/15/2017... - Page 107 5 Structure and function 5.1 Technical description of the machine The machine is used for transporting and for work on consolidated roads and unconsolidated tracks. The machine consists of a basic machine (1) which is equipped with dif‐ ferent bodies, depending on the application. Basic machine with rear tipping trough (2): The basic machine is equipped with a rear tipping trough.
-
Page 108: Technical Description Of The Basic Machine (Series Production Equipment)
5 Structure and function 5.2 Technical description of the basic machine (series production equipment) Technical description of the basic machine (series production equipment) Fig. 5.2: Technical description of the basic machine Frame Exhaust system with particulate filter Operator's cab Hydraulic pump maintenance door Rear lighting device Track undercarriage Tool box... - Page 109 5 Structure and function 5.2 Technical description of the basic machine (series production equipment) The basic machine consists of a frame (1), the operator's cab (3), the track undercarriages (6) and a drive system. The operator's cab and the drive system are arranged on the front frame.
-
Page 110: Track Undercarriage
5 Structure and function 5.2 Technical description of the basic machine (series production equipment) 5.2.1 Track undercarriage BMD-00400 Fig. 5.3: Technical description of the track undercarriage Caterpillar track Support roller Travel drive Track roller Guide wheel unit Each caterpillar track (1) is driven by a travel drive (3). The travel drive con‐ sists of a variable displacement axial piston motor with high-pressure con‐... - Page 111 5 Structure and function 5.2 Technical description of the basic machine (series production equipment) The upper run of the caterpillar track is guided by support rollers (2). The lower run of the caterpillar track runs over track rollers (4) with a swinging movement.
- Page 112 5 Structure and function 5.2 Technical description of the basic machine (series production equipment) Guide wheel unit Fig. 5.4: Technical description of the guide wheel unit Guide wheel Guide Elastometer Tensioning cylinder The guide wheel (1) mounted in the guide (2) is pressed against the cater‐ pillar track by a tensioning device.
-
Page 113: Drive System
5 Structure and function 5.2 Technical description of the basic machine (series production equipment) The tensioning device consists of a tensioning cylinder (4) and an elastom‐ eter (3). The caterpillar track is tensioned via the tensioning cylinder (4). If an overload occurs, the elastometer and thus the guide wheel deflect inward. - Page 114 5 Structure and function 5.2 Technical description of the basic machine (series production equipment) hydraulic fluid heat The tandem pump drives the hydraulic motor of the coolant/charge air combi cooler. exchanger and the hydraulic motor of the coolant/charge air The drive motor and the charge air are cooled by the combi cooler.
-
Page 115: Hydraulic System
5 Structure and function 5.2 Technical description of the basic machine (series production equipment) 5.2.3 Hydraulic system Hydraulic tank Fig. 5.5: Technical description of the hydraulic tank Suction connections Ventilation filter Pressure switch/clogging indicator Return filter Hydraulic tank Sight glass/thermostat 50-020-1011-900_EN 1.0 - ©... - Page 116 5 Structure and function 5.2 Technical description of the basic machine (series production equipment) The hydraulic tank (5) is used as a collecting and suction tank for hydraulic fluid, and is located under the operator's cab. The hydraulic pumps are con‐ nected to the suction connections (1) on the suction side.
- Page 117 5 Structure and function 5.2 Technical description of the basic machine (series production equipment) Hydraulic fluid heat exchanger The fan impeller (2) is driven by the hydraulic motor (3) and draws in cooling air from the outside to the inside through the heat exchanger (1). The hydraulic motor is switched on by the thermostatic switch (4) when the temperature of the hydraulic fluid is approx.
-
Page 118: Electrical System
5 Structure and function 5.2 Technical description of the basic machine (series production equipment) 5.2.4 Electrical system The electrical system is powered by a three-phase alternator on the drive system and two batteries. The batteries are located behind the battery maintenance doors in the toolbox. - Page 119 5 Structure and function 5.2 Technical description of the basic machine (series production equipment) Exterior mirror Front working light Rear window wiper Combined brake/rear light Reversing light Windscreen wiper The exterior mirrors (1) are electrically heated and can be adjusted electron‐ ically from the operator's cab.
-
Page 120: Operator's Cab
5 Structure and function 5.2 Technical description of the basic machine (series production equipment) 5.2.5 Operator's cab Fig. 5.8: Technical description of the operator's cab Operator's cab Operator's door Grab handle Elastomeric bearing Safety glass 50-020-1011-900_EN 1.0 - © 2/15/2017... - Page 121 5 Structure and function 5.2 Technical description of the basic machine (series production equipment) All functions of the machine are controlled from the operator's cab (1). The operator's cab is tested and approved as a ROPS and FOPS . The oper‐ ator's cab protects the operator in the operator's cab from falling objects or if the machine rolls over.
- Page 122 5 Structure and function 5.2 Technical description of the basic machine (series production equipment) Front control station Fig. 5.9: Technical description of the front control station Electrics box cover release lever Battery disconnection switch electrical Ventilation nozzles Loudspeaker preparations Front roller blind Steering wheel with steering knob EMERGENCY STOP switch Instrument panel/display...
- Page 123 5 Structure and function 5.2 Technical description of the basic machine (series production equipment) front control station is located in the operator's cab next to the right con‐ trol station (10). The travel movements of the machine are controlled using the steering wheel with steering knob (6), the accelerator pedal (11) and the inching pedal (12).
- Page 124 5 Structure and function 5.2 Technical description of the basic machine (series production equipment) Right control station Fig. 5.10: Technical description of the right control station Emergency exit Radio preparation Heater/air-conditioning system control Ignition switch Diagnostic socket Interior light Mirror adjustment Switches Bottle holder Front control station...
- Page 125 5 Structure and function 5.2 Technical description of the basic machine (series production equipment) right control station is located in the operator's cab next to the front con‐ trol station (10). The machine is switched on and off using the ignition switch (4). The switches (8) are used for controlling machine functions.
- Page 126 5 Structure and function 5.2 Technical description of the basic machine (series production equipment) Rear control station Fig. 5.11: Technical description of the rear control station Ventilation nozzle Operator's seat Safety belt Fire extinguisher Switches Joystick console Right control station Joystick Emergency hammer rear control station is located in the operator's cab next to the right con‐...
- Page 127 5 Structure and function 5.2 Technical description of the basic machine (series production equipment) The machine is controlled from the operator's seat (2). A safety belt (3) serves to protect the operator. The operator's seat is heated and equipped with air suspension. There are switches (5) and a joystick (8) on the joystick console (6) for additional control of machine functions.
-
Page 128: Technical Description Of The Bodies
5 Structure and function 5.3 Technical description of the bodies Technical description of the bodies 5.3.1 Rear tipping trough Fig. 5.12: Technical description of the rear tipping trough 50-020-1011-900_EN 1.0 - © 2/15/2017... - Page 129 5 Structure and function 5.3 Technical description of the bodies Trough Lashing eyes Pivot Frame Lifting cylinder holder Support Hydraulic cylinder Block Cab protection wall The rear tipping trough is used for holding, transporting and tipping loose bulk materials. The cab protection wall (9) prevents materials falling onto the operator's cab.
-
Page 130: Round Tipping Trough
5 Structure and function 5.3 Technical description of the bodies 5.3.2 Round tipping trough Fig. 5.13: Technical description of the round tipping trough swivel frame/trough Trough Lashing eyes Pivot for Support Swivel frame Machine frame trough Lifting cylinder for Swivel lock 50-020-1011-900_EN 1.0 - ©... - Page 131 5 Structure and function 5.3 Technical description of the bodies The round tipping trough is used for holding, transporting and tipping loose bulk materials. The round tipping trough can be swiveled left or right out of the direction of travel by up to 90°. swivel frame/ The trough (1) is connected to the swivel frame (5) by the trough pivots (3).
-
Page 132: Platform
5 Structure and function 5.4 Technical description of the optional equipment 5.3.3 Platform The platform (1) is used for transporting work equipment, tools and mate‐ rials. Fig. 5.14: Technical description of the platform Platform Technical description of the optional equipment The optional equipment described in this section is not necessarily part of the machine. -
Page 133: Crane (Optional)
5 Structure and function 5.4 Technical description of the optional equipment 5.4.1 Crane (optional) platform can be equipped Optionally, the machine variant equipped with the with a crane (1). The crane can be mounted on the front of the machine or between the cab and the platform. -
Page 134: Swiveling Operator Stand (Optional)
5 Structure and function 5.4 Technical description of the optional equipment 5.4.2 Swiveling operator stand (optional) Optionally, the machine can be equipped with a swiveling operator stand. This allows the operator stand to swivel by 180° together with the steering wheel, joystick and pedals during shunting and unloading work. -
Page 135: Cab With Dual Seating (Optional)
5 Structure and function 5.4 Technical description of the optional equipment 5.4.3 Cab with dual seating (optional) Optionally, the machine can be equipped with dual seating in the cab. 5.4.4 Additional lighting (option) Fig. 5.16: Technical description of additional lighting (option) Rotating beacon Additional working light at rear 50-020-1011-900_EN... -
Page 136: Hardox Reinforced Trough (Optional)
5 Structure and function 5.4 Technical description of the optional equipment The machine can be equipped with one or two rotating beacons (1) as an option. The machine can be equipped with additional rear working lights (2) as an option. 5.4.5 Hardox reinforced trough (optional) Optionally, the machine can be equipped with a Hardox reinforced trough. -
Page 137: Eco Mode (Optional)
5 Structure and function 5.4 Technical description of the optional equipment 5.4.7 ECO mode (optional) Optionally, the machine can be equipped with an ECO mode for shutoff when idling. In ECO mode, the engine speed is decreased after a predefined amount of time;... -
Page 138: Central Lubrication Device (Option)
5 Structure and function 5.4 Technical description of the optional equipment 5.4.8 Central lubrication device (option) The machine can be equipped with a central lubrication device (1) as an option. The central lubrication device operates fully automatically and is inde‐ pendent of the operating hours of the machine. -
Page 139: Reversing Camera (Option)
5 Structure and function 5.4 Technical description of the optional equipment 5.4.9 Reversing camera (option) The machine can be equipped with a reversing camera as an option. The area behind the machine is imaged by the camera (2) and displayed on the monitor (1). -
Page 140: Reverse Warning Device (Option)
5 Structure and function 5.4 Technical description of the optional equipment 5.4.10 Reverse warning device (option) The machine can be equipped with a reverse warning device as an option. When the machine is reversing, an audible warning signal sounds. 5.4.11 Rear window roller blind (option) The machine can be equipped with a roller blind on the rear window as an option. -
Page 141: Transport, Packing, Storage
6 Transport, packing, storage 6.1 Safe working when packing, transporting and unpacking at the place of use Transport, packing, storage Safe working when packing, transporting and unpacking at the place of use When packing, transporting and unpacking the machine, comply with the requirements of accident prevention regulations, environmental protection and any safety regulations of the country in question. -
Page 142: Transport/Setup
6 Transport, packing, storage 6.2 Packing 6.1.1 Transport/setup The owner/user or the personnel tasked with transporting must ensure that the machine is transported in accordance with its designated use, safely and with consideration for the dangers involved. Before starting transportation all necessary information about first aid and rescue possibilities (emer‐... -
Page 143: Transport Inspection
Compare the goods receipt directly with the shipping papers. Damage, incorrect quantities or incorrect deliveries must be reported immediately to Bergmann Maschinenbau GmbH & Co. KG. Check subassemblies and components for externally visible signs of damage and defects. Notify the shift supervisor immediately if you notice any changes. -
Page 144: Storage
6 Transport, packing, storage 6.4 Storage Storage Unless specified otherwise in the purchase order, the components are pre‐ pared to be assembled shortly after delivery. Storage conditions of the machine: protected against the weather covered protected against dust well ventilated outdoors only if on a wood foundation For further information about the storage conditions of optional accessory and equipment, see the respective third-party documentation (→... -
Page 145: Transporting On Low Loader And By Railway
6 Transport, packing, storage 6.6 Transporting on low loader and by railway Damaged attachment eyes are not allowed to be used until the defects have been rectified. Coordinate the working method for the lift and establish responsibilities in a clearly understood manner. Wear gloves when handling ropes. - Page 146 6 Transport, packing, storage 6.6 Transporting on low loader and by railway The machine has no certification for public roads and must therefore only be driven on private premises. Low loader and railway transportation are the appropriate methods for transporting the machine over long distances. If such a transport method is required, loading and transport should be coordinated with a company that has experience in the field of heavy-load transportation.
- Page 147 6 Transport, packing, storage 6.6 Transporting on low loader and by railway ► Load the machine onto the transport vehicle (→ 6.7). ► Lash down the machine on the transport vehicle using the indicated attachment points (1) and (2). ► Apply the parking brake.
-
Page 148: Lifting The Machine
6 Transport, packing, storage 6.7 Lifting the machine Lifting the machine DANGER Risk due to suspended loads! Serious or even fatal injury could be caused by suspended loads falling. Persons must not be underneath suspended loads. Make sure that an adequate safety distance is maintained. Cordon off an extensive area around the range of movement of the loads. - Page 149 6 Transport, packing, storage 6.7 Lifting the machine Fig. 6.2: Lifting the machine The machine can be lifted and loaded with a crane using suitable means of attachment. The means of attachment (ropes/chains) must have a minimum safe working load of 20,000 kg. 50-020-1011-900_EN 1.0 - ©...
-
Page 150: Hand Signals For Guidance
6 Transport, packing, storage 6.7 Lifting the machine A 4-ply chain or 4-ply rope with transverse connection must be used. The machine may only be attached using the attachment eyes for the track undercarriage. 6.7.1 Hand signals for guidance If the operator cannot see the working area adequately, the area in question must be made safe by erecting fixed barriers. -
Page 151: Installation, Initial Startup And Function Test
7 Installation, initial startup and function test 7.1 Safety instructions for installation and initial startup Installation, initial startup and function test Safety instructions for installation and initial startup During installation and initial startup of the machine, comply with the requirements of the accident prevention regulations, environmental protec‐ tion and any safety regulations of the country in question. - Page 152 7 Installation, initial startup and function test 7.1 Safety instructions for installation and initial startup DANGER Danger in the event of fire in the operator's cab! In the event of a fire in the operator's cab, flammable materials could quickly catch fire and injure persons. Leave the operator's cab immediately in the event of a fire.
-
Page 153: Assembly
7 Installation, initial startup and function test 7.2 Assembly Assembly The machine is supplied fully assembled. No assembly is required. Initial startup and function test of the machine 7.3.1 Preparatory activities Do not work in any way that impairs safety. Take the machine into operation in accordance with its intended use, taking account of safety aspects and potential dangers, and as described in the documentation. - Page 154 7 Installation, initial startup and function test 7.3 Initial startup and function test of the machine ► Check the electrical system. DANGER! Risk due to catching or entanglement! When the maintenance cover is open, there is a risk of getting entangled or caught by the moving parts on the running drive motor! Do not open the maintenance cover when the drive motor is run‐...
-
Page 155: Carrying Out The Function Test/Initial Startup
7 Installation, initial startup and function test 7.3 Initial startup and function test of the machine 7.3.2 Carrying out the function test/initial startup During the function test, pay attention to unusual noises and increased sur‐ face temperatures which might indicate a defect. If there are malfunctions during the function test, immediately stop the machine, secure it and rectify malfunctions. - Page 156 7 Installation, initial startup and function test 7.3 Initial startup and function test of the machine ► Check the seat contact switches for the driving functions. ► Move the operator's seat to the forward position using the front/back setting. ► Shift the operator's body weight to the front area of the seat.
-
Page 157: Checks After Initial Startup/Function Test
7 Installation, initial startup and function test 7.3 Initial startup and function test of the machine ► Switch on all consumers individually, and check the correct function and movements according to the operating signs. ► Run through the hydraulic functions several times, starting at a slow speed. - Page 158 7 Installation, initial startup and function test 7.3 Initial startup and function test of the machine ► Check the hydraulic system for leaks. Retighten loose screw connec‐ tions. Immediately renew hydraulic lines that are defective, have damp bindings, are cracked or kinked. ►...
-
Page 159: Operation
8 Operation 8.1 Safety instructions Operation Safety instructions When operating the machine, comply with the requirements of the accident prevention regulations, environmental protection and any safety regulations of the country in question. In addition to the regulations listed here, the general safety regulations (→... - Page 160 8 Operation 8.1 Safety instructions DANGER Risk of accident due to using the machine on an uphill gradient, downhill gradient or in a sloping position! Using the machine on an uphill gradient or downhill gradient (e.g. hill‐ sides, ditches, mountains) or in a sloping position poses a risk of an acci‐ dent due to the machine toppling over.
- Page 161 8 Operation 8.1 Safety instructions DANGER Danger in the event of fire in the operator's cab! In the event of a fire in the operator's cab, flammable materials could quickly catch fire and injure persons. Leave the operator's cab immediately in the event of a fire. Take fire-fighting measures only from outside using the appropriate fire extinguisher.
-
Page 162: Operation Of The Machine
8 Operation 8.2 Operation of the machine Operation of the machine 8.2.1 Opening and closing 8.2.1.1 Side window ► Press the pusher (3) and handle (2) together and hold them. ► Push the side window (1) to the side using the handle. When closing, make sure that the locking mechanism is heard to engage. -
Page 163: Seats, Steering Wheel, Mirrors
8 Operation 8.2 Operation of the machine 8.2.2 Seats, steering wheel, mirrors 8.2.2.1 Operator's seat Adjusting the seat and attaching the seatbelt Before startup and when there is a change of operator, the operator's seat must be adjusted for the operator. No objects are allowed to be kept in the range of movement of the opera‐... - Page 164 8 Operation 8.2 Operation of the machine Fig. 8.2: Using the operator's seat Safety belt Backrest adjustment lever Adjuster for lower lumbar support Adjuster for middle lumbar support Seat heater switch Forward/back adjustment handle Button for height and weight adjustment 8 Seat forward/back Tilt seat ►...
- Page 165 8 Operation 8.2 Operation of the machine ► Make the front/back adjustment. ► Pull the handle (6) upwards and hold it pulled. ► Move the operator's seat into position. ► Release the handle. The handle must engage. ► Fasten safety belt (1). Further information about the operator's seat and the adjusting possibilities, see third-party documentation (→...
- Page 166 8 Operation 8.2 Operation of the machine 8.2.2.2 Adjusting the steering wheel Adjusting the height: ► Release lever (1). ► Adjust the steering wheel to the required height by pulling/pushing. ► Tighten lever. Adjusting the angle: ► Release lever (2). ►...
- Page 167 8 Operation 8.2 Operation of the machine 8.2.2.3 Adjusting the mirrors ► Turn the switch (1) to select the mirror to be adjusted. Left - Adjusting the left mirror Right - Adjusting the right mirror ► Adjust the mirror. Position 2 - turn up Position 3 - turn right Position 4 - turn down Position 5 - turn left...
- Page 168 8 Operation 8.2 Operation of the machine 8.2.2.4 Mirror heater Position 1 - Mirror heater off Position 2 - Mirror heater on Fig. 8.5 Mirror heater switch is located on the right control station. 50-020-1011-900_EN 1.0 - © 2/15/2017...
-
Page 169: Light And Windscreen Wiper
8 Operation 8.2 Operation of the machine 8.2.3 Light and windscreen wiper 8.2.3.1 Working light Position A1 - Front working lights off Position A2 - Front working lights on Position B1 - Rear working lights off Position B2 - Rear working lights on Fig. - Page 170 8 Operation 8.2 Operation of the machine 8.2.3.2 Interior light Interior light The interior light (2) switches on/off automatically when the operator's door is opened/closed. The switch (3) is used for switching on manually. Reading light Switch (4) is used for switching on the reading light (2). Fig.
- Page 171 8 Operation 8.2 Operation of the machine 8.2.3.3 Windscreen wiper Position 1 - Windscreen wiper off latching Position 2 - Continuous wipe momentary contact - Wiping with screen wash Position 3 Fig. 8.8 windscreen wiper switch is located on the front control station. 50-020-1011-900_EN 1.0 - ©...
- Page 172 8 Operation 8.2 Operation of the machine 8.2.3.4 Rear window wiper Position 1 - Rear window wiper off latching Position 2 - Continuous wipe momentary contact - Wiping with screen wash Position 3 Fig. 8.9 Rear window wiper switch is located on the right control station. 50-020-1011-900_EN 1.0 - ©...
-
Page 173: Heating/Air Conditioning And Ventilation
8 Operation 8.2 Operation of the machine 8.2.4 Heating/air conditioning and ventilation 8.2.4.1 Heating/air conditioning control Setting the temperature ► The temperature can be raised or lowered via knobs (4) and (5). The desired temperature is shown on the display (3) in °C. ►... - Page 174 8 Operation 8.2 Operation of the machine ► Turn the controller (1) to the left or right. Min pos.: ventilation at lowest setting Max pos.: ventilation at highest setting Off pos.: ventilation off ► Knob (7) switches the recirculating air function on/off. When the recircu‐ lating air function is switched on, the red indicator light next to the knob lights up.
- Page 175 8 Operation 8.2 Operation of the machine 8.2.4.3 Rectangular ventilation nozzles The distributor (2) is turned at the dial (1) to specify the air flow direction. The air quantity is set by opening/closing the cover (3) on the dial (4). Fig.
- Page 176 8 Operation 8.2 Operation of the machine 8.2.5 Instrument panel and display Overview of instrument panel and display Fig. 8.13: Overview of instrument panel and display Buttons left Instrument panel left Instrument panel top Instrument panel right Buttons right Display 50-020-1011-900_EN 1.0 - ©...
- Page 177 8 Operation 8.2 Operation of the machine The individual instrument panels (2, 3 and 4) and the display (6) are described in the following sections. The buttons left (1) and buttons right (5) are used for operating the display and are described in the corresponding section.
- Page 178 8 Operation 8.2 Operation of the machine 8.2.5.1 Instrument panel left Fig. 8.14: Instrument panel left Pre-glow indicator light High-beam light indicator light Drive motor rev counter Parking brake indicator light Low-beam light indicator light Engine temperature too high indicator light Drive motor coolant temperature 50-020-1011-900_EN...
- Page 179 8 Operation 8.2 Operation of the machine When an indicator light (2, 3, 4, 5 or 6) lights up, this means the corre‐ sponding function/message is active. ATTENTION! Danger of machine damage! There is a danger of machine damage if the machine continues to be Engine temperature too high indi‐...
- Page 180 8 Operation 8.2 Operation of the machine 8.2.5.2 Instrument panel right Fig. 8.15: Instrument panel right Maintenance required indicator light General warning indicator light Speedometer Forward travel direction indicator light Reverse travel direction indicator light Fuel level Reserve fuel level indicator light 50-020-1011-900_EN 1.0 - ©...
- Page 181 8 Operation 8.2 Operation of the machine When an indicator light lights up, this means the corresponding function/ message is active. ATTENTION! Danger of machine damage! There is a danger of machine damage if the machine continues to be General warning indicator light lights up. operated when the Allow the machine to cool down at idling speed.
- Page 182 8 Operation 8.2 Operation of the machine 8.2.5.3 Instrument panel top Fig. 8.16: Instrument panel top Alternator indicator light Oil pressure indicator light not assigned DPF regeneration suppressed indicator Clean diesel particulate filter indicator not assigned light light Exhaust system overheated indicator Working mode indicator light not assigned light...
- Page 183 8 Operation 8.2 Operation of the machine When an indicator light lights up, this means the corresponding function/ message is active. Clean diesel particulate The diesel particulate filter must be cleaned if the filter indicator light (6) lights up. The machine load must be reduced if the Exhaust system overheated indicator light (7) lights up.
- Page 184 8 Operation 8.2 Operation of the machine 8.2.5.4 Display Main screen Fig. 8.17: Display - main screen 50-020-1011-900_EN 1.0 - © 2/15/2017...
- Page 185 8 Operation 8.2 Operation of the machine Time Bergmann company logo Text panel Operating hours OK button Warning display button Forward button Date Travel direction display Back button The main screen displays information such as the time (1), operating hours forwards/reverse (8).
- Page 186 8 Operation 8.2 Operation of the machine Operating parameters submenu Fig. 8.18: Operating parameters submenu Travel direction display Transmission/hydraulic oil temperature Engine temperature Speed display Battery voltage Date OK button Warning display button Forward button Back button 50-020-1011-900_EN 1.0 - © 2/15/2017...
- Page 187 8 Operation 8.2 Operation of the machine Operating parameters submenu displays information about the machine status. Buttons (7, 8, 9 and 10) are used for navigating through the other sub‐ menus. 50-020-1011-900_EN 1.0 - © 2/15/2017...
- Page 188 8 Operation 8.2 Operation of the machine Warning/error messages submenu Fig. 8.19: Warning/error messages submenu Warning/error messages text panel SPN code FMI code Maintenance counter Operating hours OK button Warning display button Forward button Back button Warning/error messages submenu displays warning and error mes‐ sages with corresponding codes (→...
- Page 189 8 Operation 8.2 Operation of the machine Forward button It is possible to scroll through the error messages using the Back button (9). Pressing the Warning display button returns (8) and the you to the main screen. Only one error message is displayed in the text panel (1) at one time. If a warning/error message is displayed, shut down the machine and con‐...
- Page 190 8 Operation 8.2 Operation of the machine Setting language submenu Setting language submenu. The system language can be set in the Forward button (4) and The particular language can be selected using the Back button (5). The OK button (2) and Warning display button (3) are used for confirming/canceling the procedure.
- Page 191 8 Operation 8.2 Operation of the machine 8.2.6 Driving and control elements 8.2.6.1 Switching the battery main switch on/off ► Open the maintenance door on the drive unit (1). ► Lock the maintenance door using the rod (2). Fig. 8.22 50-020-1011-900_EN 1.0 - ©...
- Page 192 8 Operation 8.2 Operation of the machine ► Switch the battery main switch to the corresponding position. ON - Electrical power supply switched on Position 1 OFF - Electrical power supply disconnected Position 2 ► Close the maintenance door on the drive unit again. Fig.
- Page 193 8 Operation 8.2 Operation of the machine 8.2.6.2 Battery disconnection switch The battery disconnection switch in the operator's cab interrupt the electrical power supply of the electrical box. ► Switch the battery disconnection switch to the corresponding position. ON - Electrical power supply switched on Position 1 OFF - Electrical power supply disconnected Position 2...
- Page 194 8 Operation 8.2 Operation of the machine 8.2.6.3 Ignition switch Positions of the ignition key: Position 1 - Ignition off Position 2 - Ignition on Position 3 - Starting the drive motor Fig. 8.25 The ignition switch is located on the right control station. Depending on the outside temperature, the drive motor is automatically preheated at key position 2.
- Page 195 8 Operation 8.2 Operation of the machine 8.2.6.4 EMERGENCY STOP switch EMERGENCY STOP switch (1) immediately stops the move‐ Pressing the ment of the machine. The drive motor and the hydraulic functions of the EMERGENCY STOP switches must be bodies remain in operation. All unlatched so the machine can be taken back into operation.
- Page 196 8 Operation 8.2 Operation of the machine 8.2.6.5 Foot pedals Pressing the inching pedal (1) decelerates the travel movement of the machine in working and transport mode. In transport mode, the travel speed is regulated using the accelerator pedal (2). In working mode, the engine speed and the maximum speed are set via the dial switch (→...
- Page 197 8 Operation 8.2 Operation of the machine 8.2.6.6 Dial switch The particular function is shown on the sign (3) of the dial switch (2). The setting in question can be read off on the display (1). The engine speed and maximum speed in working mode are controlled using the dial switch on the machine.
- Page 198 8 Operation 8.2 Operation of the machine 8.2.6.7 Joystick console Fig. 8.29: Joystick console Working mode/Transport mode switch Ladder switch Travel direction switch Parking brake switch Release trough button Release/Neutral button The travel direction switch (2) selects the travel direction. 50-020-1011-900_EN 1.0 - ©...
- Page 199 8 Operation 8.2 Operation of the machine Switch forward - Forward travel direction Switch backward - Reverse travel direction Neutral and into a travel direction, in In order to shift the transmission out of Release/Neutral switch (6) must addition to the travel direction switch, the also be activated.
- Page 200 8 Operation 8.2 Operation of the machine ► Parking brake switch to the rear. Pull the activation lock on the ► Activate the switch and release the activation lock. Ladder Schalter (3) can retract and extend the ladder. The machine attachments can be controlled using the joystick. rear tipping trough construction: Using the joystick with Joystick forward...
- Page 201 8 Operation 8.2 Operation of the machine 8.2.6.8 Horn momentary contact - Horn on Position 1 Fig. 8.30 horn switch is located on the front control station. 50-020-1011-900_EN 1.0 - © 2/15/2017...
- Page 202 8 Operation 8.2 Operation of the machine 8.2.7 Storage and useful information 8.2.7.1 Roller blind The roller blind (2) can be pulled down at the tab (3) and adjusted in height. To release the lock, hold the tab firmly and pull the loop (1). Fig.
- Page 203 8 Operation 8.2 Operation of the machine 8.2.7.2 Cab door storage compartment A storage compartment (1) is located on the cab door. Fig. 8.32 50-020-1011-900_EN 1.0 - © 2/15/2017...
- Page 204 8 Operation 8.2 Operation of the machine 8.2.7.3 Cab beverage holder There are two beverage holders (1) to the right of the operator's seat. Fig. 8.33 50-020-1011-900_EN 1.0 - © 2/15/2017...
- Page 205 8 Operation 8.2 Operation of the machine 8.2.8 Optional equipment 8.2.8.1 Swiveling operator stand Fig. 8.34: Swiveling operator stand operator stand lever 50-020-1011-900_EN 1.0 - © 2/15/2017...
- Page 206 8 Operation 8.2 Operation of the machine The optional swiveling operator stand can be turned by actuating lever (1) by 180°. ► Bring the machine to a stop. ► Activate lever and turn operator stand 180°. ► Ensure that the lever is properly engaged again and the operator stand cannot turn inadvertently.
- Page 207 8 Operation 8.2 Operation of the machine 8.2.8.3 Reversing camera The optional reversing camera switches on automatically when reverse gear is engaged. Further information about operating the optional reversing camera, see third-party documentation (→ part 3 of the documentation). 8.2.8.4 Radio Information about operating the optional radio, see third-party documenta‐...
- Page 208 8 Operation 8.3 Checks before starting work Checks before starting work DANGER Risk of accident due to tearing the caterpillar track! A risk of accident is posed if the caterpillar track tears as a result of wear and the machine drives on uncontrollably in any direction. Prior to operation, always check the caterpillar track for tears or broken-out sections in the elastic, and for wear in the steel inserts.
- Page 209 8 Operation 8.4 Switching on the machine ► Check the coolant level (→ 9.3.3). ► Check the hydraulic fluid level (→ 9.3.3). ATTENTION! Warning of machine damage! A risk is posed of the machine being damaged due to air in the fuel system if the fuel tank is run completely empty.
- Page 210 8 Operation 8.4 Switching on the machine Air-conditioning system (optional) switched off. The voltage supply at the battery main switch and at the battery discon‐ nection switch is switched on (→ 8.2.6.1). ► Switch on the ignition (→ 8.2.6.3). The instrument panel carries out a lamp function test. The indicator lights light up briefly.
- Page 211 8 Operation 8.4 Switching on the machine ► Start the drive motor using the ignition switch. Hold the key in the Start position for max. 15 seconds. Release the key immediately when the drive motor starts. Release the key if the drive motor does not start. ►...
- Page 212 8 Operation 8.5 Travel mode The engine speed is restricted to about 1500 rpm when the hydraulic system is cold, so as to avoid damaging the drive motor. The restriction is lifted once a hydraulic fluid temperature of approx. 30 °C has been reached.
- Page 213 8 Operation 8.5 Travel mode WARNING Risk of accident due to driving with a lifted trough! A risk is posed of personal injury or damage to property when driving with a raised trough. Driving with a raised trough is only permitted over short distances for tipping procedures and at a low speed.
- Page 214 8 Operation 8.5 Travel mode Transport position of the round tipping trough ► Move the trough to the central position. ► Lower the trough completely. The trough rests on the swivel lock. ► Body hydraulics switch to the transport position. Move the Transport position of the crane (Option) ►...
- Page 215 8 Operation 8.5 Travel mode Preparations for on-road driving on private roads ► Move the bodies to the transport position (→ 8.5). ► Switch off the working light (→ 8.2.3.1). ► If fitted, switch on the rotating beacon (→ 8.2.8.2). Transporting people is forbidden! 8.5.2 Selecting the travel mode and driving...
- Page 216 8 Operation 8.5 Travel mode Changing the direction of travel The direction of travel should only be changed when the machine is at a standstill or traveling at a slow speed, so as to avoid jerky movements of the machine. DANGER! Risk of accident when reversing! When reversing, the field of vision can be restricted by reduced visi‐...
- Page 217 8 Operation 8.5 Travel mode Braking the machine CAUTION Risk of accident due to activating the parking brake during the drive! Activating the parking brake during the drive will lead to the machine stopping immediately. Never activate the parking brake during the drive. The lap belt on the operator's seat must be fastened.
- Page 218 8 Operation 8.5 Travel mode ► Working mode travel mode. Select the neu‐ Before changing the travel mode, set the travel direction switch to the tral position in the middle. ► Select the travel direction. ► Adjust the engine rpm. ►...
- Page 219 8 Operation 8.6 Tipping ► Release the inching pedal. ► Regulate the travel speed using the accelerator pedal. Tipping DANGER Risk of crushing! Persons in the danger area can get severely crushed if the operator unin‐ tentionally lifts/lowers the trough. Make sure that no persons are in the danger area during tipping.
- Page 220 8 Operation 8.6 Tipping WARNING Risk of impact! There is potential for serious or even fatal injuries if persons are in the danger area when turning the trough. Make sure that no persons are in the danger area when turning the trough.
- Page 221 8 Operation 8.7 Crane operation Crane operation DANGER Risk of crushing! There is danger to life and limb if the crane is not operated properly and the machine tips over. Operate and implement the crane only according to the regulations of the manufacturer.
- Page 222 8 Operation 8.8 Checks during operation ► Move the machine to the place of operation and line it up. ► Body hydraulics switch . Unlock the ► Operate the crane. For information about controlling the crane, see third-party documentation (→ part 3 of the documentation). ►...
- Page 223 8 Operation 8.9 Refueling the machine ► Pay attention to the indicator and warning displays. ► Check the machine on an ongoing basis for fluid leaks. Refueling the machine Fuel WARNING Danger of fire and explosion! Danger of serious or fatal injuries if fuels catch fire. No smoking, fire or naked flames when handling fuels.
- Page 224 8 Operation 8.9 Refueling the machine WARNING Danger of poisoning! Severe or fatal injuries due to contact, swallowing or inhaling fuel and fuel vapors. Do not inhale fuel vapors. In case of skin contact, immediately rinse off fuel with water and soap.
- Page 225 8 Operation 8.9 Refueling the machine ATTENTION Warning of machine damage! Refueling with incorrect or contaminated fuel or fuel with an inferior quality can cause damage to the machine. Only refuel the machine with a permitted fuel according to the infor‐ mation in the documentation.
- Page 226 8 Operation 8.9 Refueling the machine ► Open the tank cap (1). Unlock the tank cap if required. ► Fill the fuel through the filler pipe. ► Close the tank cap again once the machine has been fully refueled. Fig. 8.36 We recommend fully refueling the machine at the end of a shift, so as to avoid condensation forming.
- Page 227 8 Operation 8.10 Switching off the machine ► Open the tank cap (2). Unlock the tank cap if required. ► Fill in Adblue through the filler pipe (1). ► Close the tank cap again once the machine has been fully refueled. Fig.
- Page 228 8 Operation 8.10 Switching off the machine ► Move the travel direction switch to the central position (→ 8.2.6.7). ► Apply the parking brake (→ 8.2.6.7). ► Switch off the ignition (→ 8.2.6.3). Parking the machine Procedure for parking the machine, e.g. at the end of a shift. ►...
- Page 229 8 Operation 8.11 Recovering the machine 8.11 Recovering the machine After an accident, the machine needs to be recovered and removed. Towing the machine away is not permitted. ► Contact customer service (→ 13.1). ► Have the machine recovered by hiring a specialist company. ►...
- Page 230 9 Daily maintenance work 9.1 Safety instructions Daily maintenance work Safety instructions During maintenance work on the machine, comply with the requirements of the accident prevention regulations, environmental protection and any safety regulations of the country in question. In addition to the regulations listed here, the general safety regulations (→...
- Page 231 9 Daily maintenance work 9.1 Safety instructions WARNING Risk of burn injuries! It is possible to receive serious burn injuries due to very hot machine parts. Always wear personal protective equipment. Always allow the machine to cool down before carrying out repairs or maintenance work.
- Page 232 9 Daily maintenance work 9.2 Carrying out maintenance work Carrying out maintenance work Should defects or malfunctions that pose a risk to the safe operation of the machine be found during maintenance work, then starting up the machine is strictly forbidden until the defects/malfunctions have been remedied! The defects found need to be reported to the owner/user immediately so that he/she can initiate suitable countermeasures.
- Page 233 9 Daily maintenance work 9.2 Carrying out maintenance work The periods of time stated apply to normal operating conditions. In extreme operating and working conditions, shortening the intervals may be advis‐ able. Please contact us in such cases. 9.2.1 Opening/closing the maintenance doors on the drive unit Maintenance door ►...
- Page 234 9 Daily maintenance work 9.3 Maintenance work to be carried out Maintenance cover ► Push the electrics box cover release (1) and open the electrics box main‐ tenance cover. DANGER! Risk due to catching or entanglement! When the maintenance cover is open, there is a risk of getting entangled or caught by the moving parts on the running drive motor! Do not open the maintenance cover when the drive motor is run‐...
- Page 235 9 Daily maintenance work 9.3 Maintenance work to be carried out ► Monitor the machine for oil leaks. If leaks do occur, then these must be eliminated. ► Check the machine for completeness and that the hoods/covers have been fastened properly. ►...
- Page 236 9 Daily maintenance work 9.3 Maintenance work to be carried out 9.3.2 Lubricating the machine DANGER Risk of crushing! When working underneath a raised trough, a risk of accident is posed by crushing if, for example, the trough lowers on its own due to a pressure drop in the hydraulic system.
- Page 237 9 Daily maintenance work 9.3 Maintenance work to be carried out 9.3.2.1 Lubrication points on the basic machine Fig. 9.2: Lubrication points on the basic machine 50-020-1011-900_EN 1.0 - © 2/15/2017...
- Page 238 9 Daily maintenance work 9.3 Maintenance work to be carried out Pos. Maintenance point Interval Lubricant speci‐ Lubricant quan‐ Remark fication tity Maintenance cover gas weekly Spray-on grease as needed 4 joints pressure springs joints Drive unit maintenance weekly KP2K-30 until grease 3 lubrication nip‐...
- Page 239 9 Daily maintenance work 9.3 Maintenance work to be carried out Pos. Maintenance point Interval Lubricant speci‐ Lubricant quan‐ Remark fication tity Cab door lock weekly Spray-on grease as needed Lubricate the locking device Fuse box maintenance weekly Spray-on grease as needed 4 joints cover gas-pressure spring...
- Page 240 9 Daily maintenance work 9.3 Maintenance work to be carried out Ladder Fig. 9.3 50-020-1011-900_EN 1.0 - © 2/15/2017...
- Page 241 9 Daily maintenance work 9.3 Maintenance work to be carried out Pos. Number - maintenance Interval Lubricant speci‐ Lubricant quan‐ Remark point fication tity Top hydraulic cylinder weekly Spray-on grease as needed 1 joint Bolts (pivot) weekly Spray-on grease as needed 1 joint Bottom hydraulic cylinder weekly...
- Page 242 9 Daily maintenance work 9.3 Maintenance work to be carried out 9.3.2.2 Lubrication point overview for the track undercarriage Fig. 9.4: Lubrication points on track undercarriage 50-020-1011-900_EN 1.0 - © 2/15/2017...
- Page 243 9 Daily maintenance work 9.3 Maintenance work to be carried out Pos. Number - maintenance Interval Lubricant speci‐ Lubricant quan‐ Remark point fication tity Guide wheel unit daily KP2K-30 until grease 8 lubrication nip‐ emerges ples DIN 51825 Support rollers daily KP2K-30 until grease...
- Page 244 9 Daily maintenance work 9.3 Maintenance work to be carried out 9.3.2.3 Overview of rear tipping trough lubrication points Fig. 9.5: Lubrication points on the rear tipping trough 50-020-1011-900_EN 1.0 - © 2/15/2017...
- Page 245 9 Daily maintenance work 9.3 Maintenance work to be carried out Pos. Number - maintenance Interval Lubricant speci‐ Lubricant quan‐ Remark point fication tity Top hydraulic cylinder daily KP2K-30 until grease 2 lubrication nip‐ emerges ples DIN 51825 trough Locating bolts for daily KP2K-30 until grease...
- Page 246 9 Daily maintenance work 9.3 Maintenance work to be carried out 9.3.2.4 Overview of round tipping trough lubrication points Fig. 9.6: Round tipping trough lubrication points 50-020-1011-900_EN 1.0 - © 2/15/2017...
- Page 247 9 Daily maintenance work 9.3 Maintenance work to be carried out Pos. Number - maintenance Interval Lubricant speci‐ Lubricant quan‐ Remark point fication tity Top hydraulic cylinder for daily KP2K-30 until grease 2 lubrication nip‐ trough emerges ples DIN 51825 trough Locating bolts for daily...
- Page 248 9 Daily maintenance work 9.3 Maintenance work to be carried out 9.3.2.5 Overview of crane lubrication points For information about the location and number of lubrication points, mainte‐ nance intervals and the lubricants permissible on the crane, see third-party documentation (→ part 3 of the documentation). 50-020-1011-900_EN 1.0 - ©...
- Page 249 9 Daily maintenance work 9.3 Maintenance work to be carried out 9.3.3 Checking the fill levels Engine oil fill level indicator ► Open the maintenance door on the drive unit (→ 9.2.1). ► Withdraw the oil dipstick (1). ► Wipe off the oil dipstick using a clean, lint-free cloth. ►...
- Page 250 9 Daily maintenance work 9.3 Maintenance work to be carried out ► Withdraw the oil dipstick again and read off the engine oil fill level using the marking on the oil dipstick. The correct oil level must be between the L (minimum) and H (maximum) markings.
- Page 251 9 Daily maintenance work 9.3 Maintenance work to be carried out Drive motor coolant fill level indicator ► Open the maintenance cover on the drive unit (→ 9.2.1). ► Check the coolant level using the sight glass (1) on the coolant reservoir (2).
- Page 252 9 Daily maintenance work 9.3 Maintenance work to be carried out ► Allow the machine to warm up. ► Remove the screws (2) and open the hydraulic tank (1) maintenance flap. Fig. 9.10 ► Using the fill level/thermometer display (1), read off the fill level for the hydraulic fluid after a few minutes operating time.
- Page 253 9 Daily maintenance work 9.3 Maintenance work to be carried out Fuel fill level indicator At the end of each working day, fill the fuel tank so as to avoid the forma‐ tion of condensation. ► Read off the fuel fill level on the right instrument panel (→ 8.2.5.2). ATTENTION! Warning of machine damage! A risk is posed of the machine being damaged due to air in the fuel system if the fuel tank is run completely empty.
- Page 254 9 Daily maintenance work 9.3 Maintenance work to be carried out Checking the fill level of the windscreen washer system ► Open the maintenance door for the drive motor (→ 9.2.1). ► Check the fill level in the reservoir (1) for the windscreen washer system. ►...
- Page 255 10 Malfunctions and troubleshooting 10.1 General safety instructions for troubleshooting Malfunctions and troubleshooting 10.1 General safety instructions for troubleshooting In addition to the regulations listed here, the general safety regulations (→ 3) must be complied with in full. WARNING Risk of burn injuries! It is possible to receive serious burn injuries due to very hot machine parts.
- Page 256 10 Malfunctions and troubleshooting 10.2 Malfunctions WARNING Risk of accident due to inadequate protective devices! A risk of accident is posed as a result of missing, defective, incorrect or incorrectly installed protective devices. Equip all areas (where a protective device is stipulated) with the rele‐ vant protective device.
- Page 257 10 Malfunctions and troubleshooting 10.2 Malfunctions 10.2.1 General malfunctions Fault Possible cause of fault Troubleshooting ► Switch on the battery main All consumers without function. Battery main switch not connected switch. or defective. ► If the battery main switch is defective, renew it.
- Page 258 10 Malfunctions and troubleshooting 10.2 Malfunctions Fault Possible cause of fault Troubleshooting ► Check the hydraulic fluid heat Hydraulic fluid gets too hot. exchanger for contamination and clean it with air if neces‐ sary. ► Significant leak at the hydraulic Check the hydraulic system for leaks and repair it if necessary.
- Page 259 10 Malfunctions and troubleshooting 10.2 Malfunctions Fault Possible cause of fault Troubleshooting ► Top up engine oil if necessary. ► Switch off the machine immedi‐ Engine oil pump defective. ately. ► Contact customer service. ► Engine temperature too high indi‐ Switch off the machine without Coolant level too low.
- Page 260 10 Malfunctions and troubleshooting 10.2 Malfunctions Fault Possible cause of fault Troubleshooting ► Check the fuel level. Fault in the fuel supply. Top up the machine if neces‐ sary. ► Check the fuel filter and renew it if necessary. ► Check the battery.
- Page 261 10 Malfunctions and troubleshooting 10.2 Malfunctions Fault Possible cause of fault Troubleshooting ► Check the cab air filter/filter Cab air filter/filter screen contami‐ screen for contamination. nated. ► Clean or renew the cab air filter/filter screen if required. ► Renew the defective fuse. Fuse in control has blown.
- Page 262 10 Malfunctions and troubleshooting 10.2 Malfunctions Fault Possible cause of fault Troubleshooting ► Check the fuses in the engine Electrical components do not func‐ Fuse defective. compartment and renew if nec‐ tion. essary. ► Check the fuses in the opera‐ tor's cab and renew if neces‐...
- Page 263 10 Malfunctions and troubleshooting 10.2 Malfunctions 10.2.3 Malfunctions of the hydraulic system Fault Possible cause of fault Troubleshooting ► Find out the cause of the low Unusual noises in the hydraulic Hydraulic fluid level too low. hydraulic fluid level. system. Rectify the cause, if found.
- Page 264 10 Malfunctions and troubleshooting 10.2 Malfunctions Fault Possible cause of fault Troubleshooting ► Check the hydraulic system for Significant leak at the hydraulic leaks and repair it if necessary. connections or defective hydraulic line. ► Check the settings and correct Incorrect hydraulic settings.
- Page 265 10 Malfunctions and troubleshooting 10.2 Malfunctions If a warning/error message is displayed, shut down the machine and con‐ tact customer service. 10.2.5 Lowering the trough manually Rear tipping trough If the electrical system or the drive motor fails, the rear tipping trough will have to be lowered manually.
- Page 266 10 Malfunctions and troubleshooting 10.2 Malfunctions DANGER! Risk of crushing! A risk of accident is posed due to crushing if persons get under the load being brought down if the bodies are being lowered manually. Make sure that no persons are in the danger area during manual lowering of the bodies.
- Page 267 10 Malfunctions and troubleshooting 10.2 Malfunctions Round tipping trough If the electrical system or the drive motor fails, the round tipping trough will have to be aligned and lowered manually. ► Secure the machine to prevent inadvertent movements. ► Establish access to the area under the machine. 50-020-1011-900_EN 1.0 - ©...
- Page 268 10 Malfunctions and troubleshooting 10.2 Malfunctions DANGER! Risk of crushing! A risk of accident is posed due to crushing if persons get under the load being brought down if the bodies are being lowered manually. Make sure that no persons are in the danger area during manual lowering of the bodies.
- Page 269 10 Malfunctions and troubleshooting 10.2 Malfunctions ► Operate the trough tilting valve (1) on the hexagon (4). To actuate, use a ring wrench/open-end wrench (9 mm) to turn the hex‐ agon. The round tipping trough lowers under its own weight. The procedure can take a few minutes.
- Page 270 11 Disassembly Disassembly When dismantling the machine, comply with the requirements of the acci‐ dent prevention regulations, environmental protection and any safety regu‐ lations of the country in question. In addition to the regulations listed here, the general safety regulations (→...
- Page 271 11 Disassembly The machine should be dismantled with assistance from the customer service of Bergmann Maschinenbau GmbH & Co. KG. Contact customer service in the event of dismantling (→ 13.1). 50-020-1011-900_EN 1.0 - © 2/15/2017...
- Page 272 12 Taking out of operation, putting back into operation and disposal 12.1 Taking out of operation Taking out of operation, putting back into operation and dis‐ posal 12.1 Taking out of operation ► Clean the machine thoroughly. ► Drive/transport the machine to the location where it will be taken out of operation.
- Page 273 12 Taking out of operation, putting back into operation and disposal 12.2 Returning to operation 12.2 Returning to operation Before the machine is returned to operation, the owner/user must be certain that the machine is in good working order. ► Lubricate the complete machine.
- Page 274 12 Taking out of operation, putting back into operation and disposal 12.3 Disposal 12.3 Disposal If the machine is to be decommissioned and disassembled, this can be done in various ways: Placing the work with a specialist company. If appropriate knowledge and tools are available, this can also be done independently by your own personnel.
- Page 275 12 Taking out of operation, putting back into operation and disposal 12.3 Disposal If the machine is not scrapped promptly after it has been dismantled, the parts must be stored in a protected area. It is necessary to ensure that any service products remaining on and in the components cannot get into the ground.
- Page 276 13 Spare part stocking and customer service 13.1 Spare part and customer service addresses Spare part stocking and customer service 13.1 Spare part and customer service addresses Bergmann Maschinenbau GmbH & Co. KG Essener Strasse 7 D-49716 Meppen-Hüntel Germany Phone:...
- Page 277 14 Appendix 14.1 The most important hand signals for providing guidance Appendix 14.1 The most important hand signals for providing guidance The most important signals are shown below. If required, additional appro‐ priate signals must be agreed between the operator and the banksman. Attention Hold arm outstretched with open hand Stop...
- Page 278 14 Appendix 14.1 The most important hand signals for providing guidance Move forward slowly Bend both arms at the elbows and make beckoning movements with the palms facing inward Reverse slowly Bend both arms at the elbows and make pushing movements with the palms facing outward Turn right Left thumb out towards the left...
- Page 279 14 Appendix 14.2 CE declaration of conformity Lift load Outstretched right index finger pointing upward, move left hand up and down Lower load Outstretched right index finger pointing down, move left hand up and down Increase jib length Both thumbs point outward Reduce jib length Both thumbs point inward 14.2...
- Page 280 14 Appendix 14.3 Tightening torques 14.3 Tightening torques General tightening torques The recommended tightening torques for the screw connections are listed below. In justified individual cases, different tightening torques - which are then stated in the respective assembly drawings (and have to be complied with), may be necessary - see diagrams in the original scale (→...
- Page 281 14 Appendix 14.3 Tightening torques Dimension Width across flats Screw tightening torque M (Nm) (mm) Strength class 8.8 Strength class 10.9 Strength class 12.9 1050 1220 50-020-1011-900_EN 1.0 - © 2/15/2017...
- Page 282 14 Appendix 14.3 Tightening torques Dimension Width across flats Screw tightening torque M (Nm) (mm) Strength class 8.8 Strength class 10.9 Strength class 12.9 1100 1550 1800 1450 2100 2450 Tab. 14.1: General tightening torques - metric coarse-pitch thread Setscrews, metric fine thread DIN 13, Part 13 Dimension Width across flats Screw tightening torque M...
- Page 283 14 Appendix 14.3 Tightening torques Dimension Width across flats Screw tightening torque M (Nm) (mm) Strength class 8.8 Strength class 10.9 Strength class 12.9 M14 x 1.5 M16 x 1.5 M18 x 1.5 M20 x 1.5 M22 x 1.5 1050 M24 x 2 1150 1350...
- Page 284 14 Appendix 14.4 Diagrams in original scale 14.4 Diagrams in original scale The diagrams in original scale are enclosed with the documentation. These should be referred to in the corresponding register of the overall documen‐ tation. 50-020-1011-900_EN 1.0 - © 2/15/2017...
Need help?
Do you have a question about the 4010 and is the answer not in the manual?
Questions and answers