
Related Manuals for Froggit HP1000SE PRO


Summary of Contents for Froggit HP1000SE PRO
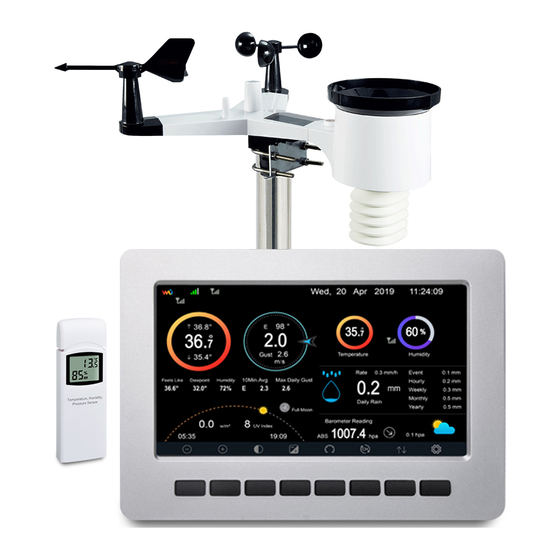
- Page 1 HP1000SE PRO Display Manual (EN) Support/updates/manuals/spare parts/compatible products: www.froggit.de...
- Page 2 Display console memory card slot USB port Power jack Reset Note: The USB port in the console of weather station is only for firmware update, not for data communication (USB cable not included). You can use a SD card for the firmware update.(SD card not included). Indoor sensor: The indoor sensor will display indoor temperature, humidity and barometric pressure alternately.
- Page 3 Description Description Outdoor Feels Indoor humidity Like/Dew point/Humidity/10Min. Average Wind Direction/Max Daily Gust PM2.5 RF signal bar for concentration(optional multi-channel sensor) temperature and humidity sensor(optional sensor) RF signal bar for Multi-channel PM2.5 sensor(optional temperature and sensor) humidity sensor cycle display mode icon(optional sensor) Sunrise / Sunset Time Multi-channel...
- Page 4 Initial Display Console Set Up Immediately after power up (inserting power adapter), the unit will turn on the display, and the unit will start to look for reception of the indoor and outdoor sensor data. This may take up to 3 minutes. Dark Background Display Light Background Display Note: Sunrise/sunset time display will only work properly when GEO...
- Page 5 Backlight on/off key Backlight on/off key Press this key to on/off the backlight Press this key to on/off the backlight Background key Press this key to choose between Press this key to choose between dark background display and light background background display and light background display Pressure display key...
- Page 6 30-40 100-110 40-50 > 110 Humidity Icon Humidity Color Color Humidity Color Range (%) Ring Range (%) Ring 0%, No 50 to 60 signal or dashes 1 to 10 60 to 70 10 to 20 70 to 80 20 to 30 80 to 90 30 to 40 90 to 99...
- Page 7 Hourly Rainfall Icon Hourly Icon Hourly Color Rain (in) Rain (in) Ring 0.6 to 0.8 0 to 0.2 0.8 to 1 0.2 to 0.4 1 to 1.2 0.4 to 1.2 to 1.4 Multiple Channel Selection and Scroll Mode Multi-channel sensor is an optional sensor, not included in the package. If you have multiple wireless sensors, while in normal mode, press the key to toggle display in sequence of indoor, ch1, ch2….ch8, scroll display.
- Page 8 Max/Min Screen Icon Description Selection key Press this key to select the weather MAX/MIN record which need to clear Selection key Press this key to select the weather MAX/MIN record which need to clear Enter key While the desired weather MAX/MIN record selected , press this key to popup Message ”Clear the Max/Min record?”.
- Page 9 History record Screen Description File Select key Press this key to clear all history record Page Select key Press this key to enter particular page of the history data. Each page contains 16sets data. Scroll left key Press this key to view the left of the scrollable area.
- Page 10 Clear History Record Screen View a specific page of history While in History Record Mode, press the key to enter the page selection mode: view a specific page of history Screen Press to select a digit in a number, press key to change the number.
- Page 11 Press to shift the data display of 12/24/48/72H. Press to view the graph of the following data: Indoor outdoor temperature Dew Point and Feels like Indoor outdoor humidity Wind speed and Gust Wind Direction UVI ...
- Page 12 option field Down arrow key Press this key to change the activated option field Set key Press this key to select the Setting sub- Mode Return key Press this key to return to previous mode Date and Time setting While in Menu Setting Mode, press key to select Date and Time Setup field, press key to enter Date and Time Setup mode:...
- Page 13 change the month setting. Press to set the year, the year digit on focus will turn red, press the key to change the year setting 3) Time zone setting Press key to select Time zone setting field, press the to change the time zone setting. Press key to select Update field, press the key to update the time immediately.
- Page 14 Solar Rad. Unit Press to change the solar radiation units of measure between W/m^2, lux and fc. Multi Channel Sensor In Multi channel sensor Setup Screen, you can rename the sensor or register the sensor again while the sensor lost connection to console display.
- Page 15 Backlight setting While in Menu Setting Mode, press key to select Backlight Setup field, press key to enter backlight Setup mode: Backlight Setting Screen Automatic control backlight: select this option, the backlight will auto turn on and off according the set time Turn on the backlight: set the time of turning on backlight Turn off the backlight: set the time of turning off backlight Automatic brightness adjustment: select this option, the brightness will...
- Page 16 Down arrow key Press this key to change the activated option field Return key Press this key to return to previous mode If the auto backlight turn-on time has been set, you can press key to turn off the backlight within the turn on time. Backlight will turn on again automatically at next turn on time.
- Page 17 maximum, minimum and total value. When one month was selected, the annual rainfall and annual max/min rainfall were zero clearing at 0:00 of the first day of the selected month. Storing Interval (1-240minutes Selectable) Weather Server Your console is capable of sending your sensor data to select internet- based weather services.
- Page 18 website, if the website Website has the same protocol with Wunderground or Ecowitt Table: Supported weather services Note: If you are testing the setup with the outdoor sensor package nearby and indoor, you may want to consider connecting to Wi-Fi, but not yet configuring any of the weather services.
- Page 19 After completing the weather station, you will see something like this: Your station ID will have the form: KSSCCCC###, where K is for USA station (I for international), SS is your state, CCCC is an abbreviation for your city and ### is the station number in that city. In the example above, you see station 424 in the state of Arizona (AZ) in the United States (K).
- Page 20 scroll scroll Scroll Scroll return to value value field up field Setup down down Set Station ID: Press to highlight the Station ID. Enter your station ID. Press to display the keyboard. Press to scroll to the character and press to select the character.
- Page 21 There are also some very useful mobile apps. The URLs provided here go to the Web version of the application pages. You can also find them directly from the iOS or Google Play stores: WunderStation: iPad application for viewing your station’s data and graphs https://itunes.apple.com/us/app/wunderstation-weather-from-your- neigh...
- Page 22 https://itunes.apple.com/us/app/wu https://itunes.apple.com/us/app/wu-storm/id955957721 Weather Underground: Forecast Weather Underground: Forecast: iOS and Android application for : iOS and Android application for forecasts https://itunes.apple.com/us/app/ https://itunes.apple.com/us/app/weather-underground- forecast/id486154808 forecast/id486154808 https://play.google.com/store/apps/details?id=com.wunderground.and https://play.google.com/store/apps/details?id=com.wunderground.and https://play.google.com/store/apps/details?id=com.wunderground.and roid.weather&hl=en PWS Weather Statio PWS Weather Station Monitor: View weather conditions in your : View weather conditions in your neighborhood, or even right in your own backyard.
- Page 23 Weathercloud server setup To register with Weathercloud follow these steps: 1) Visit weathercloud.net and enter a Username, Email and Password to sign 2) Respond to the validation email from Weathercloud (it may take a few minutes). 3) You will then be prompted to add a device/ Select “Create device” enter your station’s...
- Page 24 Figure 31: : Weathercloud Server setup screen Server setup screen scroll scroll Scroll Scroll return to value value field up field Setup down down Weather Observations Website (WOW) Weather Observations Website (WOW) server setup To have your weather station upload data to the Met Office’s WOW site To have your weather station upload data to the Met Office’s WOW site To have your weather station upload data to the Met Office’s WOW site you will need to complete the following steps:...
- Page 25 The actual form is longer, but all questions should be self The actual form is longer, but all questions should be self The actual form is longer, but all questions should be self-explanatory. Complete and submit the form. You will receiv Complete and submit the form.
- Page 26 You will be presented with a form where you detail your You will be presented with a form where you detail your station’s location station’s location and a bunch of other settings related to how you wish the site to operate. and a bunch of other settings related to how you wish the site to operate.
- Page 27 scroll scroll Scroll Scroll return to value value field up field Setup down down Ecowitt.net server setup Figure 33: Ecowitt Server setup screen scroll scroll Scroll Scroll return to value value field up field Setup down down To register with Ecowitt follow these steps: 1) Visit ecowitt.net and enter Email and Password to sign up.
- Page 28 Note: When select device address on map, please wait till the map display before select your address. Note: Please put in the correct time zone to get the correct time. Because the time will be updated to internet time automatically while WIFI connection.
- Page 29 Select Enable button and select the protocol type. The website should has the same protocol with Wunderground or Ecowitt. Input all the information needed. Wi-Fi scan Select Wi-Fi Network Screen Press key to select the Wi-Fi network. Press key to confirm and enter the password.
- Page 30 Only after connect to WLAN you can upload the data to weather website. If the Wi-Fi network connects successfully, the icon will show on the left top of the console display. If the data upload to Wunderground.com successfully, the icon will show on the left top of the console display.
- Page 31 Background While in Menu Setting Mode, press key to select Background Setup field, press key to choose between dark background display and light background display 3.11 Alarm Setting Mode Figure 36: Alarm Setting Screen Description Select key Press this key to select the unit or scrolls the value Select key Press this key to select the unit or scrolls...
- Page 32 option field Set key Press this key to select the Setting sub- Mode Return key Press this key to return to previous mode The first row is high alarm value and the second row is low alarm value. When weather alarm condition has been triggered, that particular alarm will sound for 120 second and the corresponding icon will flash until the weather condition doesn’t meet the user set level.
- Page 33 Mode Return key Press this key to return to previous mode To adjust the parameter, press to scroll to the parameter you wish to change. Press to highlight the sign (positive vs. negative, if applicable) and significant digit. Press to change the calibrated value.
- Page 34 Solar Gain 1.00 Calibrated laboratory grade Radiati solar radiation sensor 1 w/m Gain 126. Solar radiation conversion from wavelength correction (5) Wind Gain 1.00 Calibrated laboratory grade wind meter (6) Rain Gain 1.00 Sight glass rain gauge with an aperture of at least 4” (7) Daily Offset Curr...
- Page 35 console match fluid thermometer. (2) Humidity is a difficult parameter to measure electronically and drifts over time due to contamination. In addition, location has an adverse affect on humidity readings (installation over dirt vs. lawn example). Official stations recalibrate or replace humidity sensors on a yearly basis.
- Page 36 sunlight is 126.7 lux / w/m . This variable can be adjusted by photovoltaic experts based on the light wavelength of interest, but for most weather station owners, is accurate for typical applications, such as calculating evapotransporation and solar panel efficiency.
- Page 37 purpose of your weather station is to measure conditions of your surroundings, which vary significantly from location to location. NOTE: UV Calibration MUST be performed every 2 to 3 months to improve results. Over time, UV Index may alter results based on bright and strong sunlight conditions.
- Page 38 select Yes or No. Press the key to confirm the selection. Clear History Press key to select Clear History. Press key to popup the Message Box ”Clear the history record?” Press select Yes or No. Press the key to confirm the selection. Clear Max/Min Press key to select Clear Max/Min.
- Page 39 km/h 3 - 7 mph, or 4.8 - 11.3 Light breeze km/h 7 - 12 mph, or 11.3 -1 9.3 Gentile km/h breeze 12 - 18 mph, or 19.3 - Moderate 29.0 km/h breeze 18 - 24 mph, or 29.0 - Fresh breeze 38.6 km/h 24 - 31 mph, or 38.6 -...
- Page 40 Sunny Partly Cloudy Cloudy Pressure Pressure Pressure increases for a increases slightly decreases sustained period or initial power slightly of time Rainy Stormy Pressure Pressure decreases for a rapidly sustained period decreases of time Lightning Alert The lightning icon will appear if the Dew Point exceeds 70 F. This means there is a chance of lightning storms forming.
- Page 41 disposal to predict weather conditions, including weather radar, weather disposal to predict weather conditions, including weather radar, weather disposal to predict weather conditions, including weather radar, weather models, and detailed mapping of ground conditions. models, and detailed mapping of ground conditions. Moon Phase In the event the moon phase is 100%, the t the moon phase is 100%, the icon...
- Page 42 Day 13 Day 26 Full Moon New Moon Gerneral safety insructions Gerneral safety insructions Danger of asphyxiation: Danger of asphyxiation: Keep all packaging materials Keep all packaging materials (plastic bags, rubber bands, etc.) away (plastic bags, rubber bands, etc.) away from children.
- Page 43 batteries with a complete set of full power batteries. If the unit is not powered for a longer period of time or is not in use, remove the batteries from the unit. The manufacturer accepts no liability for incorrectly inserted batteries! Notes on the return of batteries according to §12 BatterieVO: Batteries do not belong in the household waste.
- Page 44 Hereby we declare, HS-Group GmbH & Co.KG, Escherstr. 31, 50733 D- Cologne, that this product is in compliance with the essential requirements and other relevant provisions of Directive 2014/53/EU. The declaration of conformity for this product can be found at: www.froggit.de or on request.
Need help?
Do you have a question about the HP1000SE PRO and is the answer not in the manual?
Questions and answers