Advertisement
Quick Links
Advertisement

Related Manuals for Texi Art Auto 2

Summary of Contents for Texi Art Auto 2
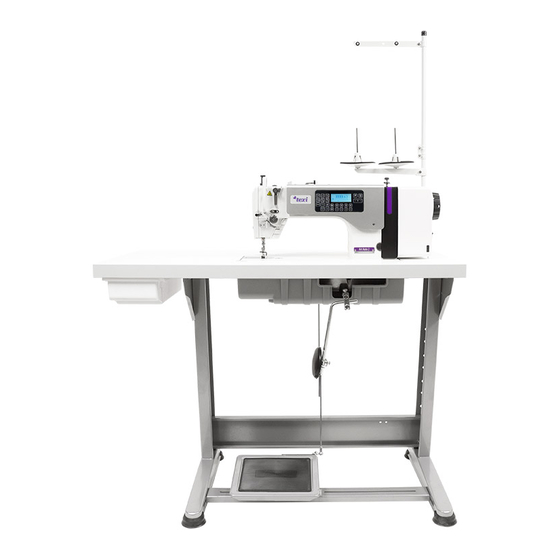
- Page 1 Intruction manual Control panel QD690 Art Auto 2...
- Page 2 Safety Instruction 1. Users are required to read the operation manual completely and carefully before installation or operation. 2. All the instruction marked with sign must be observed or executed; otherwise, bodily injuries might occur. 3. The product should be installed and pre-operated by well-trained persons. 4.
-
Page 3: Key Description
1 Button Displays and Operating Instructions 1.1 Key Description Name Indicate If click, enter or exit the user parameter setting interface. Function Parameter If long-press, it will switch to the password input interface. Enter the correct password, press S key to Edit confirm, you can enter the advanced parameter setting interface. -
Page 4: Auxiliary Function
If click, increase the sewing speed. Speed Increase If long-press, continuously increase the sewing speed. If click, decrease the sewing speed. Speed Decrease If long-press, continuously decrease the sewing speed. 1.2 Auxiliary Function 1.2.1 Debugging Mode On the main interface, long-press S key to enter to the debugging parameter interface. 1.2.2 Tight Seam Mode Editing On the main interface, long-press tight seam key to display "F-1"... -
Page 5: User Parameter
editing interface "01 1 3.0", press the 1st or 2nd column to adjust the number of 00-99 stitches, press the 4th column to adjust Repeat 1-9 times, press to adjust the stitch length. After the setting is completed, press the S key to confirm. Short press P key to exit to the main interface. 1.2.6 Pattern Constant-stitch Sewing Editing In the multi-section sewing mode, long-press pattern constant-stitch sewing key on the main interface to switch to pattern constant-stitch sewing editing interface "d-01 3.0", press the fourth column... - Page 6 Items Range Default Description The position of the pedal for 30-1000 running The position of the pedal for the 30-1000 stop The position of the pedal for 30-1000 lifting presser foot The position of the pedal for 30-500 thread trimming Pattern freedom sewing editing The strength of thread trimming 1-45...
- Page 7 Items Range Default Description Presser foot lifter operation duty Presser foot lifter operate in duty cycle to save electricity and protect the 1-50 electromagnet from over-heat. cycle (%) Delay the start of the motor to protect the lowering time of 10-990 Delay the start time, with automatic presser foot down.
- Page 8 Items Range Default Description The stop angle of thread 5-359 clamping 0-359 Trimming engage angle 10-100 Stopping strength after trimming Up and down needle position 15-345 Up and down positioning distance angle (1 degree for every 4 values) distance 10-990 Wiping thread return delay time Make sure the wiper returns to its original position 10-100...
- Page 9 Items Range Default Description Duty cycle for hook thread with P115 0-100 clamp function without any thrum The suction time for clamp P116 0-5000 1000 function without any thrum Duty cycle for pull thread with 0-100 P117 clamp function without any thrum Back-tacking step motor -500~500...
-
Page 10: Error Code List
Items Range Default Description 1mm forward stitch length P177 0-200 reference value setting 1mm backward stitch length P178 0-200 reference value setting 2mm forward stitch length P179 0-200 reference value setting 2mm backward stitch length P180 0-200 reference value setting 3mm forward stitch length P181 0-200... - Page 11 Turn off the machine, please check if the encoder in bad connection or is too Positioning signal error loose. To get it right and turn on. If there are still errors, please replace the control box and call for customer service. Turn off the system power supply, please check motor encoder connector if loose Encoder signal error.
- Page 12 1. Presser foot electromagnet: 1, 2 (+32V) 6P Function Port Description 1. Pull thread: 1(+24V), 4 2. Hook thread: 2(+24V), 5 3. Suction: 3(+24V), 6...
Need help?
Do you have a question about the Art Auto 2 and is the answer not in the manual?
Questions and answers