
Related Manuals for Sentry ST 723


Summary of Contents for Sentry ST 723
- Page 1 Contact / Non-Contact Tachometer MODEL:ST 723 Instruction Manual REACH R oHS (SVHC) COM P LIAN T...
- Page 3 Contact / Non-Contact Tachometer Instruction Manual REACH R oHS (SVHC) COM P LIAN T...
- Page 4 Table Content...
-
Page 5: Product Introduction
1. Product Introduction Thank you for purchasing the Digital Tachometer. The Digital Tachometer is Contact and Non-Contact RPM (revolutions per minute) measuring instruments. Features include a 5 digits LCD, scan/hold function and auto power off (30 seconds). To measure, point the Laser spot or bring the contact probe to the object. - Page 6 1-2 Application Gear Boxes Engines Motors Pumps Compressors Centrifuges Couplings Fans Shafts Grinders Pulleys Length Measurement 1-3 Warnings! You may receive harmful laser radiation exposure if you do not adhere to the warnings listed below: Use of controls or adjustments or performance of procedures other than those specified here may result in hazardous radiation exposure.
-
Page 7: Safety Information
Use extreme caution when operating the laser sighting. Never point the laser beam at a person. Do not attempt to open the tachometer. There are no user serviceable parts. Keep out of the reach of all children. Refer to the inside back cover for product warning label. 2. - Page 8 2-2 Cautions! This product contains a Class 2 laser; use caution when operating this device with the laser on. Do not submerge the unit in water. Do not use an extension shaft as the adapters may come off of the shaft and cause damage or injury. If operating arrangements are used or procedures carried out other than those described here in these instructions, this can lead to dangerous exposure to...
- Page 9 IEC61000-4-8:Power frequency magnetic field immunity test. IEC60825-1:Safety. Tests were conducted using a frequency range of 80- 1000MHz with theinstrument in three orientations. The average error for the three orientationsis ±0.5℃ (±0.1℉) at 3V/m throughout the spectrum. However, between 781- 1000MHz at 3V/m, the instrument may not meet its stated accuracy.
-
Page 10: Specification
3. Specification Range of Non-Contact 6.0 - 99,999 RPM(rev/min) Range of Contact 6.0 - 25,000 RPM(rev/min) Range of 0.6 - 2,500.0 M/M (m/min) 0.7 - 2734.0 Y/M (yard/min) Surface Speed 23.6 - 98425 I/M (inch/min) 2.0 - 8202.1F/M(fee/min) Lengh(cantact) 0.1-9999.9 M(m) 0.1-10936 YD (yard) 0.3-32808 FT (feet) Total number of revolutions 1 - 99999(REV) -
Page 11: Operation
4. Operation 4-1 Quick Start Flip open the battery compartment cover and install a 9V Battery. Non-Contact: Stick the self- adhesive reflective tape on the object whose rotational speed is to be measured. The reflective tape should be stocked as close to the outer edge of the object to be measured as possible. -
Page 12: Unit Diagram
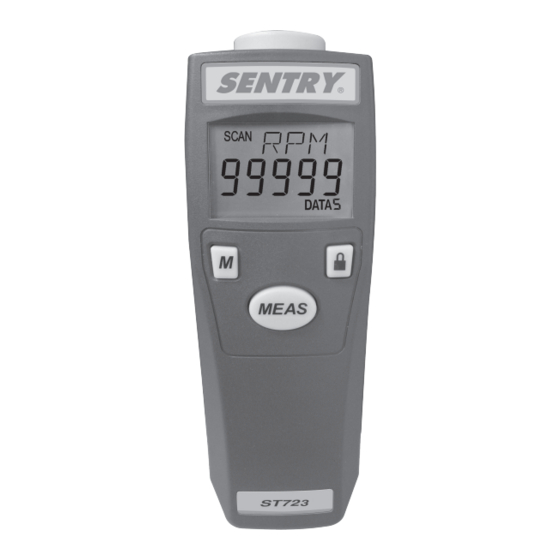
4-2 Unit Diagram Laser beam outlet: Used for Non-contact RPM measurements. Display section: Displays measurements. M button: Data Storage and Recall Data. Unit button: Contact, Non-Contact and the relative measurements mode switch. MEAS button: Turns the tachometer on and records measurements. - Page 13 4-3 Display Main display: 5 digit LCD displays measurement readings. Scan: Press the measuring button, the data will update and "SCAN" will show. Hold: Release the measuring button, the data will freeze and "Hold" will appear. Unit display: Displays measuring units. Low battery display: When the battery current is weak, will show.
-
Page 14: Function Descriptions
4-4 Function Descriptions In Scan mode, the current measurement is displayed on the main display. The main display will hold the last values until the tachometer automatically turns off. Memory mode: The tachometer can store or recall 10 selectable M A X m e a s u r e m e n t s , 1 0 s e l e c t a b l e M I N measurements, 10 selectable AVG measurements and 10 selectable DATA measurements. - Page 15 Chart 1 Press the “M” button once to next Storage Data0 Max Data0 Min Data0 Avg Data0 Data1 Max Data1 Min Data1 Avg Data1 Data2 Max Data2 Min Data2 Avg Data2 Data9 Max Data9 Min Data9 Avg Data9...
- Page 16 Chart 2 Press the “M” button and hold for approx. 3 sec to leap to next Data Set Data0 Max Data0 Min Data0 Avg Data0 Data1 Max Data1 Min Data1 Avg Data1 Data2 Max Data2 Min Data2 Avg Data2 Data9 Max Data9 Min Data9 Avg Data9...
- Page 17 Contact and Non-Contact Measurement Mode Switch: The functions are separated into two group of measurement. One is the rate measurement which is shown on the left side of the following flow chart. The other is the revolution and length measurements which are shown on the right side of the following flow chart.
- Page 18 Press for 3 sec.
- Page 19 RPM : No n - C o n t a c t r e v o l u t i o n s p e r m i n u t e measurements. rPm : Contact revolutions per minute measurements. I / M : Contact Inch per minute measurements.
-
Page 20: Maintenance
5. Maintenance Cleaning the lens: Blow loose particles from the lens using clean compressed air. Gently brush remaining debris away with a camel's hair brush. Carefully wipe the surface with a cotton swab moistened with water. NOTE: DO NOT use solvents to clean the lens. Clean the housing: Use soap and water on a damp sponge or soft cloth. - Page 21 Note Ver.02 13/JUN.
- Page 24 3F, No.122, Sec.1, Sanmin Road, Ban-Ciao Dist., New Taipei City 220, Taiwan, R.O.C. TEL:886-2-2956-8198 FAX:886-2-2956-7662 http://www.sentrytek.com.tw PA05-0000723-01 ST723 Ver.02 13/JUN.
Need help?
Do you have a question about the ST 723 and is the answer not in the manual?
Questions and answers