Table of Contents
Advertisement
Quick Links
Advertisement
Table of Contents

Related Manuals for Seres OL TOC Evolution VUV


Summary of Contents for Seres OL TOC Evolution VUV
- Page 1 SOL-96.120.031 / 060223 TOC Evolution VUV Operator’s Manual TOC Evolution VUV...
- Page 2 Customer Support Seres OL and its representatives maintain a fully trained staff of technical specialists around the world. For any technical question, contact your nearest Seres OL representa- tive, or the manufacturer: Seres OL SAS ZA de la Sipière 219, Avenue de Provence...
-
Page 3: Table Of Contents
TOC Evolution VUV Table of Contents Safety Instructions .......... - Page 4 TOC Evolution VUV 6.4.2 Sample Pump ..........42 6.5.
- Page 5 TOC Evolution VUV Safety Instructions Operator’s Manual This document describes the main steps for instrument setup, operation and maintenance. Safety Instructions General The instructions included in this chapter explain the potential risks associated with instrument operation and provide important safety practices designed to minimize these risks.
-
Page 6: Warning Notices
TOC Evolution VUV Safety Instructions 1.1. Warning Notices The signal words and symbols used for safety-related notices have the following meaning: DANGER Your life or physical wellbeing are in serious danger if such warnings are ignored. Follow the prevention instructions carefully. -
Page 7: Safety Instructions
TOC Evolution VUV Safety Instructions Warning signs The warning signs in this manual have the following meaning: Electrical shock hazard Corrosive Harmful to health Flammable Hot surface UV radiation General warning SOL-96.120.031 / 060223... - Page 8 TOC Evolution VUV Safety Instructions 1.2. General Safety Regulations Spare parts Use only official Seres OL spare parts and consumables. If other parts are used during the normal warranty period, the manufacturer’s warranty is voided. disposables Modifications Modifications and instrument upgrades shall only be carried out by an authorized service technician.
-
Page 9: Handling Precautions
TOC Evolution VUV Safety Instructions WARNING Do not use this instrument in presence of flammable liquids or vapors as this may pose a safety hazard. WARNING If it is necessary to carry out maintenance work with the UV lamp switched on, wear UV protective goggles. -
Page 10: General Safety Regulations
TOC Evolution VUV Safety Instructions 1.4. International Symbols Used The symbols found on the instrument have the following meaning: Electrical fuse Ground Equipotentiality Alternating current Hot surface General attention Electrical hazard UV radiation SOL-96.120.031 / 060223... - Page 11 TOC Evolution VUV Product Description Product Description Application The TOC Evolution VUV is a complete monitoring system for the automatic, continuous measurement of total organic carbon (TOC) in range potable water and return condensate. Measuring Advanced oxidation process with UV/VUV light and persulfate: By...
- Page 12 TOC Evolution VUV Product Description Tangential 0.5 l/h filtration (option) 2.5 bar 500 l/h 3.5 m/s 1.75 m/s Sample inlet Filtered sample 100 µm membrane filter Compressed air inlet The sample is pumped through a tangentially positioned membrane filter with a mesh size of 100 μm. Only a small amount, approximately 1%, is drawn through the membrane filter and used by the analyzer.
-
Page 13: Product Description
TOC Evolution VUV Product Description Relays Three potential-free contacts per measuring channel with the follow- ing functions: two thresholds (high/low) sample flow alarm On request, one of the following functions can be configured ex- works for relay 2 (replaces threshold 2): ... -
Page 14: Instrument Specifications
TOC Evolution VUV Product Description 2.1. Instrument Specifications Power supply Voltage: 110 (configuration) or 230 VAC 50/60 Hz Power consumption: 300 VA maximum Environmental Temperature: 5–40 °C conditions Relative humidity: 5% to 95% Pollution level: Installation category: Maximum altitude: 2000 m Do not use this instrument in presence of flammable liquids or gases. - Page 15 TOC Evolution VUV Product Description Measuring Low-range variant: 0–2 ppm range Limit of detection: 0.01 ppm Repeatability: ±2% FS Accuracy: ±3% FS Middle-range variant: 0–10 ppm Limit of detection: 0.1 ppm Repeatability: ±2% FS Accuracy: ±3% FS High-range variant: 0–100 ppm Limit of detection: 0.5 ppm...
- Page 16 TOC Evolution VUV Product Description Wall cabinet Material: Stainless steel SS316 Screws: 4x M8 Weight: 80 kg Protection degree: IP55 Reagent shelf made of SS316 available as an option. 1-channel instrument with optional reagent shelf: 422 mm / 16.61" 600 mm / 23.62"...
- Page 17 TOC Evolution VUV Product Description 1-channel instrument with tangential filtration: 422 mm / 16.61" 600 mm / 23.62" 408 mm / 551 mm / 21.69" 16.06" 913 mm / 35.94" 2-channel instrument: 422 mm / 16.61" 600 mm / 23.62"...
-
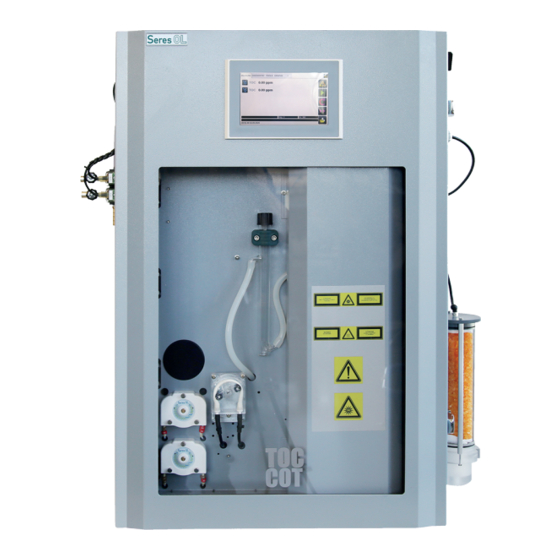
Page 18: Instrument Overview
TOC Evolution VUV Product Description 2.2. Instrument Overview 1-channel Power switch instrument Touchscreen Cable glands Activated charcoal and soda lime cartridges Silica gel cartridge Peristaltic pump (sample) Peristaltic pumps (reagents) Analyzed air outlet Liquid seal UV protective cover Fast loop... - Page 19 TOC Evolution VUV Product Description Instrument Letters A to K, N and O: with tangential 1-channel instrument filtration Compressed air inlet Shut-off valve Tangential filter Sample inlet Sample outlet SOL-96.120.031 / 060223...
- Page 20 TOC Evolution VUV Product Description 2-channel Power switch instrument Touchscreen Cable glands Activated charcoal and soda lime cartridges Silica gel cartridge Peristaltic pump (sample) Peristaltic pumps (reagents) Analyzed air outlet Pressure reducing device Sample inlet taps Liquid seal UV protective cover...
-
Page 21: Installation
TOC Evolution VUV Installation Installation 3.1. Before Installation Unpacking Carefully unpack the analyzer and check it for visible damage. On-site Verify the electrical and hydraulic connections available at the installa- tion site against the requirements in Instrument Specifications, p. requirements 3.2. -
Page 22: Electrical Connections
TOC Evolution VUV Installation 3.4. Electrical Connections WARNING Risk of electrical shock Always turn off power before manipulating electric parts. Only operate the instrument from a power outlet which has a protec- tive earth connection. Overview of electrical connections I/O board (relays, analog signal outputs) for sample stream 1... -
Page 23: Connections On I/O Boards
TOC Evolution VUV Installation 3.4.1 Connections on I/O Boards Connection I/O board (W1128001) for channel 1: schemes Threshold 1 General failure Threshold 2 Water failure Digital input 2 (on request) 4-20 mA COD 4-20 mA TOC SOL-96.120.031 / 060223... - Page 24 TOC Evolution VUV Installation Additional I/O board (W1128007) for channel 2 (if present): Threshold 1 not used Threshold 2 Water failure 4-20 mA COD 4-20 mA TOC SOL-96.120.031 / 060223...
- Page 25 TOC Evolution VUV Installation Relays Name Available on Description Relay 1: both channels High threshold. Threshold 1 Relay 2: both channels Low threshold. Threshold 2 Relay 3: channel 1 Analyzer failure. General The relay coil is energized during failure normal operation and de-energized on error and loss of power.
- Page 26 TOC Evolution VUV Installation Analog signal Name Available on Description outputs 4–20 mA both channels Chemical oxygen demand (COD). (4–20 mA) 4 mA corresponds to low range measurement and 20 mA to high range measurement. 4–20 mA both channels TOC concentration.
-
Page 27: Cable Thicknesses
TOC Evolution VUV Installation 3.4.2 Cable Thicknesses In order to comply with IP55, use the following cable thicknesses: Outer diameter of cable: 7.5–13 mm Outer diameter of cable: 5–10 mm Note: Seal cable glands that are not in use. 3.4.3... -
Page 28: Ac Power
TOC Evolution VUV Installation 3.4.4 AC Power A B C Protective earth (PE), terminal 3 Neutral conductor, terminal 2 Phase conductor, terminal 1 Ferrite Wrap the mains cable two times around the supplied ferrite. Earthing The earthing system to be used is the TNS scheme. -
Page 29: Jbus Via Rs485 (Option)
TOC Evolution VUV Installation 3.4.5 Jbus via RS485 (Option) A RS485 interface Terminals Terminal 1: data B (+), terminal 2: data A (-). SOL-96.120.031 / 060223... -
Page 30: Jbus Via Tcp/Ip (Option)
TOC Evolution VUV Installation 3.4.6 Jbus via TCP/IP (Option) Converter Ethernet port feedthrough to the outside Connecting the If the “Ethernet interface (TCP/IP)” option has been ordered, a converter has been installed in the upper part of the analyzer. Ethernet cable The connection is made via the Ethernet port located on the right side of the analyzer exterior. -
Page 31: Startup
TOC Evolution VUV Startup Startup 4.1. Installing the Reagent Bottles WARNING Multiple hazards For safe handling of reagents, you must read and understand the Material Safety Data Sheets (MSDS). Wear appropriate protective equipment. Preparation of 1 Check that the ends of all reagent tubes are cut at an angle. This... -
Page 32: Filling The Liquid Seal
TOC Evolution VUV Startup 4.2. Filling the Liquid Seal Cover Liquid seal 1 Unscrew the cover [A]. 2 Fill the liquid seal up to the overflow with demineralized water. 3 Screw the cover back on. SOL-96.120.031 / 060223... -
Page 33: Starting Sample Flow
TOC Evolution VUV Startup 4.3. Starting Sample Flow Single-channel Sample tube instrument Drain Fast loop Flow sensor Sample inlet tap Open the sample tap [E] so that a part of the sample overflows into the drain. SOL-96.120.031 / 060223... - Page 34 TOC Evolution VUV Startup Dual-channel Sample tube instrument Pressure reduction device Sample inlet taps Solenoid valves Open the sample tap [C] so that a part of the sample overflows into the drain. SOL-96.120.031 / 060223...
-
Page 35: Preliminary Start-Up
TOC Evolution VUV Startup 4.4. Preliminary Start-Up Initial tests 1 Open the pressure regulator [A] if it is closed. 2 Turn the power switch to the ON position. The instrument starts and the “Initial tests” screen appears. Initial tests... - Page 36 TOC Evolution VUV Startup Priming the reagent tubes WARNING UV light Put on UV protective goggles before removing the cover of the UV reactor. 1 Remove the UV protective cover. 2 Open the <TOOLS> tab and press the <Electrical test> button.
-
Page 37: Run-In Period
TOC Evolution VUV Startup 4.5. Run-in Period 1 Go back to the main screen. 2 Start measurement by pressing the button. 3 Let the analyzer perform one or two measuring cycles before proceeding with the next steps. 4.6. Manual Measurement 1 Perform a manual measurement with a standard solution. -
Page 38: Operation
TOC Evolution VUV Operation Operation 5.1. Access Levels There are two predefined access levels: User access: Allows viewing data in the main window. Access with extended permissions: Allows stopping the measurement, changing settings and performing maintenance tasks. The password for access with extended permissions is “0712”. After 10 minutes of inactivity, the password is requested again. -
Page 39: User Interface
TOC Evolution VUV Operation 5.2. User Interface MEASURE DIAGNOSTIC TOOLS 14.29 ppm Stream1 Step: 2.8 On:473 Sample/Emptying reactor 06:41:11 06.04.2022 Menu tabs: MEASURE tab: Displays measured values and the progress of the current measuring cycle. GRAPHS tab (dual-channel instrument only): Displays the trend graphs . -
Page 40: Maintenance
TOC Evolution VUV Maintenance Maintenance 6.1. Maintenance Schedule Check fill levels in reagent bottles. Monthly Check color indicators of soda lime and silica gel granules. Prepare new reagents according to the separate method sheet. If reagents are empty ... -
Page 41: Stop Of Operation For Maintenance
TOC Evolution VUV Maintenance 6.2. Stop of Operation for Maintenance Before performing any maintenance work on reagent or pump tubes, it is recommended to flush the reagent system with demineralized water. Proceed as follows: 1 Stop sample flow. 2 Perform one measuring cycle with deionized water instead of sample. - Page 42 TOC Evolution VUV Maintenance 7 Open the <PUMPS> tab. 8 Press the <ON> button next to “Acid - P1”. PUMPS RELAYS SOLENOIDS ACTUATOR 4-20mA OUTPUT INPUTS Sample pump command Acid - P1 tr/min tr/min Persulfate - P2 9 Let the pump run for approximately 2 minutes. Then set the pump to <OFF>.
-
Page 43: Replacing Reagents
TOC Evolution VUV Maintenance 6.3. Replacing Reagents WARNING Multiple hazards For safe handling of the reagents, you must read and understand the Material Safety Data Sheets (MSDS). Wear appropriate protective equipment. Note: • It is recommended to replace the reagents when there is approximately 2–3 cm of reagent left in each bottle. -
Page 44: Replacing Peristaltic Pump Tubes
TOC Evolution VUV Maintenance 6.4. Replacing Peristaltic Pump Tubes 6.4.1 Reagent Pumps WARNING After rinsing with deionized water, reagent tubes may still contain traces of chemicals Wear appropriate protective equipment (gloves, glasses, protective clothing). 1 Flush the reagent tubes with deionized water as described in Stop of Operation for Maintenance, p. - Page 45 TOC Evolution VUV Maintenance 5 Connect the new tube to the right side fitting and roll the tube around the rotor while turning it. 6 Connect the other tube end to the left side fitting. 7 Install the front cover on the pump.
-
Page 46: Sample Pump
TOC Evolution VUV Maintenance 6.4.2 Sample Pump 1 Turn the power switch to the OFF position. 2 Pull off the black sleeves [C] from the pump inlet and outlet. 3 Unscrew the three screws [A]. 4 Remove the cover and the pump tube [B] carefully. Unclip the old pump tube from the cover. -
Page 47: Replacing Soda Lime And Activated Charcoal
TOC Evolution VUV Maintenance 6.5. Replacing Soda Lime and Activated Charcoal General The soda lime granules have a color indicator (purple when saturat- ed). When replacing the soda lime granules, always replace the acti- vated carbon granules at the same time. - Page 48 TOC Evolution VUV Maintenance 3 Wait 30 seconds until the purging cycle has been completed. 4 Check that the pressure gauge indicates 0 bar. 5 Remove the inlet and outlet tubes from the top and bottom of the cartridge. 6 Remove the cartridge from its cradle.
-
Page 49: Replacing Silica Gel
TOC Evolution VUV Maintenance 6.6. Replacing Silica Gel General The silica gel granules lose their orange color when saturated. Replacing Air tube the granules Screws Hooks Silica gel cartridge 1 Pull the air tube [A] out of the black elbow fitting. -
Page 50: Replacing Uv Lamp
TOC Evolution VUV Maintenance 6.7. Replacing UV Lamp Overview Preparation 1 Switch the analyzer off. 2 Remove the cover [A]. Remove old 3 Disconnect the two connectors [D]. UV lamp 4 Unscrew the three screws [C] on the top of the UV lamp and remove the retaining frame. -
Page 51: Manual Measurement And Calibration
TOC Evolution VUV Maintenance 6.8. Manual Measurement and Calibration Entering the 1 To stop the current measuring cycle, press the button on the main screen and enter the password “0712”. In the next dialog, maintenance confirm with “OK”. menu 2 From the main screen, open the <TOOLS> tab and press the <Maintenance>... -
Page 52: Manual Measurement
TOC Evolution VUV Maintenance 6.8.1 Manual Measurement The <Manual measure> function can be used to verify the instrument performance using a standard solution. It is recommended to per- form one or two manual measurements before each calibration to obtain a meaningful result. -
Page 53: Standard Calibration
TOC Evolution VUV Maintenance 6.8.3 Standard Calibration Note: • On multi-channel instruments, only calibrate sample stream 1. 1 Start the standard calibration by pressing the button. 2 In the next window, check that the displayed concentration value corresponds to the actual concentration of the standard. If neces- sary, adjust the concentration value. -
Page 54: Longer Stop Of Operation
TOC Evolution VUV Maintenance 6.9. Longer Stop of Operation If the instrument is going to be switched off for a few days or longer, proceed as follows: 1 Stop sample flow. 2 Prime all reagent and sample tubes with deionized water as described in Stop of Operation for Maintenance, p. -
Page 55: Configuration Of The Analyzer
If 0 seconds are set, the display will never turn off. by screen Airflow Setpoint of the air flow controller. setpoint Adjust this value only if instructed to do so by Seres OL customer service. NDIR Tempera- Temperature setpoint in °C of the NDIR detector. ture setpoint Adjust this value only if instructed to do so by Seres OL customer service. - Page 56 8640 (12 cycles * 24 hours * 30 days). Persulfate Amount of persulfate added per measuring cycle. pump turn Adjust this value only if instructed to do so by Seres OL customer number service. JBUS slave ID Sets the JBUS slave ID.
- Page 57 TOC Evolution VUV Configuration of the Analyzer Measuring Menu To access the measuring menu, press the button on the main screen. STREAM 1 tab Stream 1 state Activates or deactivates stream 1. TOC measure Indicates whether stream 1 is currently being measured.
- Page 58 TOC Evolution VUV Configuration of the Analyzer TOC tab Threshold 1 Upper threshold value. Threshold 2 Lower threshold value. Min. 4 –20mA Beginning point of the linear scale. Max. 4–20mA End point of the linear scale. Note: In addition to the settings listed above, the Parameter menu contains further settings which are not documented in this manual.
-
Page 59: Troubleshooting
TOC Evolution VUV Troubleshooting Troubleshooting This chapter provides some hints to make troubleshooting easier. For detailed information on how to replace or clean parts refer to Maintenance, p. If you need help please contact your local distributor. Please have the serial number and the diagnostic values (see 59) ready. - Page 60 TOC Evolution VUV Troubleshooting Instrument shows error message “Water default” although there is sample flow Possible cause Corrective action Filling solenoid valve (EV1) – Check that the solenoid valve is plugged in correctly. does not switch. One or more sample tubes –...
- Page 61 TOC Evolution VUV Troubleshooting Measured value is not updated Possible cause Corrective action The same value was – No action necessary. measured twice. Measurement was stopped – Start measurement. or paused. Screen does not work Possible cause Corrective action The application does not –...
- Page 62 TOC Evolution VUV Troubleshooting Possible cause Corrective action Reagents not pumped – Check filling levels of reagents. properly. – Check that the reagent pumps are working. – Check that the reagent tubes are cut at an angle and immersed all the way to the bottom of the bottles.
-
Page 63: Saving Diagnostic Data To Usb Stick
TOC Evolution VUV Troubleshooting 8.2. Saving Diagnostic Data to USB Stick The TOC Evolution VUV permanently records measurement and diagnostic data and stores it in a non-volatile memory. If required, this data can be transferred to a USB stick. Transfer to... -
Page 64: Replacing Parts
TOC Evolution VUV Troubleshooting 8.3. Replacing Parts 8.3.1 NDIR Overview Preparation 1 Switch the analyzer off. 2 Open the inner door of the analyzer. Remove old 3 Loosen the screws on each side of the cover [B] and carefully remove it. -
Page 65: Glassware
TOC Evolution VUV Troubleshooting 8.3.2 Glassware Overview Protective cover Condenser Heater “Clarinet” manifold Preparation 1 Make sure that there is no water in the analyzer. If necessary, empty it. 2 Switch the analyzer off. 3 Remove the cover [A]. SOL-96.120.031 / 060223... - Page 66 TOC Evolution VUV Troubleshooting 8.3.2.1 Condenser Overview Front: Rear: Remove old 1 Cut the sleeves [A] and [C] lengthwise and remove them from the glassware. condenser 2 Pull off the tube [B] from the condenser and empty the safety guard.
- Page 67 TOC Evolution VUV Troubleshooting 10 Unscrew and remove the fan [G]. 11 Unscrew and remove the heatsink [H] and the peltier element. 12 Clean the metal surfaces. Install new 13 Place the heatsink and the peltier element to the new condenser.
- Page 68 TOC Evolution VUV Troubleshooting 8.3.2.2 Heater Overview Front: Rear: Remove old 1 Cut the sleeves [A] and [B] lengthwise and remove them from the glassware. heater 2 Open the inner door of the analyzer. 3 Disconnect the heater and temperature sensor cables [C].
- Page 69 TOC Evolution VUV Troubleshooting Check for leaks WARNING UV light Since the following work is performed with the analyzer switched on and the UV protective cover removed, wear UV protective goggles. 8 Start sample flow and switch the analyzer on.
- Page 70 TOC Evolution VUV Troubleshooting 8.3.2.3 “Clarinet” Manifold Overview Front: Rear: Remove old 1 Cut all eight sleeves [A] lengthwise and remove them from the glassware. Be careful not to damage the thin tubes inside the manifold sleeves [E] and [G].
- Page 71 TOC Evolution VUV Troubleshooting Check for leaks WARNING UV light Since the following work is performed with the analyzer switched on and the UV protective cover removed, wear UV protective goggles. 7 Before restarting the analyzer, fill the liquid seal with demineral- ized water.
-
Page 72: Reagent Pump
TOC Evolution VUV Troubleshooting 8.3.3 Reagent Pump WARNING After rinsing with deionized water, reagent tubes may still contain traces of chemicals Wear appropriate protective equipment (gloves, glasses, protective clothing). Preparation 1 Flush the reagent and pump tubes with demineralized water as described in Stop of Operation for Maintenance, p. - Page 73 TOC Evolution VUV Troubleshooting Page intentionally left blank. SOL-96.120.031 / 060223...
-
Page 74: Fluidic Diagrams
TOC Evolution VUV Fluidic Diagrams Fluidic Diagrams 1-channel instrument: SOL-96.120.031 / 060223... - Page 75 TOC Evolution VUV Fluidic Diagrams SOL-96.120.031 / 060223...
- Page 76 TOC Evolution VUV Fluidic Diagrams 1-channel instrument with tangential filtration: SOL-96.120.031 / 060223...
- Page 77 TOC Evolution VUV Fluidic Diagrams SOL-96.120.031 / 060223...
- Page 78 TOC Evolution VUV Fluidic Diagrams 2-channel instrument: SOL-96.120.031 / 060223...
- Page 79 TOC Evolution VUV Fluidic Diagrams SOL-96.120.031 / 060223...
-
Page 80: Notes
TOC Evolution VUV Notes Notes SOL-96.120.031 / 060223... - Page 81 TOC Evolution VUV Notes SOL-96.120.031 / 060223...
- Page 82 SOL-96.120.031 / 060223 Seres OL Products - Analytical Instruments for: Seres OL is represented worldwide by subsidiary companies and distributors and cooperates with independent representatives all over the world. For contact information, please scan the QR code. Seres OL SAS ∙ FR-13730 Saint-Victoret www.seres-ol.com ∙...
Need help?
Do you have a question about the TOC Evolution VUV and is the answer not in the manual?
Questions and answers