Table of Contents
Advertisement
Quick Links
SSV WORKS, 201 N. Rice Ave Unit A, Oxnard, CA 93030
www.SSVworks.com | Phone: 818-991-1778 | Fax: 866-293-6751
WARRANTY INFORMATION:
All SSV Works enclosures are covered by a limited lifetime warranty against defects in
material or workmanship. All SSV Works Electronics are covered by a limited 1 year warranty
against defects in material or workmanship. All Kicker Speakers are covered by a limited 1
year warranty against defects in material or workmanship. All Kicker Amplifiers are covered by
a limited 2 year warranty against defects in material or workmanship. Labor for replacement
of defective components is not covered. Contact SSV Works for further warranty information.
TOOLS NEEDED FOR INSTALLATION
- Panel Removal Tool
- 10mm wrench
PARTS LIST IMAGES
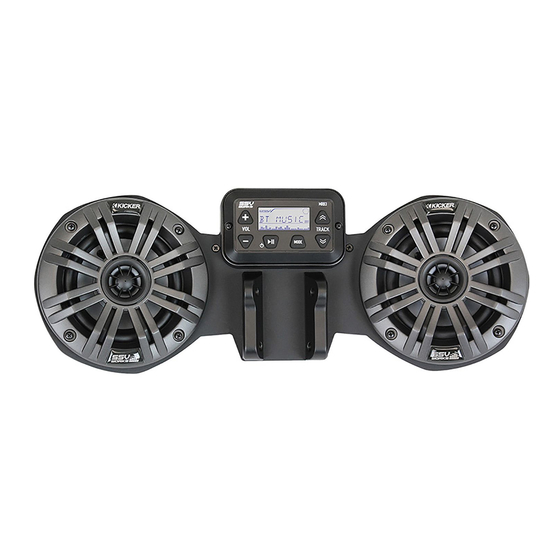
1. RKR-2K
5. Grommet
9. #4 Coarse Threaded Screw x2
- 5mm allen key
- T20, T30 torx
2. MRB3 Brain and Tray
6. M6x1.0x16mm 5mm Allen
Head Screws x4
10. M3x0.5x8mm Machine
Screw x2
Can-Am Ryker 2-Speaker Audio Kit
!
- #1 phillips screwdriver
- Drill & 1/8" 5/16" drill bits
3. Mounting Brackets
7. Push Pins x4
11. Zip Ties
RKR-2K
Please read and understand these
instructions completely before
installation to avoid possible injury, or
damage to the accessory or vehicle.
- Scribe or marker
4. Center Cover
8. M6x1.0x12mm T30 Torx
Screws & Washers x4
1
Advertisement
Table of Contents

Subscribe to Our Youtube Channel
Related Manuals for SSV Works RKR-2K


Summary of Contents for SSV Works RKR-2K
- Page 1 All SSV Works enclosures are covered by a limited lifetime warranty against defects in instructions completely before material or workmanship. All SSV Works Electronics are covered by a limited 1 year warranty installation to avoid possible injury, or against defects in material or workmanship. All Kicker Speakers are covered by a limited 1 damage to the accessory or vehicle.
- Page 2 COMPRESS A. Compress the locking tabs to the hood and slide the hood down B. Use a 10mm socket to disconnect the negative battery terminal. simultaneously to release the hood and remove. C. Open the front storage compartment, remove the (4) push pins and D.
- Page 3 H. Fasten the RKR-2K mounting brackets to the front of the gauge cluster G. Once the fairing panel has been released, lift the front storage mount. With (2) 5mm allen screws on each side. Note the orientation of compartment and disconnect the USB charging port. Set the the mounting bases.
- Page 4 M. Remove the MRB3 brain assembly from the storage container and N. To route the harness from the RKR-2K to the MRB3 brain, pull the harnesses drill a pilot hole with a 1/8” drill bit at each marked point. Open up from the RKR-2K back around the upper fairing panel and to the front of the each pilot hole with a 5/16”...
- Page 5 T. Connect the antenna. the USB port to identify which terminal is power or ground. U. Connect the MRB3 front speaker output to the RKR-2K input. V. Align the arrows on the wire control panel with the arrow on the MRB3 controller connector and connect.
- Page 6 Z. Place the storage compartment back into its cavity. each side to mount the MRB3 in place. A1. Hold the center cover onto the front of the RKR-2K, fasten the (2) M3 B1. Support the top of the center cover of the system and fasten the machine screws into the system to retain the cover.
Need help?
Do you have a question about the RKR-2K and is the answer not in the manual?
Questions and answers