
Related Manuals for Furrion DV3100S


Summary of Contents for Furrion DV3100S
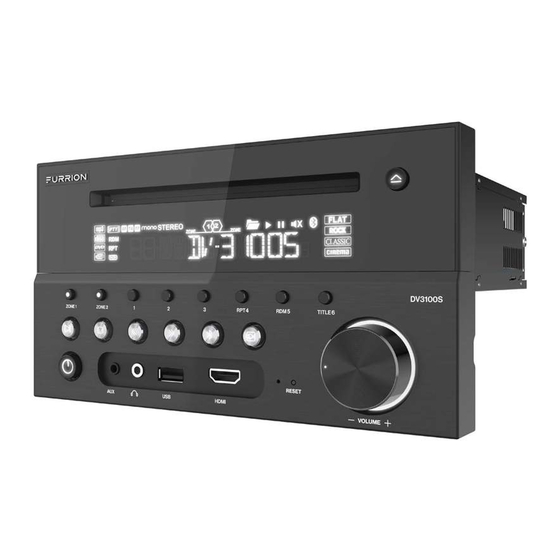
- Page 1 ENTERTAINMENT SYSTEM MODEL: DV3100S LIPPERT NO.: 2021123566 USER MANUAL DV3100S Product picture is for reference only.
-
Page 2: Welcome
Welcome Thank you and congratulations for purchasing this Furrion® DV3100S Entertainment System. Before operating your new product, please read these instructions carefully. This instruction manual contains information for safe use, installation and maintenance of the product. Please keep this instruction manual in a safe place for future reference. This will ensure safe use and reduce the risk of injury. -
Page 3: Table Of Contents
Contents Welcome ........................2 Contents ........................3 Important Safety Instructions ................4 Safety....................................... 4 Class 1 Laser Product ............................... 4 Notice of compliance ................................ 5 FCC Radiation Exposure Statement ......................... 5 What’s in the box ................................6 Precautions ................................... 6 Features ....................................6 Introduction ......................6 Supported Format ................................ -
Page 4: Important Safety Instructions
Important Safety Instructions Safety 3. Switch off the power when the unit is not in use. (Disconnect the power plug from the power outlet when you do not intend to use the unit for a prolonged period of CAUTION time.) Before moving the unit, remove the disc from the unit/tray first. -
Page 5: Notice Of Compliance
These limits are designed to provide operate the equipment. reasonable protection against harmful Thank you for purchasing a Furrion Product, interference in a residential installation. we hope you will enjoy using our product. This equipment generates, uses and can For maximum enjoyment please look through... -
Page 6: What's In The Box
Introduction What’s in the box Thanks for purchasing the Furrion DV3100S Entertainment System. This manual will help you set up and begin using your product. Please read this manual thoroughly and keep this manual in a safe place for future reference. -
Page 7: Supported Format
Introduction ● Microphone on front Supported Format Supported Video Format File Container Video Codec Audio Codec Resolution Remark Extension MPEG-4 Visual Dolby Digital (AC3) DivX PCM/LPCM .avi 720 x 480 (30fps) 4.xx/5.xx/6. AAC-LC (2ch) xx/3ivX .divx 720 x 576 (30fps) MPEG-Audio XviD (MP1/MP2/MP3) -
Page 8: Functional Overview
Functional Overview Control Panel INPUT MODE Select the corresponding sound source: Turn on the unit or switch to standby AM/FM, DISC/USB, BT, AV IN, AUX or mode. HDMI mode. Built-in microphone Stop playback. RESET AUX socket Reset the unit and load its factory default Connect to the 3.5mm video / audio settings. -
Page 9: Remote Control
Functional Overview Disc slot Fast backward/forward within a IR sensor for remote control chapter / track. Tune to a radio station. ZONE 1 / ZONE 2 Turn on or off the audio source in each of the different areas where your speakers Start (resume) / pause playback. - Page 10 Functional Overview LOC/SLOW.FWD/* SUBT/REDIAL In radio mode, enable or disable local Select the caption language during DVD mode. playback (if available). During disc playback, select a slow Redial the last dialed number. forward speed. ST/ANGLE/# Select repeat playback mode. In FM mode, switch between stereo and mono sound output.
- Page 11 Functional Overview Description of icons on the LCD display Icon Description Lights up when a USB storage device is connected. Lights up when a DVD is loaded. DISC Lights up when a disc (DVD,VCD,CD) is loaded. Lights up when a loaded disc or connected USB storage device contains MP3 files.
-
Page 12: Before Operation
Before Operation Wiring Diagram SUBWOOFER OUTPUT AV OUTPUT 1 WIRING SOCKET A AUDIO INPUT AV OUTPUT 2 WHITE L RED R YELLOW VIDEO BLACK IR REMOTE JACK ANTENNA JACK WIRING SOCKET B The Description of the Wiring Diagram for Socket A and Socket B WIRING SOCKET A WIRING SOCKET B WIRING HARNESS A... - Page 13 Before Operation Wiring Connecting Socket A View Pin No. Color Function Purple Right (B) Speaker (+) Purple/Black Right (B) Speaker (-) Grey Right (A) Speaker (+) Grey/Black Right (A) Speaker (-) White Left (A) Speaker (+) White/Black Left (A) Speaker (-) Green Left (B) Speaker (+) Green/Black...
- Page 14 Before Operation WIRES FROM RV, BOAT OR TRUCK CCD-0005558 Rev. 12.30.22...
-
Page 15: Mounting Installation
Before Operation Mounting Installation Location 1. Choose a mounting location away from humid areas, water sources, appliances or any equipment that can radiate heat. 2. Select an area on a wall or cabinet which is free from cable, fuel or brake lines and ensure the area behind the wall mount stereo has a vent hole or if it is an enclosed box and has adequate room around the rear of the unit for cooling. -
Page 16: Prepare The Remote Control
Before Operation Prepare the Remote Control Remote control battery note 1. Improper use of a battery may cause 1. Before using the remote control for the overheating or an explosion that could first time, pull the insulating sheet out result in injury or fire. of the remote control in the direction 2. -
Page 17: Operation
Operation Quick Reference Guide General Operation Power on/off, switch Press to turn the unit on or enter standby mode. to standby mode Press and hold to turn the unit off. Press MUTE on the remote control to mute sound. The icon flashes on Mute the display. - Page 18 Operation Radio Operation Press and hold for 5 seconds to set the AM/FM radio region (Europe/USA1/ Select radio region USA2/AUSTRALIA). Manual tuning Press to move the radio frequency down or up one step at a time. Automatic tuning Press and hold to search for the next strongest station automatically.
-
Page 19: Common Operation
Operation ● HDMI - Connection on the front of the Common Operation unit to connect an external HDMI OUT device. Turn the unit on or switch to Adjust volume standby mode Rotate the VOLUME -/+ knob clockwise Press to turn the unit on or switch to to increase volume, rotate anticlockwise to standby mode. -
Page 20: Radio Operation
Operation To turn on / off LOUD mode Select AM/FM band Press and hold LOUD on the remote In RADIO mode, press and hold button on control to turn on / off LOUD mode. the front panel or briefly press on the remote control to select your desired radio To adjust the sound equalizer... -
Page 21: Basic Disc / Usb Operation
Operation Basic Disc / USB Operation on the front panel (or APS on the 2. Press remote control) to search for each preset radio station starting from M1. When the Start playback field strength level is above the threshold of the stop level, the radio holds at that 1. - Page 22 Operation Stop Playback Select a chapter / track from the root/PBC menu (if available) ● When playing DVD/VCD/MP3/CD discs, press once to pause playback, then For DVD: you can press to resume normal 1. Press TITLE on the remote control to playback.
-
Page 23: Advanced Disc / Usb Operation
Operation Advanced Disc / USB 3. During MP3 playback: Press RPT to select REP ONE, REP DIR, Operation REP ALL, or OFF. Repeat A-B Fast backward / forward Use this function if you want to repeat a specific segment on a disc that you define: During normal playback, press and hold / ... - Page 24 Operation Play randomly Check the playback status During DVD/VCD (PBC OFF)/MP3/CD When playing DVD/VCD/CD discs, press playback, press RDM once or more to switch OSD on the remote control once or more to between RANDOM ON and RANDOM OFF. turn on or off playback status display. In RANDOM ON mode, the chapters / tracks ●...
- Page 25 Operation 3. Use the number buttons to input the title / navigation buttons to select your desired chapter / track sequence numbers you JPEG file, and then press OK or to start want in your desired order. full-screen playback starting from the selected JPEG picture.
-
Page 26: Set Up The Dvd System Menu
Operation ● Press SETUP on the remote control again ESP and ID3 functions or use the navigation buttons to highlight ● The unit supports the ESP (Electrical EXIT SETUP and then press OK to exit Shock Protection) function to ensure the System Menu. - Page 27 Operation 4. PASSWORD 1. OSD LANGUAGE Lock or unlock the rating level of Parental Select the language of the system menu and Control. all interfaces displayed during playback. The default state is locked, and the 2. AUDIO LANG default password is 0000. Select the audio language.
- Page 28 Operation 4. SATURATION 1. DYNAMIC RANGE Adjust the saturation of video output. After selecting the compression mode of LINE OUT, you can set this item to adjust 5. SHARPNESS the linear compression ratio. Adjust the sharpness of video output. FULL: Set the Peak-to-Peak value of the Speaker Setup audio signal to minimum.
-
Page 29: Bluetooth Operation
Then press on the front panel of 3. PG DV3100S to enter pairing mode. 4. PG 13 2. When DV3100S is detected by your 5. R mobile phone, the device name FURRION 6. NC 17 DV3100S-XXXX (where X can be any 7. - Page 30 DV3100S for playback. Press and hold on the front panel of To play audio through Bluetooth, you must DV3100S for about 5 seconds to clear the activate Bluetooth mode on your mobile pairing information. device. If the Bluetooth device supports AVRCP,...
-
Page 31: Maintenance
Maintenance Maintenance and Cleaning of Discs Disc Maintenance 1. To keep the disc clean, handle the disc by its edge, and do not touch the disc surface of the play side. 2. Do not stick paper or tape on the disc. If there is glue on the disc surface, wipe it off before using. -
Page 32: Troubleshooting
Troubleshooting Please read the user manual carefully before using the unit. If you have any problems with this product, please refer to the below troubleshooting guide to help you resolve the issue. TROUBLE/SYMPTOM SOLUTION Ensure that the power switch is on. Ensure that the wall inlet is OK. - Page 33 Troubleshooting TROUBLE/SYMPTOM SOLUTION Check the batteries of remote control and make sure that they are not flat. Remote control does Direct the remote control to the IR sensor of the unit. not work Check whether there are obstacles between the remote control and IR sensor.
-
Page 34: Specifications
Specifications General Specification Power supply requirement DC 12V Total Power 4x 15W RMS USB Output Voltage / Current 5V @ 1 A Dimensions 77/8" x 43/8" x 71/2" (200 x 110.5 x 190 mm) DVD Deck Specification Format DVD/VCD/JPEG/MP4/MP3/CD Video system NTSC/PAL/AUTO (optional) Audio system 24 bit/96KHz... - Page 35 The contents of this manual are proprietary and copyright protected by Lippert. Lippert prohibits the copying or dissemination of portions of this manual unless prior written consent for an authorized Lippert representation has been provided. Any unauthorized use shall void any applicable warranty. The information contained in this manual is subject to change without notice and at the sole discretion of Lippert.
Need help?
Do you have a question about the DV3100S and is the answer not in the manual?
Questions and answers
I can't find the mounting opening for a Furrion DV3100s. I have a Firrion DV1100 currently and want to replace with a DV3100s. The hole is currently 9.09 X 5.94". Is the hole for theDV3100s larger or smaller?