ROAV DASHCAM C1 - Dashcam Manual
- Quick start manual (2 pages) ,
- Owner's manual (32 pages)
Advertisement
Safety Instructions
Please read and understand all instructions before using this product. If damage is caused by failure to follow the instructions, the warranty does not apply.
- Keep these instructions.
- Do not drop, puncture or disassemble this product.
- This product shall not be exposed to dripping or splashing.
- Avoid long exposure to direct sunlight, which may cause damage.
- Exposing this product to open flames may cause explosion.
- Use original accessories only.
- Do not install this product where it will block the driver's view of the road or the deployment of the airbag.
- Keep your attention on the road. Do not operate the controls of this product while driving.
- Ensure the camera lens is kept clean and there is nothing blocking the lens.
- Setup time and date accurately before using this product.
- Do not use the charger if the cord is damaged or broken.
- Remove this product from your vehicle when not in use for a long period.
- Keep out of reach of children.
- Use clean, soft cloth to clean. Do not use any corrosive cleaner/oil to clean.
- The Company is NOT responsible for the loss of any data/content during operation.
Introduction
Thank you for choosing Roav DashCam. This product is specifically designed for real time video and audio recording while driving. To get the most out of it, please read all of the information in this manual.
Features
Continuous loop recording
Full HD camera (1080p @ 30fps)
2.4" LCD color screen (320 x 240)
145° wide angle lens
Rotatory camera lens
Motion detection
Automatic emergency recording for collision detection
Automatic or manual file locking
Support microSD / TF card up to 32G
24 hours parking guard
Auto-record and auto-power off
Customizable watermark
Support your own language
What's Included

At a Glance

- Speaker
- Microphone
- Power button with LED indicator
- Red: recording in progress
- Green: no recording status
- Camera lens
- LCD screen
- Touch buttons
- Memory card slot
- Air vent
- Micro USB charging port
- Reset slot
Inserting Memory Card

Do not remove or insert microSD / TF card when this product is powered on, which may damage the card.
For reliable operation, use a Class 10 microSD / TF card with a capacity of 8GB, 16GB or 32GB.
| Card Capacity | 1080P 30FPS | 720P 60FPS | 720P 30FPS |
| 8 GB | 80 min | 90 min | 120 min |
| 16 GB | 160 min | 180 min | 240 min |
| 32 GB | 320 min | 360 min | 480 min |

- Insert a microSD / TF card with the gold contacts facing the screen side of the DashCam. Push the card until it clicks into place.
- To remove the microSD / TF card, gently push its top edge inward until it clicks, and then pull it out of the slot.
|
Installing Your DashCam
- Never install this product while driving.
- Install this product near the rear-view mirror to obtain the best open-field view. Do not install in a location that will obstruct your required driving view.
- Make sure that the lens is within the wiping range of the windscreen wiper to ensure a clear view even when it rains.
- Do not touch the lens with your fingers. Finger grease may be left on the lens and will result in unclear videos.
- The mount is adhesive and may be destroyed if it is removed from the windshield.
- Attach the DashCam onto the mount.

- Select a location (A or B) on the windshield rear of the rearview mirror.
- Remove 3M adhesive sticker and firmly affix the mount onto the windshield.
- Use the trim removal tool to press and hide the charging cable into the seams and weatherstripping around the edge of the dashboard.
- Adjust the lens viewing angle to ensure that it is aligned with the road ahead.


Connecting to Power
- Connect the car charger and DashCam by using the charging cable.
- Plug the other end of the car charger to your vehicle's cigarette lighter socket.

- Once the car engine is started, DashCam will automatically power on and start recording. Once the car engine is shut down, DashCam automatically saves the recording and turns off within 30 seconds.

Manually turn on/off
- To manually turn on, press the power button.
- To manually turn off, press and hold the power button for at least 2 seconds.
Downloading Roav App

Search "Roav" in App Store or Google Play to Download.
Apple and the Apple logo are trademarks of Apple Inc.

Google Play and the Google Play logo are trademarks of Google Inc.

Connect DashCam with Smartphone
With successful connection with your smartphone via built-in Wi-Fi, you can save and playback the driving recording videos on your smartphone.
- When successfully connected, DashCam stops recording.
- Android phones cannot access internet data while connected to DashCam's Wi-Fi. iOS devices should still function normally.
- On your Smartphone: Select "Settings" > "Wi-Fi".
- Find "Roav DashCam C1" on the list and connect it, enter password (initial password: goroavcam).
- Follow the instructions on your smartphone to complete the connection.
Using Your DashCam
As a driver, you have full responsibility to drive safely and adhere to all applicable traffic regulations.
Record Videos
- When connected to a car charger, DashCam automatically starts recording,
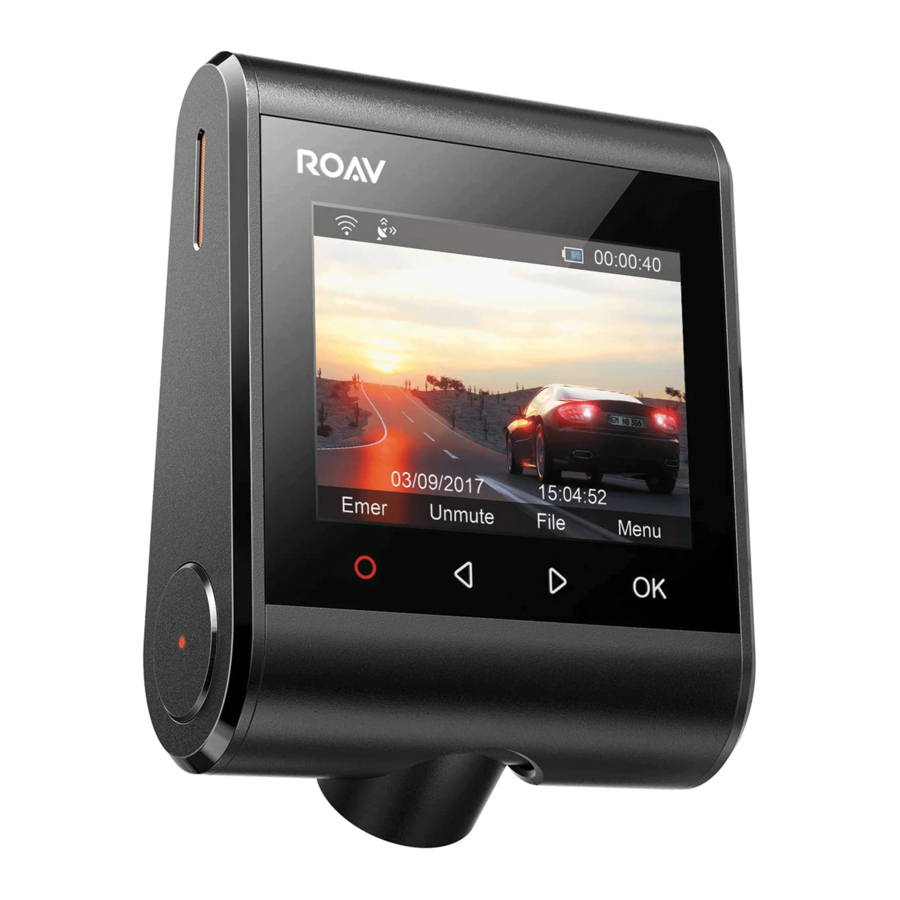
![]() is displayed and red dot flashes on the screen, the current recording duration is displayed, and the current date and time is displayed.
is displayed and red dot flashes on the screen, the current recording duration is displayed, and the current date and time is displayed. - To enable / disable the audio recording, tap
![]() (Mute).
(Mute).
 (Mute).
| Each recording video clip lasts 3 minutes. |
Protect the Current Recording
By default, DashCam uses a sensor to automatically detect accidental collisions and protect the video file with duration of 30 seconds, and  is displayed. This indicates that those recordings have been locked and will not be overwritten by new video clips.
To protect the current recording manually, tap ![]() (Emer).
(Emer).
Playback Videos
The DashCam stops recording while viewing videos or settings.
- Tap
![]() (File) to view all saved videos.
(File) to view all saved videos. - Select a video to playback.
 (File) to view all saved videos.
| Touch Button | Virtual Button | Mark |
 |  | Play / Pause |
 |  | Delete Current / Delete All |
 |  | Lock Current / Unlock Current (while pause) |
 |  | Back to previous menu |
System Setup
To adjust DashCam's settings, tap (Menu).
| Menu Options | Description | Available Options | ||
| Resolution | Set a desired video resolution. | 720P 60FPS / 720P 30FPS / 1080P 30FPS | ||
| Frequency | Set video frequency range | 50 Hz / 60 Hz | ||
| Sensitivity | Sensitivity for gravity | Low / Medium / High / Off | ||
| Parking Monitor | Enable to keep DashCam in standby mode. Motion will be detected for 15 times and DashCam starts recording a 30 second video each time. | On / Off | ||
| WIFI | Connect with smartphone | On / Off | ||
| Time | Set date and time | Tap  / /  to adjust the value, tap to adjust the value, tap  to next option, tap to next option, tap  to save to save | ||
| Language | Set on-screen display menu language | English / Deutsch / 日 本語文 / 简体中文 / 繁体中 / Español / Italiano / Français | ||
| LCD Auto Off | Turn off the screen backlight after a period of inactivity | 30 Seconds / 60 Seconds / Off | ||
| Machine Sound | Mute or unmute | On / Off | ||
| Default | Reset all options to the default settings | Cancel / OK | ||
| Format | Format the memory card and all the data will be deleted | Cancel / OK | ||
| Watermark | Display / hide the date and time on the recordings | On / Off | ||
| About | Check the current version number | |||
| Touch Button | Virtual Button | Mark | ||
| |  | Click repeatedly to select a setting Click to confirm a selection | ||
 |  | Toggle the next setting | ||
 |  | Toggle the previous setting | ||
 | | Back to recording mode | ||
Specifications
 Specifications are subject to change without notice.
Screen: 2.4" LCD color TFT (320 x 240)
Camera sensor: Sony Exmor IMX 323
Camera lens: wide-angle lens 145°
Chipset: Novatek NT96658
Power input: 5V ![]() 1A
1A
Max video resolution: 1080P 30FPS (1920x1080)
Video clip format: .MOV
Wi-Fi: 2.4GHz Band
Battery capacity: 470mAh
Charging cable length: 3.2 m
Operating temperature range: 14°F to 149°F
Storage temperature range: -20℉ to 160℉
Weight: Approx. 4.2 oz
Size: 3.4*2.6*1.4 in
FAQ
- Can not record?
- Check if the memory card is inserted properly and there is enough free capacity.
- Check the battery level.
- Blurred image?
- Use a clean, soft lens-cleaning cloth to gently clean the lens.
- Malfunction or crash?
- Press and hold the Reset slot by using a sharp pin for at least 2 seconds.
- Blank screen?
- The screen saver is activated. Change settings to "Off" if required.
- Fail to view and playback videos on your smartphone?
- Check on your smartphone if Wi-Fi is successfully connected to the DashCam.
- How to enable parking monitor?
- Tap
![]() (Menu), select "Parking Monitor" > "On".
(Menu), select "Parking Monitor" > "On".
- Tap
- Worry about the memory card is full?
- Continuous loop recording allows to overwrite the old unlocked files.
- Will my data be used when my smartphone is connected with DashCam?
- No. Data will be used only if you share the saved videos via social apps.
Customer Service
 12-month limited warranty Lifetime technical support support@goroav.com
 Lifetime technical support
 support@goroav.com
 1-800-988-7973 (US) Mon-Fri 9am-5pm (PST)
 @GoRoav
 @GoRoav

Documents / Resources
References
Download manual
Here you can download full pdf version of manual, it may contain additional safety instructions, warranty information, FCC rules, etc.
Advertisement


Need help?
Do you have a question about the DASHCAM C1 and is the answer not in the manual?
Questions and answers