Kapsys SmartVision3 - Mobile Phone Quick Start Guide
- User manual (52 pages)
Advertisement
Box content
SmartVision3 is delivered with:
- A 220/110 Volts mains charger – 5 Volts USB
- A USB cable (C type)
- A pair of stereo earphones with microphone
- 5 NFC tags
- A SIM ejector tool
- A Quick starting guide
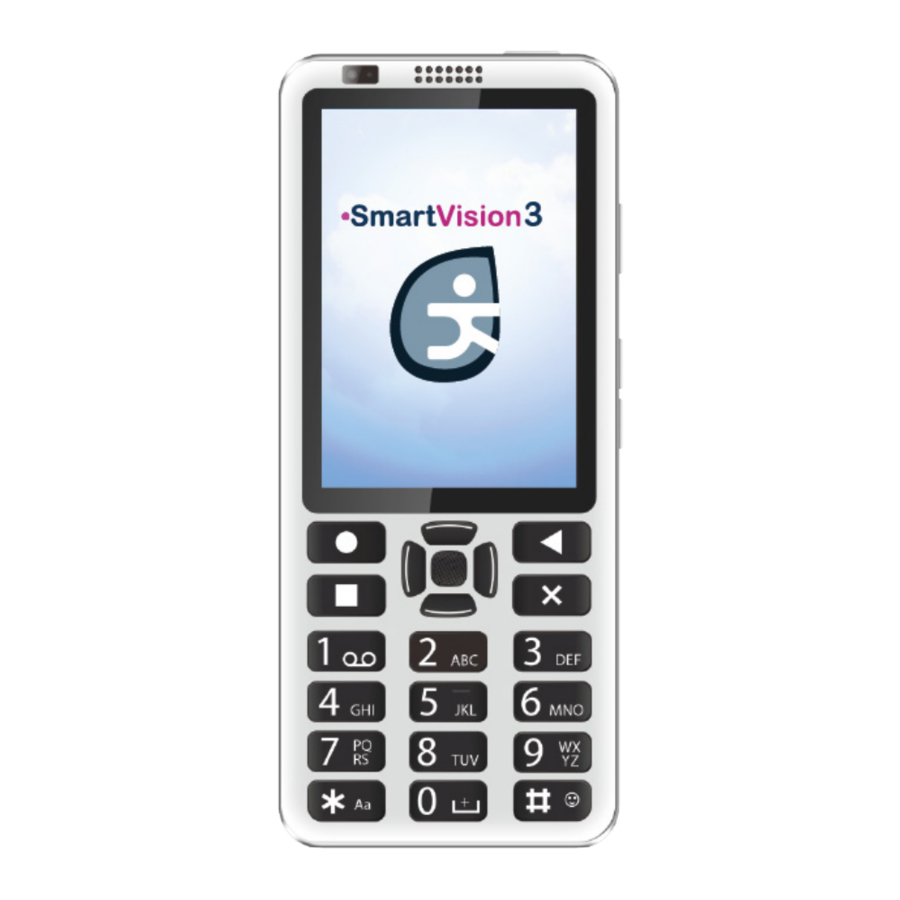
Overview

| No | Item | Description | |
| 1 | 3.5 mm headphone jack | Connect to stereo earphones | |
| 2 | Power button | Press and hold to turn SmartVision3 ON/OFF. Press to turn the screen ON/OFF (sleep mode) | |
| 3 | Sim card tray | To insert your SIM and SD card | |
| 4 | Front-facing camera | Use for self-portrait images and online video chat | |
| 5 | Receiver | Main receiver for phone calls | |
| 6 | Display | Display data and control with touchscreen | |
| 7 | Control keys and navigation pad |  | Navigate through the screen with multidirectional commands (up, down, right, left) and a central "OK" button. |
 | Go back to home screen | ||
 | Open the menu of the current screen | ||
 | Go back to the previous screen | ||
 | Delete user input | ||
| 8 | Alphanumeric keypad | Use to input characters | |
| 9 | Voice command button | Use to dictate text and launch specific features | |
| 10 | Volume buttons | Increase or decrease audio output level. | |
| 11 | Double rear cameras | 16 Mega Pixels + 2 Mega Pixels resolution | |
| 12 | Finger print sensor | Use to unlock the phone or make secure payments. | |
| 13 | Microphone | Main microphone for phone calls and voice recognition | |
| 14 | USB C type connector | Charge the battery / data synchronisation | |
| 15 | Loudspeaker | Main multimedia speaker | |
Getting started
Inserting the Nano SIM and micro SD cards
SmartVision3 has a dual SIM / SD card connector. You can insert two SIM cards or an SD card and a SIM card. You cannot have both the second Nano SIM card and the microSD card inserted at the same time. SmartVision3 is only compatible with SIM cards in Nano SIM format. A modified card that is thicker than the standard Nano SIM card will not fit properly on the tray and may damage the SIM connector. The micro SD card is optional and is not supplied with the SmartVision3. SmartVision3 supports SD cards up to 128 GB.
- Open the SIM tray:
Lay the phone flat in front of you face up. Insert the tip of the SIM extraction tool supplied with your phone into the SIM tray eject hole on the left side of the phone. Make sure the SIM extraction tool is perpendicular to the hole. Otherwise, the device may be damaged. When inserting the SIM extraction tool into the SIM tray eject hole, do not obstruct the tray to avoid damaging the eject mechanism inside the slot. Push the tip all the way into the hole until the SIM tray pops out and then pull it out. The SIM tray has two compartments. The first compartment allows you to insert a SIM card or an SD card. The second compartment allows you to insert only a SIM card

- Inserting a SIM card and a SD card (optional): Position the SD card in the first compartment of the tray, metal side down, bevelled corner down. Then position the SIM card in the second compartment of the tray, metal side down, the bevelled corner at the bottom right. Then gently reinsert the SIM tray all the way into the slot. When reinserting the SIM tray into the phone, make sure it is oriented horizontally so that the SD card and SIM card do not fall out. The tray should be fully inserted and did not protrude from the slot.

- Inserting two SIM cards:
Position the first SIM card, metal side down, bevelled corner at the bottom right, in the first compartment of the SIM tray. Perform the same operation for the second compartment of the SIM tray. Then gently reinsert the SIM tray all the way into the slot. When reinserting the SIM tray into the phone, make sure it is oriented horizontally so that the SIM cards do not fall out. The tray should be fully inserted and not protrude from the slot or fall out.
The position of the SIM cards in the tray does not matter. The SIM cards configuration and management is done via the phone's «Settings» into «Network and Internet» section.


Charging the battery
Charge the battery before using the device for the first time or when you have not used it for a while. Only use a compatible charger and cable for your device. Using an incompatible charger and cable may cause injury or damage your device. To charge the battery, connect the USB Type-C cable between the SmartVision3 USB connector and the AC charger. Then plug the AC charger into a wall outlet.
When the battery is fully charged, disconnect the charger from the device.
Turning your smartphone ON/OFF
To turn on your SmartVision3, press and hold the ON/ OFF button located on the upper edge. When the device vibrates, release the button. If the product does not turn on, check that the battery has been properly charged. To turn off the device, press and hold the ON/OFF button located on the upper edge. Then select on the screen the "ON/OFF" item then "Switch off".
Restart the phone
To restart the device, make a long press on the ON/OFF button located on the upper edge. Then select on the screen the "ON/OFF" item then "Restart". If your device freezes and becomes unresponsive, press the power button for 10 seconds to automatically restart the phone.
Standby mode
When SmartVision3 is turn ON, a short key press of the ON/OFF button will bring it to standby mode (screen off), or back to running mode (screen on). The standby mode is activated after an inactive period for battery safe. In standby mode the screen is off and the keyboard is disabled, however the functions remain active. You can still receive your calls, messages, emails etc.

Documents / ResourcesDownload manual
Here you can download full pdf version of manual, it may contain additional safety instructions, warranty information, FCC rules, etc.
Download Kapsys SmartVision3 - Mobile Phone Quick Start Guide
Advertisement


Need help?
Do you have a question about the SmartVision3 and is the answer not in the manual?
Questions and answers