
Related Manuals for Melopero Shake RP2040

Summary of Contents for Melopero Shake RP2040
- Page 1 Getting started with Melopero Shake RP2040 MELOPERO Getting started with Melopero Shake RP2040 Version 1.0.0 - October 2021...
- Page 2 This guide is constantly updated with corrections and new content. When a new version is released, we also update the version number: Version 1.1.0 October 2021 Getting started with Melopero Shake RP2040 Version 1.1.0 - October 2021...
-
Page 3: Table Of Contents
5.1 Download the Arduino IDE ......14 5.2 Add Shake RP2040 to Arduino IDE ....14 5.3 Using default I2C on Arduino IDE . -
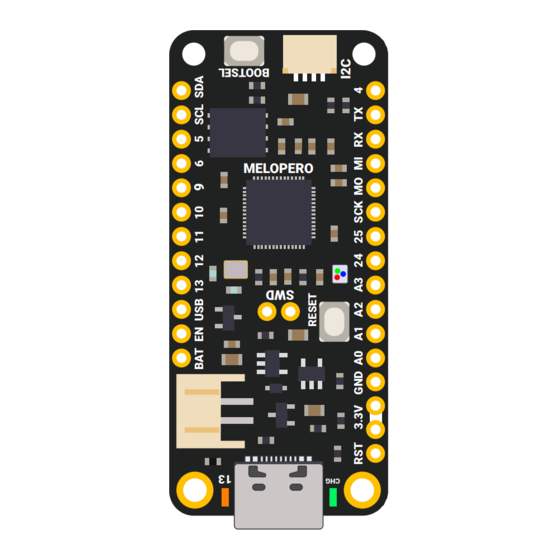
Page 4: Hardware Overview
1. Hardware overview The Melopero Shake RP2040 is a development board based on the Raspberry Pi RP2040 micro- controller, programmable in C/C++, MicroPython, CircuitPython and Arduino. The board features: • 16MB of FLASH Memory • 3.7-4.2 LiPo battery charger (200mA charge current) •... -
Page 5: Lipo Battery Charger
500mAh must be used. 1.2 Low Battery Monitor The Shake RP2040 is also equipped with a low battery monitor, connected to pin GP17, that will send a LOW signal on the ouput as soon as the battery voltage drops to 3.4V. -
Page 6: Pinout
• In the Arduino IDE they are 7, 8 and 6 (check the green labels) • For use with MicroPython, they are called with the number you find in the GPxx labels (only the number) Getting started with Melopero Shake RP2040 Version 1.1.0 - October 2021... -
Page 7: Installing Circuitpython
3.1 Download CircuitPython As we write the first version of this guide, the Melopero Shake Rp2040 is already listed on the offi- cial CircuitPython.org website, but the .uf2 file is not available yet, it’ll be released automatically at the first new CircuitPython release. -
Page 8: Install Circuitpython
You can also start with your board unplugged from USB, press and hold the BOOTSEL button on your Shake RP2040. While holding the button, connect the other end of the USB cable to the Shake board. This will cause Shake to load his bootloader. You should see the RPI-RP2 appear as a new drive on your computer when you do this. -
Page 9: Install Mu Editor
The first time you’ll run Mu editor, it should ask for which mode you want to load. Select “CircuitPython”. You can always change mode by clicking on “mode” in the upper menu and selecting your favourite one. Getting started with Melopero Shake RP2040 Version 1.1.0 - October 2021... -
Page 10: Mu Quick Start
On the upper menu, clicking “new”, you’ll create a new file. Once you have connected the Melopero Shake RP2040, click “Load“, then select the CIRCUITPY driver, and open code.py. After editing this file, click “Save“, and it’ll be loaded on your board. -
Page 11: Installing Micropython
You can also start with your board unplugged from USB, press and hold the BOOTSEL button on your Shake RP2040. While holding the button, connect the other end of the USB cable to the Shake board. This will cause Shake to load his bootloader. You should see the RPI-RP2 appear as a new drive on your computer when you do this. -
Page 12: Install Thonny Editor
Go to Preferences (should be options/settings on windows), click “Interpreter” tab and then select Micropython (Raspberry Pi Pico) and the right port from the port menu (your board must be con- nected and with MicroPython already installed) Getting started with Melopero Shake RP2040 Version 1.1.0 - October 2021... -
Page 13: Thonny Quick Start
In the Shell, try to run the command print(“hello world“) and press enter. The REPL will interpret the line of code and get you the result, in this case it’ll print “hello world”. Getting started with Melopero Shake RP2040 Version 1.1.0 - October 2021... -
Page 14: Setting Up Arduino Ide
5.2 Add Shake RP2040 to Arduino IDE To add support for the Shake RP2040 to the Arduino IDE, we use the port of the RP2040 develo- ped by Earle F. Philhower, III (earlephilhower on GitHub) Go to File>Preferences and enter the following URL in the “Additional Boards Manager URLs”... -
Page 15: Using Default I2C On Arduino Ide
If you are connecting a sensor on the I2C bus using the Qwiic connector on the Shake, remember to replace, in your Arduino Sketch, Wire with Wire1. (This modification does not apply if you are using I2C0/Wire pins on the Shake RP2040, GP09 and GP08, check the pinout diagram in section 2 ). -
Page 16: Clear The Flash Memory
5.1 Flash nuke If you need to do a deep clean of the flash memory, download the following uf2 file and install it on the Shake RP2040 as you did for CircuitPython or MicroPython (see sections 3.2 and 4.1): www.melopero.com/melopero_shake_rp2040_flash_nuke.uf2 Getting started with Melopero Shake RP2040 Version 1.1.0 - October 2021...
Need help?
Do you have a question about the Shake RP2040 and is the answer not in the manual?
Questions and answers