Table of Contents
Advertisement
Quick Links
Advertisement
Table of Contents

Related Manuals for HELVAR 458 DIM8


Summary of Contents for HELVAR 458 DIM8
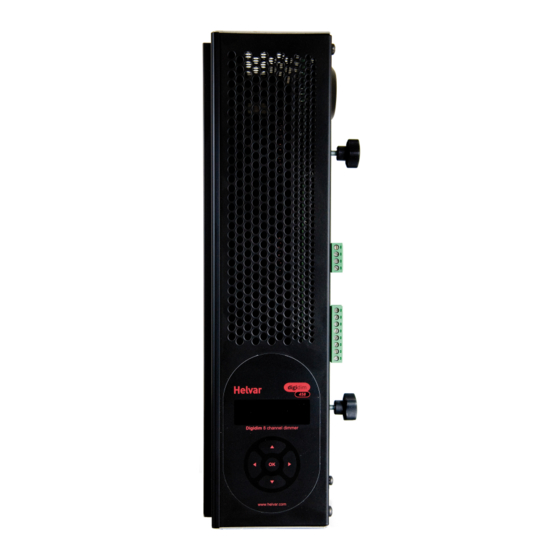
- Page 1 458 DIM8 Installation and User Guide...
- Page 2 It has both a DALI and an S-DIM/DMX interface, and so can be fully integrated into a Digidim or Imagine router system. It can also be controlled by the Helvar TouchPanel, or used on standalone DALI or Digidim systems. NOTE: DALI AND S-DIM / DMX MUST NOT BE CONNECTED SIMULTANEOUSLY.
-
Page 3: Installation
Refer to the mounting dimensions and clearance diagrams in the 458Mx Chassis Installation Guide. • When a Helvar control module (e.g. dimmer unit) is attached, the grilles must NOT be obstructed. Refer to the Helvar 458Mx Chassis Installation Guide for further information. - Page 4 DALI supply connections Touch Panel power, Override, and S-DIM/ DMX connections Connect external switch Override for override operation Touch Panel Power Power link Link for DALI power S-DIM/DMX Link for termination TERM Helvar Digidim 458/DIM8 8-Channel Dimmer Module: Installation and User Guide...
-
Page 5: Power On The Unit
Power can be supplied to one TouchPanel from the TouchPanel power connection terminal. S-DIM and DMX connections If connecting to a Helvar Imagine system, plug in the connector of the S-DIM/DMX cable loom to the S-DIM/DMX terminals. This is attached to the DIN-rail inside the chassis. -
Page 6: Load Types
400 W of lamp load. In addition, the transformer has to be short-circuit proof on the secondary side, or it must be equipped with thermal protection on the primary side. The thermal protection is to be non-resettable or manually resettable only. Helvar Digidim 458/DIM8 8-Channel Dimmer Module: Installation and User Guide... -
Page 7: Control Panel Functions
If S-DIM or DMX is connected and you change lighting levels or recall scenes on the Control Panel, then, after a short period of time, the levels revert to those being sent by the S-DIM/DMX master. Helvar Digidim 458/DIM8 8-Channel Dimmer Module: Installation and User Guide... -
Page 8: Control Panel Lcd Display
Control panel keypad Use the keypad to: - set dimmer channel levels - set output channel levels (if an Options Module is connected) - navigate the system menus to adjust module settings Helvar Digidim 458/DIM8 8-Channel Dimmer Module: Installation and User Guide... - Page 9 In switch mode (for S-DIM/DMX) with a dimmer channel level set to 2% (default switch-on level for S-DIM/DMX), the channel turns on to 100%, and if set to 1%, it turns off. This setting can be changed in the ‘Dimming Curves’ sub-menu. Helvar Digidim 458/DIM8 8-Channel Dimmer Module: Installation and User Guide...
- Page 10 Return to Main Display Screen (from main menu) Physical selection Physical selection mode is activated using a Helvar remote control unit. It allows loads and controls to be grouped together without the use of programming software. Refer to the equipment instructions for details.
- Page 11 Reset all settings to factory defaults. Use password Apply password lock to settings (except to ‘Unit details’ and ‘Enter password’ items). Enter password Remove the password lock (see ‘Use password’) Helvar Digidim 458/DIM8 8-Channel Dimmer Module: Installation and User Guide...
- Page 12 Whilst paired with a dimmer channel, the dimmer channel will operate in switch mode. Output mode Channel: 1 – 4; (Default: 1) Mode: 0: 0/10V 1: 1-10V sink 2: 0-10V 3: PWM + 4: PWM – 5: DALI b’cast 6: DSI 7: (Off) Helvar Digidim 458/DIM8 8-Channel Dimmer Module: Installation and User Guide...
- Page 13 Recall Scene Recall a scene previously stored (temporarily if connected to a Helvar router system). Scenes are sets of lighting levels and can make use of any combination of channels. This option is always available, even when password protection is applied to other options.
-
Page 14: Dimming Curves
Set channel levels for situations where the DALI bus goes low, such as when it is short-circuited or the DALI PSU is turned off. Options: Channel: 1 – 8; Failure level: 0 – 100%; **** (= do not apply Failure level); (Default:100%) Helvar Digidim 458/DIM8 8-Channel Dimmer Module: Installation and User Guide... - Page 15 Limit the maximum output level of each channel. You can set the maximum level to between 1% and 100%. Note: The maximum level is 100% by default. Options: Channel: 1 – 8; Maximum level: 1% – 100%; (Default:100%) Helvar Digidim 458/DIM8 8-Channel Dimmer Module: Installation and User Guide...
-
Page 16: Lcd Contrast
When the LCD timeout is on, after 60 seconds of inactivity on the Control Panel, the back-light on the LCD ‘Display Screen’ dims down and the Control Panel is then in standby mode. Options: Timeout: (up button); x (down button) (Default: = yes) Helvar Digidim 458/DIM8 8-Channel Dimmer Module: Installation and User Guide... -
Page 17: Factory Reset
The password lock will be applied after a period of 60 seconds from this message appearing. Enter password If the password is enabled and you wish to use all of the functions of the module, you must enter the correct password. Helvar Digidim 458/DIM8 8-Channel Dimmer Module: Installation and User Guide... -
Page 18: Troubleshooting
User can change override levels Override On Override input pulled low level on-the-fly (unless locked) S-DIM communications error e.g. two units with the same Comms Error S-DIM address, or incorrect S-DIM/DMX mode selection. Helvar Digidim 458/DIM8 8-Channel Dimmer Module: Installation and User Guide... - Page 19 Weight: 6.2 kg Housing: Powder coated steel (black) Heatsink: Anodised aluminium Operating and Storage Conditions Ambient Temperature: 0ºC to 40ºC Storage Temperature: -10°C to 70°C Relative Humidity: Max 90%, non-condensing Helvar Digidim 458/DIM8 8-Channel Dimmer Module: Installation and User Guide...
- Page 20 Dimensions Dimensions in mm www.helvar.com 10/11/2022 Doc. 7860182, issue 03 Helvar Digidim 458/DIM8 8-Channel Dimmer Module: Installation and User Guide Data subject to change without notice...
Need help?
Do you have a question about the 458 DIM8 and is the answer not in the manual?
Questions and answers