Table of Contents
Advertisement
Quick Links
Advertisement
Table of Contents

Related Manuals for Medion X89730

Summary of Contents for Medion X89730
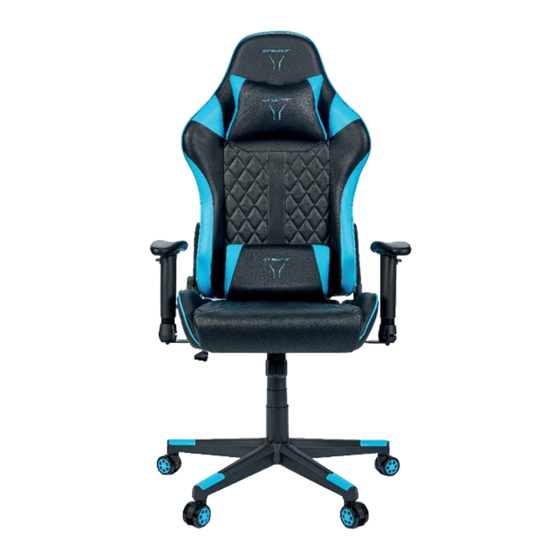
- Page 1 User Manual GAMING CHAIR X89730...
-
Page 2: Table Of Contents
Contents Contents About these operating instructions ............... 5 Explanation of symbols ..................5 Proper use ....................... 6 Safety information ..................7 Package contents .................... 8 Device parts ..................... 9 Individual parts for armrest assembly ............10 Device overview ....................11 Assembly ......................12 Operation ...................... -
Page 4: About These Operating Instructions
About these operating instructions About these operating instructions Thank you for choosing our product. We hope you enjoy using it. Read the safety instructions carefully before using the device for the fi rst time. Note the warnings on the device and in the operating instructions. Always keep the operating instructions close to hand. -
Page 5: Proper Use
Proper use Proper use The device is only intended for private use and not for industrial/ commercial use. Please note that no liability will be accepted if the device is used for an improper purpose: • The chair is designed for a maximum total load of 120 kg. •... -
Page 6: Safety Information
Safety information Safety information CAUTION! Risk of injury! Improper replacement of parts or work close to the seat height adjustment mechanism could result in injury. − Replacement of parts must only be performed by trained staff. − Do not use the chair as a substitute for a ladder, as a climbing aid, trestle or similar. -
Page 7: Package Contents
Package contents Package contents DANGER! Choking and suffocation hazard! Risk of choking and suffocation from swallowing or inhaling small parts or plastic wrap. − Do not store any of the packaging material used (bags, polystyrene, etc.) within the reach of children. −... -
Page 8: Device Parts
Device parts Device parts Backrest Backrest hinges Seat Lumbar support cushion Side covers Neck & head cushion Armrests (not pre-assembled) -
Page 9: Individual Parts For Armrest Assembly
Device parts Cross base Castors Tilting mechanism Gas lift strut Telescopic cover Allen key Fastening screws Individual parts for armrest assembly Armrest pads Armrest posts Covers Mounting plates Cheese head screws... -
Page 10: Device Overview
Device parts Round-head screws Washers Device overview Button for adjustment of armrest height Resistance adjustment Lever for adjustment of seat height and tilting function Lever for backrest adjustment... -
Page 11: Assembly
Assembly Assembly We recommend that you ask another person to help you assemble the chair. First screw in the screws manually and then tighten them using the tool supplied. Insert the 5 castors as far as they will go into the castor sockets on the underside of the cross base (see Fig. - Page 12 Assembly Both the armrests must fi rst be assembled as described below and in Fig. 2 before being mounted on the gaming chair: − Place the armrest pad top down on a stable, even surface. − Place the armrest post on the armrest pad with the height adjustment button pointing outwards, also...
- Page 13 Assembly − Loosen and remove the 8 pre-assembled screws on the underside of the seat − Using the Allen key, fasten the left and the right armrest to the seat with 2 each of the previously removed screws (see Fig. 3). −...
- Page 14 Assembly − Loosen and remove the pre- assembled screws on both sides of the backrest screws each per side). − To fasten the backrest hinges onto the backrest, fi rst screw only the upper screw half-way into the corresponding drill hole. −...
- Page 15 Assembly − Fasten the upper side covers onto the backrest hinges on both sides using the supplied screws and the Allen key (see Fig. 7). − Fasten the neck & head cushion and the lumbar support cushion onto the gaming chair using the fi xing strap attached to the cushions, as shown in Fig. 8.
-
Page 16: Operation
Operation Assembly is now complete. Your new gaming chair is ready for use (see Fig. 9). Operation Adjusting the armrest position − Press the button for height adjustment on the respective armrest and move the armrest into the desired position (see Fig. 10). −... -
Page 17: Setting The Backrest Position
Operation Setting the backrest position CAUTION! Risk of injury! When the backrest is under full load in the lying position, the chair can become unstable and tip over. − Never put your whole weight on the backrest when in the lying position. -
Page 18: Setting Tilt Resistance
Operation Setting tilt resistance − Turn the resistance adjustment anticlockwise to increase the tilt resistance of the backrest (see Fig. 13). − Turn the resistance adjuster clockwise to reduce the tilt resistance of the backrest. Adjusting the seat height − Pull the lever on the tilting mechanism upwards and move the seat to the desired height... -
Page 19: Cleaning And Care
• In our Service-Community, you can meet other users, as well as our staff, and you can exchange your experiences and pass on your knowledge there. You can fi nd our Service Community at community.medion.com. • Alternatively, use our contact form at www.medion.com/contact. -
Page 20: Privacy Statement
Privacy statement Dear customer, We wish to inform you that we, MEDION AG, Am Zehnthof 77, D-45307 Essen, Germany process your personal data as a data controller. For matters regarding data protection, we are supported by our company data protection offi... -
Page 21: Legal Notice
These operating instructions are protected by copyright. Mechanical, electronic and any other forms of reproduction are prohibited without the written permission of the manufacturer. Copyright is owned by the distributing company: MEDION AG Am Zehnthof 77 45307 Essen Germany Please note that you cannot use the address above for returns. Please always contact... -
Page 22: Warranty Details
You are also entitled to have the goods repaired or replaced if the goods fail to be of acceptable quality and the failure does not amount to a major failure. AFTER SALES SUPPORT 11/2022 YEAR WARRANTY 1300 884 987 www.medion.com.au... -
Page 23: Repair And Refurbished Goods Or Parts Notice
If at any time you feel your repair is being handled unsatisfactorily, you may escalate your complaint. Please telephone us on 1300 884 987 or write to us at: MEDION Australia Pty Ltd Chatswood, NSW 2067; Australia Hotline: 1300 884 987 (Opening hours: Mon –... - Page 24 Made in China DISTRIBUTED BY: ALDI STORES 1 SARGENTS ROAD MINCHINBURY NSW 2770 www.aldi.com.au AFTER SALES SUPPORT 711150 1 300 884 987 australia@medion.com YEAR MODEL: WARRANTY 11/2022 MD 88730...
Need help?
Do you have a question about the X89730 and is the answer not in the manual?
Questions and answers