Table of Contents
Advertisement
Quick Links
Advertisement
Table of Contents

Related Manuals for RainPoint IK10P


Summary of Contents for RainPoint IK10P
- Page 1 Instruction WIFI AUTOMATIC WATERING PUMP KIT Model: IK10P Free Hotline US: +1 833-381-5659 (MON-FRI 9:30 AM-5:30 PM PST) Web: www.rainpointonline.com EU: +44 800-808-5337 Email: service@rainpointus.com WhatsApp: +1 626-780-5952 (MON-FRI 9:00 AM-5:00 PM CET )
- Page 2 Dear friend, Thanks for choosing RAINPOINT WiFi automatic watering system! Your satisfaction as a RAINPOINT customer means everything to us. Before using this unit, please read these operating instructions carefully, take special care to follow the warning and safety suggestions. If you have any question or problem during using our product, please contact our customer service and your problem will be solved within 24hrs.
-
Page 3: Table Of Contents
TABLE OF CONTENTS PRODUCT OVERVIEW 01-02 1. PACKAGE INCLUDES 2. TECHNICAL PARAMETER 3. INTRODUCTION OF BUTTONS AND INDICATORS 1. TWO POWER SUPPLY METHODS 1.1 Install 4*AA 1.5V alkaline batteries for power 1.2 Plug in the USB cable for power 2. DETERMINE THE CORRECT PLACEMENT 3. -
Page 4: Product Overview
PRODUCT OVERVIEW 1. Package Includes Accessories Name Function Included Power supply USB Cable Len: 10m/32.8 Ft Tubing Inner diameter of pipe:0.17”(>1/6”) Outside diameter of pipe: 1/4” Filter Filtering impurities from water Tubing End Caps Micro Drip root directly Emitters Straight Barb Conne cting water pipes Fitting T Barb Fitting... -
Page 5: Technical Parameter
Cross Barb Split water and connect pipes Fitting Detachable Put it on the timer to make the timer hangable Hook Prevents water from backing up in the Check Valve pipes back to the pump 2. Technical Parameter Iniet Outlet Maximum water pressure 0.3Bar Water flow 0.4L/Min... -
Page 6: Introduction Of Buttons And Indicators
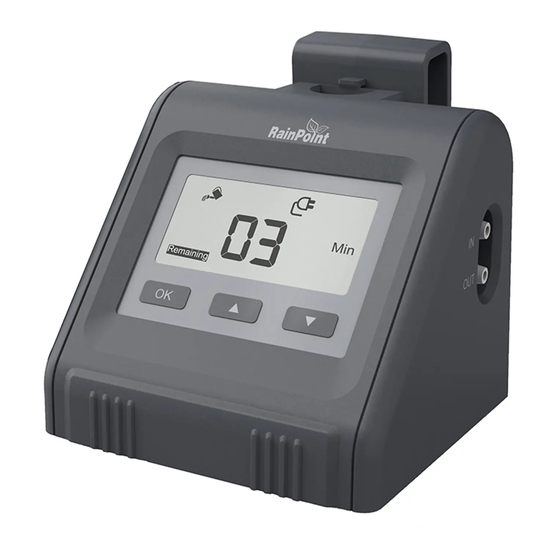
3.Introduction Of Buttons And Indicators “OK” Button: • Press to enter setting mode of 3 different options: How Long, How Often and Delay • Press and hold enter the manually watering mode “▲” Button: Increase the number, hold to accelerate Decrease the number, hold to reduce faster “... -
Page 7: Two Power Supply Methods
Two power supply methods rand new AA (1.5V) alkaline batteries (not included) as the marked " -", "+" direction. Note: resistance. properly. · Used up batteries must be removed from the pump. cause explode or leak. -
Page 8: Plug In The Usb Cable For Power
1) Plug in the USB cable (included) 2) When the power is on, the indicator will light up. Note: · We recommend that you use USB power supply where there is a power supply, so that the water pump can have a stable voltage and improve efficiency. ·... -
Page 9: Determine The Correct Placement
2. Determine the correct placemen leaking and over-watering problem) water pipe can not be placed 100% straight, we recommend that the height between the plants and pump should n ot exceed 2.5m. 2.5m 2.5m... -
Page 10: Connect The Hose Correctly
3. Connect the hose correctly 3.1 Cut the hose according to the distance of the device, the plant or you need 3.2 Put the head of hose into hot water for 10s or Put a veggie little veggie oil on the end of the hose before connecting Inlet Outlet... -
Page 11: Installation Completed And Tested
2) When you need to connect the hose while splitting to twoways, you can use the T 3) When you need to connect a hose while splitting to other 3 ways 3.7 When water needs to be delivered to the soil, you need to use the micro drip emitters Tips: deep, which will help water enter the plant roots. -
Page 12: Operating Instructions
OPERATING INSTRUCTIONS STEP 1:HOW LONG Press "OK" button,"HOW LONG" will light up,press ▲/▼ to set the watering duration,then press “OK” to confirm and go on the next step. (Watering duration can be setting from 20s to 30mins) STEP 2:HOW OFTEN When entering "HOW OFTEN"... - Page 13 STEP 3:DELAY MODE When the screen shows DELAY, use the "▲" and "▼" buttons, to select watering delay schedule from 0 hours to 24 hours,then press "OK" button to to save the schedule. Note: If "How Often" : "How Long" has been changed during setting and setting the delay time to 0 hours, the watering pump will automatically turn on manual watering (watering duration is 20s).
- Page 14 STEP 4: AUTOMATIC WATERING 1. Press "OK" again,Remaining and Watering Icon light up,and it will start watering schedule automatically. The countdown of remaining watering time will be showed. 2. When the watering program is finished, the NEXT icon lights up which means the remaining time to the next watering.
-
Page 15: Manual Mode
MANUAL MODE Press and hold enter the manually watering mode. Warning alarm 1 Lacking water alarm When it appears on the screen,please check if it’s short of water in the tank and fill enough water in time. The pump timer will keep working as scheduled. -
Page 16: Low Battery Alarm
2 Low battery alarm When the display shows the power and flashing,it means the battery... -
Page 17: Troubleshooting
TROUBLESHOOTING Problem Possible Cause Possible Solution Uneven water Too far away from pots and The further away from the pump the potted plant is, the weaker the water flow will become. Please water containers or too long use some clamps to hold the first few branches so pipes can reduce the pump's that the mainstream water can be delivered quickly and for a long time. -
Page 18: Warranty
24 hours. CUSTOMER SERVICE Still have trouble with setup , please search for " RainPoint " on Youtube for installation videos! If the user manual doesn’t have what you're looking for or you need other help, please contact us before returning the product to the store and let us know the Model NO and LOT NO.
Need help?
Do you have a question about the IK10P and is the answer not in the manual?
Questions and answers