
Related Manuals for Rockinger RO 244-2

Summary of Contents for Rockinger RO 244-2
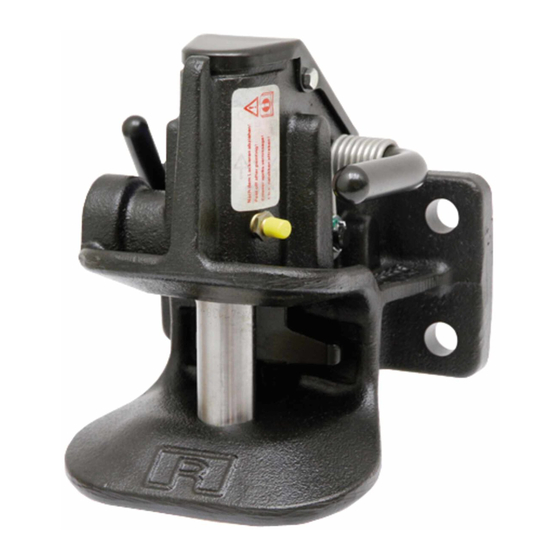
- Page 1 RO 244-2 Reparaturanleitung Repair instructions Manuel de réparation ROE47137 Kupplungsbolzen Coupling pin Axe d’accouplement ROCKINGER 02.2011 ZDE19988288P2 Member of JOST-World...
-
Page 2: Table Of Contents
2.1 Essai de fonctionnement The steps 1.1 - 1.3 are a precondition for the change of the coupling pin! General 1.1 Hand lever 1.2 Locking lever 1.3 Closing lever 1.4 Coupling pin 2.1 Function check ROCKINGER 02.2011 Member of JOST-World ZDE19988288P2... -
Page 3: General
244-2 General Liability RoCKingeR assumes no guarantee for The following information is introduced by the completeness and correctness of the a dash: information. The contents of the instruc- – Lists tions cannot be used to substantiate any – Preconditions for actions to be claims. - Page 4 The reference to a figure is made list of the tools necessary for the – with a number in [square brackets]. Capital subsequently described activities. letters after a figure number, e.g. [12A] refer to the corresponding position in the picture. ROCKINGER 02.2011 Member of JOST-World ZDE19988288P2...
-
Page 5: Hand Lever
[1d] is pulled out. B Split pin and washer, closing lever Wear gloves! C Locking spring Release the tension on the locking D Hand lever spring [1C] by levering it out with a flat-tip screwdriver Pull out hand lever [1d] ROCKINGER 02.2011 ZDE19988288P2 Member of JOST-World... - Page 6 Fit washers and two new split pins [2B] Secure the split pins against falling out: bend the end of the pin Check the coupling for correct functioning; Section 2.1 [2] A Closing lever luBRiCAnTS B Split pins – Multi-purpose grease ROCKINGER 02.2011 Member of JOST-World ZDE19988288P2...
-
Page 7: Locking Lever
Removal Release and remove the bolt [3A] Remove cap [3B] Press the closing lever [3C] all the way down and hold it there Remove the locking lever [3D] [3] A Bolt B Cap C Closing lever D Locking lever E Locking nut ROCKINGER 02.2011 ZDE19988288P2 Member of JOST-World... - Page 8 Replace locking nut [3E] M5 DIN 98N Install hand lever; Section 1.1 Check the coupling for correct functioning; Section 2.1 luBRiCAnTS – Multi-purpose grease [4] A Cap spring TighTening ToRQueS: – Bolt and nut [3A/e] on cap ………….. 6 + 2 nm ROCKINGER 02.2011 Member of JOST-World ZDE19988288P2...
-
Page 9: Closing Lever
Locking lever removed; Section 1.2 ToolS: – flat-tip screwdriver, medium Removal Press the release lever [5B] slightly back and hold it there Pull out the closing lever [5A] [5] A Closing lever B Release lever C Housing boring ROCKINGER 02.2011 ZDE19988288P2 Member of JOST-World... - Page 10 Install the hand lever; Section 1.1 Check the coupling for correction functioning; Section 2.1 noTe! If the release lever slips, it can be centred through the housing boring [5C] using the flat-tip screwdriver. ROCKINGER 02.2011 Member of JOST-World ZDE19988288P2...
-
Page 11: Coupling Pin
Locking plate for control pin, part no. ROE65632 Removal Use the screwdriver to press the control pin [6A] outwards and arrest it using the [6] A Control pin locking plate [6B] B Locking plate, part no. ROE65632 Remove the coupling pin [6C] from the C Coupling pin ROCKINGER 02.2011 ZDE19988288P2 Member of JOST-World... - Page 12 Clean and grease the guide boring for the coupling pin thoroughly Install closing lever; Section 1.3 Install locking lever; Section 1.2 Install hand lever; Section 1.1 Check the coupling for correct functioning; Section 2.1 luBRiCAnTS – Multi-purpose grease ROCKINGER 02.2011 Member of JOST-World ZDE19988288P2...
-
Page 13: Function Check
If the control pin is still projecting when the coupling is closed [9A] Replace the locking device, Repair instructions RO 244-2 [7] A Hand lever www.jost-world.com B Control pin Replace the locking lever; Section 1.2 ROCKINGER 02.2011 ZDE19988288P2 Member of JOST-World... - Page 14 Repair work 244-2 û ü [9] A Wrong [9] B Correct Control pin in closed position [8] A Closing lever B Control pin ROCKINGER 02.2011 Member of JOST-World ZDE19988288P2...
- Page 15 Siemensstr. 2 www.jost-world.com D-63263 Neu-Isenburg Sous réserve de modifications techniques. Telefon +49(0)61 02295- 0 Vous trouverez des informations mises à Fax +49(0)61 02295-298 jour sur le site : www.jost-world.com www.jost-world.com ROCKINGER 02.2011 ZDE19988288P2 Member of JOST-World...
Need help?
Do you have a question about the RO 244-2 and is the answer not in the manual?
Questions and answers