Table of Contents
Advertisement
Advertisement
Table of Contents

Related Manuals for Medisoft Ergocard CPX


Summary of Contents for Medisoft Ergocard CPX
- Page 1 HARDWARE USER MANUAL Ergocard CPX Version 2.2 H4-EN 30/12/2019...
-
Page 2: Table Of Contents
Calibrating the Prevent Pitot tube ....................25 5.4.2 Checking the Prevent flow sensor calibration ................30 Gas calibration ......................32 5.5.1 O2-CO2 gas calibration ....................... 32 5.5.2 He/CH4-CO gas calibration ......................37 Maintenance ......................41 Forward ........................41 H4-EN Ergocard CPX 2/44... - Page 3 Maintenance planning ....................42 6.2.1 Maintenance planning for Ergocard CPX Clinical ................ 42 6.2.2 Maintenance planning for Ergocard CPX Professional ..............43 H4-EN Ergocard CPX 3/44...
- Page 4 Revision Date Version Modifications 22/12/2017 1.0 Creation 01/06/2018 2.0 New design 14/05/2019 2.1 Modification of the CE marking 30/12/2019 2.2 Removing dedundant information’s H4-EN Ergocard CPX 4/44...
-
Page 5: Foreword
Additionally, other options are available to complete the cardio-pulmonary testing. The Ergocard CPX is operated by Expair, a software program developed by Medisoft S.A. that functions on Windows based PC systems. The Ergocard CPX is manufactured, calibrated and applied in conformity with latest technical requirements and official recommendations of the ATS and ERS. -
Page 6: Description Of Available Tests
• Cardiac output by CO rebreathing (indirect Fick method) Lung volumes The Ergocard CPX Professional allows performing static lung volumes measurement by using the Nitrogen washout method. This allows assessing the static lung volumes which are required for the complete interpretation of the pulmonary function test. -
Page 7: List Of Standard And Optional Tests
Diffusion The Ergocard CPX Professional allows performing several techniques of lung diffusing capacity: • Single breath real time DLCO technique with Helium or Methane tracer gas • Intrabreath DLCO Test gas mixture can be delivered in two different ways: • Using an inspiratory bag •... -
Page 8: Intended Users
1.4 Intended users This device is to be used by physiologists, doctors, respiratory therapists or nurses, or under the supervision of such. Data obtained must be interpreted and reported by trained medical staff only. 1.5 Environmental conditions This device is for clinical use in hospitals, private doctor’s offices, medical schools, sports medicine facilities or universities. -
Page 9: Accessories, Additional Equipment And Gas Cylinders
Use of accessories The use of other accessories than those provided with the system can disrupt the reliability and the safety of the unit, users or the other devices placed nearby. Medisoft Part Model Model Accessory Number... -
Page 10: Additional Equipment
A trolley can be used to place the informatics equipment (computer, printer,...). The trolley has to be medical grade and use an isolation transformer if the Ergocard is powered by the trolley. The positioning of the Ergocard module on a trolley not supplied by Medisoft S.A. is the responsibility of the customer. Computer A computer is intended to be used with the device in order to run the Expair software. - Page 11 • Lode o Corival o Excalibur Treadmill A treadmill can be used to allow to the patient to perform exercise test. Approved treadmill: • Medisoft RAM 870A, 870S, 870C • Lode Valiant • All treadmills with Trackmaster driver H4-EN Foreword 11/44...
-
Page 12: Gas Cylinder
Balance analysers (facultative) Gas inhaled by the patient 100% O 100% Used only for Ergocard CPX Pro with FRC-N option Specifications for gas cylinders • Each gas cylinder must be supplied with an analysis certificate • Analyse tolerance: min 1% rel. -
Page 13: Warnings
2.1 Location of the device Location of the Ergocard CPX The Ergocard CPX system should not be located in wet or dusty conditions. The cooling fan on the rear panel must not be obstructed which could lead to over-heating inside the module. -
Page 14: Gas Cylinders
2.2 Gas cylinders Depending on the options, the Ergocard device requires one or more gas cylinders. Some recommendations need to be followed carefully in order to avoid any risk for the patient or the device. Location of the gas cylinder outside the trolley Do not place a compressed gas cylinder near the system. -
Page 15: Displacement Of The Device
Location of the gas cylinders on the trolley Some trollies are capable of holding the gas cylinders. The cylinders have to be positioned vertically and attached with the straps. The maximum number of cylinders a trolley can hold is 3. No cylinder must be larger than 5 liters liquid. -
Page 16: General Overview
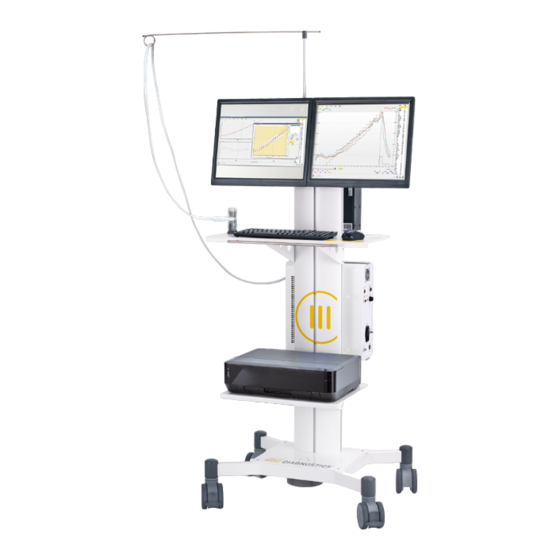
General overview 3.1 CPET system Ergocard CPX module Calibration gas cylinders Ergometer (bicycle, treadmill or any Trolley for Ergocard other ergometer) Computer and dual monitors ECG module Tango non-invasive blood pressure Keyboard and mouse (NIBP) module Printer NONIN oximeter Support arm for tubing... -
Page 17: Front Panel
3.2 Front panel Front panel Power LED Flow measurement port Sample line port Calibration port (connector for umbilical during calibration) Connector for NONIN oximeter (SpO Umbilical Prevent flow sensor Extension for NONIN oximetry sensor NONIN oximetry finger sensor H4-EN General overview 17/44... -
Page 18: Rear Panel
3.3 Rear panel Rear panel Additional serial port (COM 4) Gas inlet for calibration Power switch (ON/OFF) (16% O – 4% CO – balance N Gas inlet for ambient calibration Power supply entry (21% O – balance N USB port (connected to computer) Cooling fan Sample flow exhaust Analog Input... -
Page 19: Connections
Connections 4.1 Connections on front panel To calibrate gas analyzers, insert the umbilical connector into the calibration port. Make sure the honeycomb sticker is facing the floor (not the ceiling). For the testing mode, connect the Prevent flow sensor tube to the umbilical. Make sure the honeycomb sticker of the umbilical connector and the honeycomb of the Prevent is on the same side. -
Page 20: Rear Panel Connections
4.2 Rear panel connections Power supply cable USB cable (connected to computer) Serial cable (connected to treadmill, bicycle, …) Gas supply tube (connected to gas tank 21% O – balance N Gas supply tube (connected to gas tank 16% O –... -
Page 21: Calibration
After a calibration, it is possible to perform a check (which is recommended by ATS-ERS guidelines) in order to verify the quality of the calibration and the accuracy of the measurement. The table below summarises the calibrations which have to be performed on Ergocard CPX module. Calibration... -
Page 22: Preparing The Equipment
5.2 Preparing the equipment Turn on the module at least 20 minutes before performing the calibration. Verify the connections of the gas lines to the module. Prepare the 3 liter calibration syringe. Open fully each gas cylinder by rotating the cylinder valve counter clockwise. Check the fill in pressure on the cylinder once it is opened. -
Page 23: Initializing The Calibration Mode
5.3 Initializing the calibration mode On main menu of Expair, select the calibration menu Click on New Check the ambient conditions and correct if necessary Define operator’s name H4-EN Calibration 23/44... - Page 24 The ambient conditions are used to calculate BTPS correction factor. It is essential that ambient conditions are measured or encoded correctly for accurate volume measurement: • Temperature: in degrees Celsius • Relative humidity: in % (absolute) • Barometric pressure: in mmHg Important information on barometric pressure The barometric pressure used by the software is the actual barometric pressure, not barometric pressure corrected at sea level and not relative...
-
Page 25: Volume Calibration
5.4 Volume calibration 5.4.1 Calibrating the Prevent Pitot tube Calibration process H4-EN Calibration 25/44... - Page 26 Connect the Prevent Pitot tube to the umbilical. Make sure the connector of the umbilical is connected to the Prevent to the right side (honeycomb sticker in the same side than the honeycomb of the Prevent). Select the Volume tab. Select the device (if there are several modules connected to the same computer).
- Page 27 Analysis of the volume calibration results Analysis of the calibration results is essential to ensure an accurate volume/flow measurement by the system. Flow-volume loop During the calibration process, the flow-volume loops are displayed, the volume is on the horizontal axis and the flow is on the vertical axis. There should be no drift on the horizontal axis as shown below.
- Page 28 Verification of the system If one or two traffic lights are yellow or red, the operator has to perform a verification of the system described below. 1. Inspect the Prevent flow sensor. It should be clean, free from dust and not damaged. If necessary, clean it carefully or replace it.
- Page 29 Deviation between 5 and 10%. The calibration is acceptable and the system can be used. The deviation could be a sign that device maintenance is necessary. Please contact your Medisoft representative. Deviation greater than 10%. The calibration is not acceptable. A verification of the system by a field service technician is required.
-
Page 30: Checking The Prevent Flow Sensor Calibration
5.4.2 Checking the Prevent flow sensor calibration As the respiratory flow patterns are made up of many different flows, an individual flow error will affect the overall result. The calibration can be verified at multiple flow rates with the use of the Check button. This allows the operator to check different flow rates, ensuring the quality of the volume measurement and linearity are good over the full operating range of the flow sensor. - Page 31 ATS-ERS criteria. The system can be used. Accuracy greater than 3.5%. The linearity of the volume measurement is not good and does not meet ATS-ERS criteria. A verification of the system linearity by a field service technician is required. Please contact your Medisoft representative. H4-EN Calibration...
-
Page 32: Gas Calibration
5.5 Gas calibration 5.5.1 O2-CO2 gas calibration Calibration procedure Disconnect the Prevent flow sensor from the umbilical. Connect the umbilical to the front panel of the module. H4-EN Calibration 32/44... - Page 33 H4-EN Calibration 33/44...
- Page 34 On the calibration menu, select the Ergo-CrfN tab. If two gas cylinders are used (a calibration gas cylinder and a zero gas cylinder), make sure the check box Enable ambient gas cylinder is ticked. Click on the button Certificate 1 in order to access the calibration gas cylinder details.
- Page 35 Analyze of the calibration results During the calibration process, several parameters are measured for each analyser: • Zero: voltage when ambient air (or ambient gas from the cylinder) is passing through the analyzers • Sensitivity: voltage variation in mV for 1% of gas concentration change •...
- Page 36 Please contact your Medisoft representative. The calibration is not acceptable. A verification of the system by a field service technician is required. Please contact your Medisoft representative. H4-EN Calibration...
-
Page 37: He/Ch4-Co Gas Calibration
5.5.2 He/CH4-CO gas calibration Calibration procedure Disconnect the Prevent flow sensor from the umbilical. Connect the umbilical to the front panel of the module. H4-EN Calibration 37/44... - Page 38 On the calibration menu, select the He-CO tab. Encode the Helium (or Methane) and CO concentration of the gas cylinder. This is indicated on the analyse certificate. Click on Calibrate. Wait 20 seconds for cleaning of the analysers. Zero of the analysers is measured with ambient air (0% He, 0% CH , 0% CO).
- Page 39 Analyse of the calibration results During the calibration process, two parameters are measured, zero of the analyser and the sensitivity (voltage variation in mV for 1% of gas variation). The traffic lights indicate the deviation of these parameters relative to the factory (reference) calibration. Deviation less than 5%.
- Page 40 The calibration is acceptable and the system can be used. The deviation could be the sign that a maintenance of the device is necessary. Please contact your Medisoft representative. Deviation greater than 10%. The calibration is not acceptable. A verification of the system by a field service technician is required.
-
Page 41: Maintenance
Maintenance 6.1 Forward All Medisoft devices are designed to have a minimum lifetime of 10 years, which requires regular maintenance to be performed by the manufacturer or its representative. The device requires a preventive maintenance once a year, along with a recommended bi-annual control visits in order to validate the calibration. - Page 42 6.2 Maintenance planning The table below shows the list of actions to be performed for a full preventive maintenance. Each action must be performed by the user or a technician approved by Medisoft or its representative. The highlighted actions must be performed by the user by following the procedures described in the next paragraphs.
- Page 43 1 month User Notes (1) Sooner if the inspiratory bag has a leak. Only for Ergocard CPX Professional with FRC- inspiratory bag option. (2) Sooner if the inspiratory bag has a leak. Only for Ergocard CPX Professional with hypo-hyperoxia option.
- Page 44 Medisoft S.A. www.medisoft.be P.A.E. de Sorinnes info@medisoft.be 1, Route de la Voie Cuivrée T: +32 (0)82 22 30 20 5503 Dinant – Sorinnes (Belgium) F: +32 (0)82 22 33 34...
Need help?
Do you have a question about the Ergocard CPX and is the answer not in the manual?
Questions and answers