Table of Contents
Advertisement
Quick Links
Advertisement
Table of Contents

Summary of Contents for eav 2cuber
- Page 1 User’s Manual www.eav.solutions...
-
Page 2: Manual Overview
Manual Overview Pre ride checks • Safety warnings • Best practices • Setup and controls • Security • Key maintenance requirements • • Best practices and servicing Vehicle specification •... - Page 3 Recommended Checks Before Riding Each rider should satisfy themselves that all tyres, brakes, lights, windows and mirrors are in good condition before riding. • Front tyres should be inflated to 45PSI and rear tyres to 70PSI, with a suitable amount of tread remaining and no obvious damage.
- Page 4 Seat Adjustment - Height Each rider should adjust the seat height before use. This can easily be adjusted without any tools. 1 . Pull out the lever under the seat. 2 . Raise or lower the seat. 3 . Push in the lever. If the lever when pushed in does not hold the seat tight, pull the lever out and rotate it one full rotation clockwise before pushing the lever back in.
- Page 5 Seat Adjustment - Tilt and Slide The seat can be tilted and slid backwards and forwards if necessary. A 6mm Allen key is required for this. 1 . Using a 6mm Allen key, loosen the two Allen bolts on the underside of the seat. 2 .
- Page 6 Controls Toggle Display Display Lights Horn Indicators Walk assist / hill Assistance Level start throttle...
-
Page 7: Locking And Unlocking
Locking and Unlocking The brake levers are equipped with an additional small rotating catch. When this is engaged the brakes will be held in the ON position. Additionally, a lock can prevent the catch being released. 1 . To engage, the brake lever, the brake should be pulled with three fingers, whilst using the index finger pull the catch to lock the brakes on. - Page 8 WARNING the charger is not water-proof. 12 Volt Electrics • EAV Cargo has made available a 12-volt fused outlet in the front light box. • The main 40amp fuse is located near the steering column (take care as this is 48 volts)
- Page 9 Safety and conditions recommendations The weather conditions, road conditions and environment of the planned route should be considered before riding. The rider must wear a suitable helmet and high visibility clothing. • When manoeuvring in tight spaces, the display should be set to low assistance, preferably using the throttle. •...
-
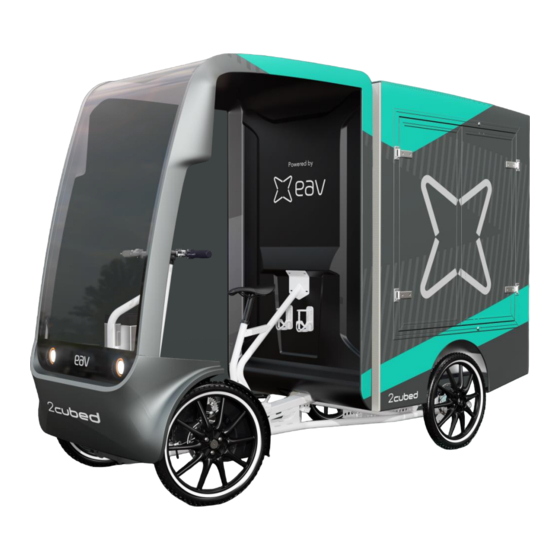
Page 10: Cargo Box
Cargo Box With the battery on, use the electric solenoid fob to open • the rear cargo box Open the secondary door using the handles on the • inside of the box To close the cargo box, close the door firmly as it •... - Page 11 Cargo Box Manual Lock Override If the battery has failed or the door opening locks have failed, Use the manual override key on both the top and bottom locks. Top and bottom manual override locks turned clockwise and anticlockwise to open.
-
Page 12: Maintenance Instructions
Maintenance Instructions www.eav.solutions... -
Page 13: Daily Checks
Daily Checks − Check tyre pressure (set to 45 PSI at the front and 70PSI at the rear)- If tyres are over or under inflated it will cause failure in the tyres or wheel itself − Check all lights working correctly (the user can lock the brakes individually front and rear) to check brake lights, and the reflectors on the side and rear −... -
Page 14: Weekly Checks
Weekly Checks − Check condition of wheels − Check tyre condition, needs to be 1mm of tread minimum − Check condition of saddle and seat post lock − Check conditions of mudguards − Check all reflective side mark stickers are still visible body and cargo box −... -
Page 15: Monthly Checks
Monthly Checks − Remove wheels and tires to inspect − Remove cargo box − Check rear drivetrain adjust motor chain if needed and apply chain lube if needed (training can be provided if needed) − Check main chain from front pedal set to rear motor (apply chain lube if needed) −... - Page 16 - Any major concerns should be reported to EAV Customer Service or your local approved mechanic straight away and we will send out a Service Technician to your location at a convenient time to you as soon as possible.
-
Page 17: Recommended Maintenance Intervals
Recommended Maintenance Intervals 6,840 kilometres / Monitor and 13,680 kilometres / 20,520 kilometres / 27,360 kilometres / 54,720 kilometres / Serviceable Parts (front to rear) Life of vehicle 3 months repair/replace 6 months 9 month 12 months 24 months when necessary Track rod ends Front discs Front disc pads... - Page 18 Cleaning Windscreen The polycarbonate windscreen should only be cleaned with ‘Rain-X 2-in1 Glass Cleaner + Rain Repellent’ • and a soft cloth. Rain-X will also help the windscreen to remain clean in wet weather. The inside of the windscreen should be treated in the same way to avoid fogging. Body •...
-
Page 19: Changing A Wheel
Changing a Wheel Position the vehicle on smooth and level ground. Apply the brakes Loosen wheel studs whilst on ground using a 17mm long reach socket. Raise vehicle safely and secure Remove wheel Repair/Replace wheel Using 17mm long reach socket - Torque to 30ftlbs/40NM... - Page 20 Brakes How to change pads - https://www.youtube.com/watch?v=ELHz5CX5V7o • Whilst brake pads are removed, check wear, minimum thickness 0.8mm. • How to bleed hydraulic system – https://www.youtube.com/watch?v=KFlxB_2JKic •...
- Page 21 Chain Rear chain adjustment Undo M10 bolt with 8mm Allen key and 17mm spanner until eccentric is just loose. • Rotate eccentric idler anticlockwise until longest chain run (bottom) has 5mm up and down free. • Tighten 17mm nut to 43Ftlbs\ 58Nm and check chain free play again. •...
- Page 22 Riding Best Practices Ensure pre ride checks are carried out before starting the bike • • Avoid hitting kerbs and other hazardous objects you may encounter and riding down large kerbs Avoid riding through potholes where possible. If they are unavoidable, slow down to reduce the •...
-
Page 23: Warranty And Servicing
NB: If you change factory settings your warranty will be null and void. • Service EAV recommends quarterly service intervals to check the wear of brake pads and tyres. • Daily and weekly bike checks must also be carried out •... - Page 24 Dimensions and Load Capacity Kerb Weight: 170kgs Max load capacity 150kgs Frame Material: Steel Maximum Rider Weight: 100kgs Maximum Speed: Assistance to 15.5mph / 25kmph Recharge Time: 6-8 hours System voltage: 48V battery, 12V electrics Battery Charger: Manufacturer Charger Supplied Battery Features: Removable battery for easy charging Brakes:...
Need help?
Do you have a question about the 2cuber and is the answer not in the manual?
Questions and answers