
Related Manuals for OPTOKON OERN-13

Summary of Contents for OPTOKON OERN-13
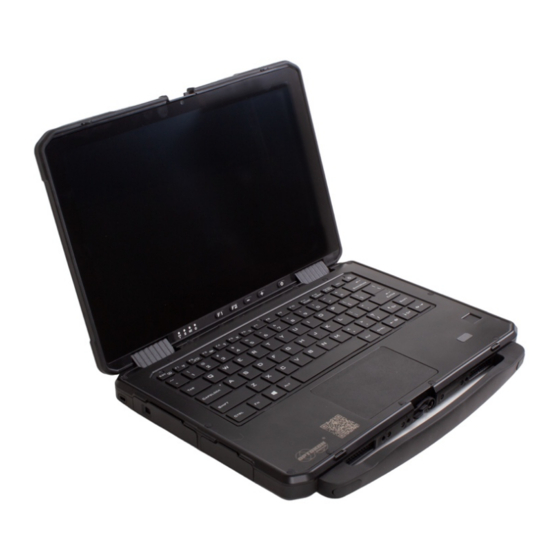
- Page 1 Rugged Notebook OERN-13 / OERN-14 Quick Start Guide Please read these instructions carefully before using this product, and save this manual for future use.
-
Page 2: Table Of Contents
Contents Preface ............................. 2 1. Overview ..............................6 2. Package Content ............................6 3. Product Overview ............................7 4. Mechanical Dimension ..........................12 5. Hardware Installation ..........................12 5.1 Side Expansion Area ........................12 5.2 Installing a Micro SD Card ......................15 6.1 Installing and Removing the Batteries .................. -
Page 3: Preface
Preface Advisory Conventions Four types of advisories are used throughout the user manual to provide helpful information or to alert you to the potential for hardware damage or personal injury. These are Notes, Important, Cautions, and Warnings. The following is an example of each type of advisory. Note: A note is used to emphasize helpful information Important:... - Page 6 Brand and product names are trademarks or registered trademarks of their respective owners. Disclaimer OPTOKON Elektronik Ltd. reserve the right to make changes, without notice, to any product, including circuits and/or software described or contained in this manual in order to improve design and/or performance.
-
Page 7: Overview
1. Overview Congratulations on purchasing OERN Series Rugged Notebook. OPTOKON Elektronik Rugged Notebook features with • Fanless cooling system. • Flip design for quick switching between laptop and tablet modes. • Easy-replaceable design for keyboard. • Removeable hard handle for easy carrying •... -
Page 8: Product Overview
3. Product Overview This section contains mechanical drawing of the OERN Series Rugged Notebook. Notice that this is a simplified drawing and some components are not marked in detail. Front Components Item Description Top cover latch Locks the top cover. Detachable carrying handle Provides a convenient way to carry the computer. - Page 9 Right-side Components Item Description Audio Jack Connects a set of headphones or headset. (Mic is only supported with 3.5mm 4-pin headset). HDMI Connects a HDMI monitor or TV set. USB Type-C High speed USB port connects to USB devices, such as USB flash drive, mouse, keyboard, printer, etc.
- Page 10 for solid-state drive, which is the mass storage device of the computer. Or USB 3.0 x 1 or PCI-E x 4 or Power 5V/1A. RS232 Interface that enables the connection of a serial device to a computer. USB Type-A USB 3.0 port connects to USB devices, such as USB flash drive, mouse, keyboard, printer, etc.
- Page 11 Touch Pad Serves as the pointing device of the computer. Docking Connector (Optional) Port to docking solutions such as vehicle docking. Antenna Passthrough To enhance wireless connections GPS, WLAN, WWAN (Optional) via powerful high-gain antennas. Rear Camera (Optional) 8MP Autofocus camera with LED light to capture photos and videos.
- Page 12 Bottom Components Item Description Battery Latch To eject the battery, for replacing battery. Battery Lock To securely enable the battery. Service Window To allow user to swap the module easily. Choices are: 4G LTE/ WLAN/ RAM. Battery 1 Supplies power to computer when external power is not connected Battery 2 Supplies power to computer when external power...
-
Page 13: Mechanical Dimension
4. Mechanical Dimension 5. Hardware Installation 5.1 Side Expansion Area You can add the following option: Smart Card Reader + Removable 2nd SSD Inserting an option to the expansion area: Important: We recommend user to turn off the computer completely by following: 1. - Page 14 3. Insert an option to the expansion area. Close the expansion slot door and lock the latch. Removing an option from the expansion area: 1. Turn off the computer and disconnect the AC adaptor. Make sure no foreign objects are under the computer.
- Page 15 3. Pull out the option from the expansion area. 4. Close the expansion slot door and lock the latch.
-
Page 16: Installing A Micro Sd Card
• Note that OPTOKON Elektronik assumes absolutely no liability for any loss of data recorded by the user, or any other damages, direct or indirect. -
Page 17: Installing And Removing The Batteries
To remove Micro SD Card: 1. Save the data and close all applications. 2. Disable the card: click on the task tray, then click . Select the card. Note: This step is unnecessary when the computer is off, or, is not displayed, or the card does not appear in the list. -
Page 18: Important Battery Tips
To remove the battery pack: 1. Shut down the laptop (or put into sleep mode). Disconnect any cords connected to the computer. 2. Turn the laptop over, bottom part is facing up. Make sure no foreign objects are under the computer. -
Page 19: Turning On The Computer
• Do not charge the battery inside a vehicle with all its windows closed and exposed to the hot sun or in other high temperature places. Charge the battery in a temperature range of 10 °C to 30 °C (50 °F to 86 °F). •... - Page 20 • Do not perform the following operation until the drive indicator turns off. o Connecting or disconnecting the AC adaptor o Pressing the power switch o Touching the keyboard, touchpad, touchscreen or external mouse. o Closing the display. 1. Open the top cover by pushing the cover latch and lifting up the cover. 2.
-
Page 21: Turning Off The Rugged Laptop
7.2 Turning Off the Rugged Laptop Important: • Do not perform the following operations o Touch the keyboard, touchpad, touchscreen, or external mouse. o Pressing power switch. o Connect or disconnect the AC adaptor. o Close the display You can shut down your laptop by Click Start à... -
Page 22: Appendix
Appendix Appendix A: Declaration of Conformity (DoC) FCC-B Radio Frequency Interference Statement This equipment has been tested and found to comply with the limits for a Class B digital device, pursuant to part 15 of the FCC rules. These limits are designed to provide reasonable protection against harmful interference in a residential installation. - Page 23 o IEC61000-4-8: 2010 o IEC61000-4-11: 2004 • EN55032: 2015/AC:2016 • EN61000-3-2:2014 • EN61000-3-3:2013 Low Voltage Directive (2014/35/EU) • EN 62368-1:2014 Battery Regulations European Union: Batteries, battery packs, and accumulators should not be disposed of as unsorted household waste. Please use the public collection system to return, recycle, or treat them in compliance with the local regulations.
- Page 24 Notes...
- Page 25 OPTOKON Elektronik Ltd. Peksimet Mah. 5555 Sk. No: 8/1 Bodrum, Muğla / Turkey Copyright © 2022 OPTOKON Elektronik Ltd. All rights reserved.
Need help?
Do you have a question about the OERN-13 and is the answer not in the manual?
Questions and answers