
Related Manuals for Amano ATVS


Summary of Contents for Amano ATVS
- Page 1 ATVS mano alidation ystem Installation and Operation Guide Enterprise Edition Version 4.2...
- Page 2 We recommend that this document be read in its entirety before any attempt is made to operate the equipment. For more information about Amano’s complete line of products, visit our web site at: www.amano.com...
- Page 3 General E-Mail Settings ........................2-33 How To Delete E-Mail Account and/or Template................2-34 How To Add E-Mail Account and/or Template.................2-34 Chapter 3: ATVS Scheduler Operation ..................3-1 Actions Log.............................3-1 Previous Action Log ..........................3-4 Exiting The Program ..........................3-4 ATVS Enterprise Edition v4.2 Installation & Operation Guide...
- Page 4 Transaction Report..........................5-9 Status Report ............................5-10 Chapter 6: Action Log Messages ...................6-1 Startup and Shut Down Messages......................6-1 Network Time Synchronization Messages.....................6-1 NIST ACTS Messages ...........................6-3 PIX Transmission Messages........................6-3 General and Other Messages ........................6-4 Troubleshooting............................6-5 ATVS Enterprise Edition v4.2 Installation & Operation Guide...
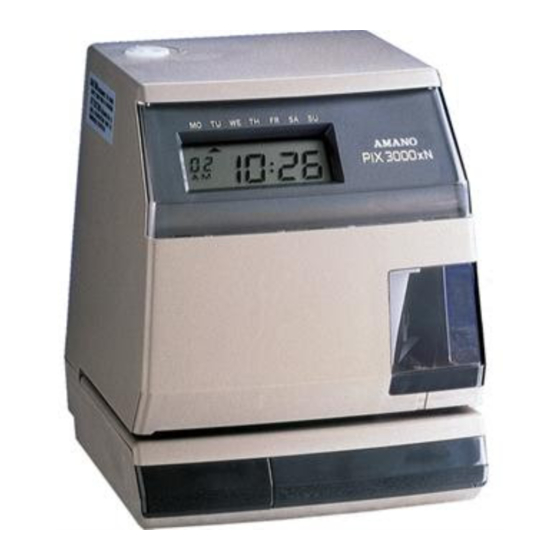
- Page 5 Each PIX-3000xNT time stamp has an internal NIC and is given an IP address for synchronization over your network. The enterprise ATVS Software is installed on a server on your network. The PIX-3000xNT time stamps are then deployed anywhere on your network.
- Page 6 • PIX-3000xNT clocks via Ethernet TCP/IP network connection ATVS software runs on a Windows NT® 4.0 (or later) platform. This enables the use of standard network management software and backup procedures to manage, maintain, and monitor the software host. The devices connected to the ATVS Host Server are synchronized by having the ATVS synchronized to NIST's NTP (Network Time Protocol) server in Boulder, Colorado, or another preprogrammed NTP source via the Internet.
- Page 7 ATVS Time Synchronization software (Enterprise version) for Windows may be used in conjunction with PIX-3000xN Time Recorders or PIX-3000xNT Time Recorders. The ATVS software may be loaded on any PC and/or server operating under Windows NT or later. ATVS Enterprise Edition v4.2 Installation & Operation Guide...
- Page 8 However, it is recommended that all configuration settings should be recorded in the event that the setup needs to be repeated in the future. While the Enterprise Edition of ATVS is running, the ATVS Scheduler runs as a service. Figure 1. Enterprise Edition ATVS Diagram...
- Page 9 2. Verify that no additional applications are running. 3. Insert the ATVS disk in the CD-ROM drive. 4. The InstallShield Wizard screen for ATVS will appear as shown in Figure 2. Figure 2. InstallShield Wizard 5. Click Next to continue the installation, and the Software License Agreement will appear to advise users of their legal responsibilities (see Figure 3).
- Page 10 CD. Figure 4. InstallShield Wizard Customer Information 7. Enter the User Name, Company Name, and ATVS serial number. Then click Next to continue with the setup, and the Destination Location screen will appear as shown in Figure 5.
- Page 11 9. When asked to choose the type of setup, it is recommended to click on Server. If the PC you are loading ATVS on is connected to the ATVS system, you may want to click on Client. Then click Next to continue, and the Select Program Folder screen will appear (see Figure 7).
- Page 12 PDF-formatted reports. If no Reader is present, that application will install. During that process, the following screen will briefly appear: 12. Next a Setup Status screen will appear showing a progress status bar for the ATVS installation as shown in Figure 9.
- Page 13 14. The InstallShield Wizard Complete will appear (see Figure 11) when done. Figure 11. InstallShield Wizard Complete 15. Click on Finish, and if the box "Would you like to run ATVS now?" is checked, the program will immediately start, and the following screen will appear signifying the ATVS Scheduler service is starting (see Figure 12).
- Page 14 14-days to use the ATVS software. During this period you must successfully activate the software. Click on the OK button to launch the ATVS program and display the Initial Wizard screen (from this step proceed to step 1 of the ATVS Initial Configuration, page 1-12).
- Page 15 (see Figure 16). Figure 16. Activate ATVS with Customer Support Call Amano support at 1-800-896-7035 and the support personnel will ask for the CS Key code letters displayed on your screen (see Figure 16). Enter the supplied [from Amano support] RS Key code into the appropriate fields in five character increments.
- Page 16 ATVS Initial Wizard screen should now appear (see Figure 19). ATVS Initial Configuration 1. After the ATVS Scheduler and program has started the Initial Wizard screen will appear. All 4 steps must be completed to finish the initial configuration and installation. If the Exit button is pressed before completion a warning confirmation dialog will appear.
- Page 17 Click on the Advanced Password tab to select expiration (see Figure 22). The default is Never Expire, so this screen can be skipped if the default selection is acceptable. From the three choices, select one of the following: Never Expire, Expires after, or Expires On. ATVS Enterprise Edition v4.2 Installation & Operation Guide 1-13...
- Page 18 9. When finished entering each new group, click on the Save button to save the group settings. When finished creating new groups, click on the Close button to quit, and return to the Initial Wizard screen. 1-14 ATVS Enterprise Edition v4.2 Installation & Operation Guide...
- Page 19 12. Select the Group from the dropdown menu, and enter the Name. Select the device Type from the dropdown menu (PIX-3000xN or PIX-3000xNT). Enter the IP Address if known (PIX-3000xNT only). ATVS Enterprise Edition v4.2 Installation & Operation Guide 1-15...
- Page 20 16. From the Save As dialog (see Figure 28), select a destination folder [Save in:] and enter a file name. Click on the Save button and a text file with the IP search results will be saved. Figure 28. Save As Dialog 1-16 ATVS Enterprise Edition v4.2 Installation & Operation Guide...
Need help?
Do you have a question about the ATVS and is the answer not in the manual?
Questions and answers