Table of Contents
Advertisement
Available languages
Available languages
Quick Links
Multifunction Pressure Cooker
Multifunction Pressure Cooker
Multifunktionaler Schnellkochtopf
Multifunkční tlakový hrnec
Multifunkčný tlakový hrniec
EN
Translation of the operating instructions from the original language.
DE
Übersetzung der Bedienungsanleitung aus der Originalsprache.
CZ
Návod k použití v originálním jazyce.
SK
Preklad návodu na použitie z originálneho jazyka.
HU
A használati utasítás fordítása eredeti nyelvről.
FR
Traduction du mode d'emploi à partir de la langue d'origine.
IT
Traduzione delle istruzioni per l'uso dalla lingua originale.
RO
Traducerea instrucțiunilor de utilizare din limba originală.
SGR-MP-X600S
Multifunkciós kukta
Autocuiseur multifonctionnel
Pentola a pressione multifunzione
Aparat de gătit multifuncțional
sub presiune
Advertisement
Table of Contents

Related Manuals for SIGURO SGR-MP-X600S

Summary of Contents for SIGURO SGR-MP-X600S
- Page 1 Translation of the operating instructions from the original language. Übersetzung der Bedienungsanleitung aus der Originalsprache. Návod k použití v originálním jazyce. Preklad návodu na použitie z originálneho jazyka. A használati utasítás fordítása eredeti nyelvről. Traduction du mode d‘emploi à partir de la langue d‘origine. Traduzione delle istruzioni per l‘uso dalla lingua originale. Traducerea instrucțiunilor de utilizare din limba originală. SGR-MP-X600S...
-
Page 2: Table Of Contents
ENGLISH Safety information Cleaning and maintenance Troubleshooting DEUTSCH Sicherheitshinweise Verwendung Reinigung und wartung Problemlösung ČESKY Bezpečnostní informace Použití Čištění a údržba Řešení problémů SLOVENSKY Bezpečnostné informácie Použitie Čistenie a údržba Riešenie problémov MAGYAR Biztonsági információk Használat Tisztítás és karbantartás Problémamegoldás FRANÇAIS Informations relatives à... -
Page 4: Safety Information
If you need help with extensive maintenance or repair of the product, which requires intervention in its internal parts, our authorized service is available at the email address siguro@alza.cz or operators at the seller's info line. For your convenience in solving any problems with the product, we have unified these contact points and the above contacts can be used in the event of any complaints or post-warranty service. - Page 5 8. This appliance is intended for domestic and indoor use. This appliance is not suitable for outdoor use. 9. Check the power cord regularly for signs of damage and the appliance must not be used if it is damaged. 10. This appliance is not intended for operation via an external timer or remote control.
- Page 6 accessories that are not intended for this appliance or are not specified by the manufacturer as suitable may cause a dangerous situation. 24. Always make sure that the appliance is properly assembled before connecting it to the power supply. 25. Do not touch the appliance or the power supply with wet or damp hands. 26.
- Page 7 47. Do not heat the inner pot in an oven or other heat source. Do not use the inner pot with another appliance. Do not use other than the supplied inner pot with appliance. 48. Always pierce food with rind, skin or membrane before cooking. Such foods may swell during cooking.
- Page 8 EN - 8...
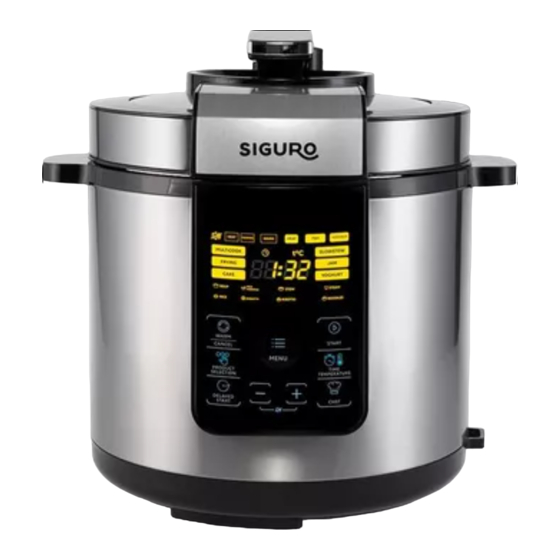
- Page 9 The body of the appliance Safety valve Lid handle Pressure cooker handles (located on both sides) Pressure cooker body Pressure valve Control panel with display Inner pot Removable power cord (not shown) 10 Rice spoon (included, not shown) Measuring cup (included, not shown) Overview of the buttons on the control panel WARM/CANCEL +/- buttons...
- Page 10 MILK PORRIDGE cooking The COOKING icon indi- program: suitable for cook- cates cooking in the pot ing milk porridge STEW cooking program: suitable for preparing The WARM icon indicates stews; option to choose that the food is kept warm the type of prepared food: after cooking MEAT (meat) –...
-
Page 11: Use
Power 220–240 V~, 50/60 Hz Power consumption 1,000 W Maximum volume Operating pressure 0–70 kPa Maximum pressure 90 kPa Allowable pressure 1.05 bar Temperature of the keep warm 60–80 °C function Dimensions 32 × 33.5 × 33.5 cm Weight 5.2 kg Before first use Remove the appliance and its accessories from the packaging. - Page 12 Warning: Always follow the maximum and minimum food with liquid levels. Failure to do so may result in damage to the appliance, property damage or serious injury. 4. Wipe the bottom of the container with a dry cloth to remove water or dirt and place the filled inner pot in the outer pot.
- Page 13 3. Press briefly again the TIME/TEMPERATURE button to set the cooking time. 4. Use the +/- buttons to set the desired cooking time. You can set it from 1 to 24 hours. 5. Press the START button to begin the cooking process. Cooking programs menu Use the MENU button to select a cooking program.
- Page 14 EN - 14...
- Page 15 EN - 15...
- Page 16 Food type selection Press repeatedly the PRODUCT SELECTION button to select the type of food for cook- ing. MEAT (meat) – FISH (fish) – VEGETABLES (vegetables). Each time you press the corresponding icon lights up on the display. Food type selection is only available for cooking programs: SOUP (soup), STEAM (steam) or STEW (stewed food).
-
Page 17: Cleaning And Maintenance
CLEANING AND MAINTENANCE Before cleaning or any maintenance, always switch off the appliance, unplug the pow- er cord from the outlet and allow it to cool down completely. Clean the pressure cooker after each use. Warning: Never immerse the appliance, the power cord or the plug of the power cord in water or any other liquid. - Page 18 Problem Cause Solution It is difficult to open the lid. The safety valve did not Carefully push the safety drop yet after the steam valve with a longer skewer was released. or a Chinese chopstick. Steam or water leaks from The silicone seal is not Install the silicone seal the lid.
-
Page 19: Sicherheitshinweise
Wir bedanken uns für den Kauf des Gerätes der Marke SIGURO. Wir sind dankbar für Ihr Vertrauen und freuen uns, Ihnen das Gerät auf den folgenden Seiten vorzustellen und Sie mit all seinen Funktionen und Verwendungszwecken vertraut zu machen. Wir glauben an ein faires und verantwortungsvolles Unternehmen und... - Page 20 6. Tauchen Sie das Gerät, das Netzkabel oder den Stecker nicht in Wasser oder andere Flüssigkeiten. 7. Waschen Sie den Innenbehälter in warmem Wasser mit ein wenig Geschirrspülmittel. Spülen Sie ihn ab und wischen Sie ihn trocken. 8. Dieses Gerät ist ausschließlich für den Gebrauch im Haushalt und innerhalb von Gebäuden vorgesehen.
- Page 21 17. WARNUNG: Bei unsachgemäßer Verwendung besteht Verletzungsgefahr. 18. Die Oberfläche des Heizelements enthält nach dem Gebrauch noch Restwärme. 19. Vergewissern Sie sich vor dem Einstecken des Steckers in die Steckdose, dass die auf dem Typenschild des Geräts angegebene Spannung mit der Spannung Ihrer Steckdose übereinstimmt.
- Page 22 34. Dieses Gerät ist nicht für die Sterilisation von Behältern vorgesehen. 35. Verwenden Sie das Gerät nicht leer, ohne Innenbehälter oder ohne Flüssigkeit im Behälter. 36. Beachten Sie beim Einfüllen des Innenbehälters immer die MIN- und MAX-Markierung. Füllen Sie den Innenbehälter niemals über die MAX-Markierung.
- Page 23 Öffnen und Schließen des Deckels Drehen Sie den Griff nach links auf „Close“ (schließen), um den Deckel zu schließen (siehe Abbildung „Close lid diagram“). Drehen Sie den Griff nach rechts auf „Open“ (öffnen), um den Deckel zu öffnen (siehe Abbildung „Open lid diagram“). Wenn der Druck im Topf höher als der Raumdruck ist, muss der Druck im Topf durch Öffnen des Druckventils abgelassen werden, bevor der Deckel geöffnet wird.
- Page 24 Gerätekörper Sicherheitsventil Deckelgriff Deckel Griffe am Schnellkochtopf (auf beiden Seiten) Körper des Schnellkochtopfs Druckventil Bedienfeld mit Display Innenbehälter Abnehmbares Netzkabel (nicht abgebildet) 10 Reislöffel (Teil der Lieferung, nicht abgebildet) Messlöffel (Teil der Lieferung, nicht abgebildet) Übersicht der Tasten auf dem Bedienfeld WARM/CANCEL Tasten +/- Starten der Erwärmung...
- Page 25 Übersicht der Bildzeichen und Symbole auf dem Display Kochprogramm SOUP: ge- eignet für die Zubereitung Bildzeichen zum Ausschal- von Suppen; mit Auswahl ten des Tonsignals der des Typs des zubereite- Tasten ten Lebensmittels: MEAT (Fleisch) – FISH (Fisch) – VEGETABLES (Gemüse) Kochprogramm RICE: ge- Das Bildzeichen HEAT zeigt eignet für die Zubereitung...
- Page 26 Kochprogramm FRYING: Bildzeichen für verzögerten geeignet zum Panieren Start Kochprogramm CAKE: ge- Bildzeichen für die Einstel- eignet für die Zubereitung lung der Temperatur von Kuchen Kochprogramm SLOWS- TEW: geeignet für das Schwarzes Display langsame Kochen Kochprogramm JAM: ge- eignet für die Zubereitung von Konfitüre und Marme- laden Kochprogramm YOGHURT:...
-
Page 27: Verwendung
Stromversorgung 220–240 V~, 50/60 Hz Stromverbrauch 1 000 W Maximale Kapazität Betriebsdruck 0–70 kPa Maximaler Druck 90 kPa Zulässiger Druck 1,05 bar Temperatur der Warmhaltefunktion 60–80 °C Abmessungen 32 × 33,5 × 33,5 cm Gewicht 5,2 kg VERWENDUNG Vor der Erstverwendung Nehmen Sie das Gerät und sein Zubehör aus der Verpackung. - Page 28 zubereiten, die während der Zubereitung an Volumen zunehmen, darf das Flüssigkeitsniveau mit den Lebensmitteln nicht 3/5 überschreiten. Beachten Sie beim Einfüllen des Innenbehälters auch die MIN-Markierung, und zwar 1/5. Warnung: Beachten Sie immer das maximale und minimale Flüssigkeitsniveau mit Lebensmitteln. Andernfalls kann es zu Schäden am Gerät, Sachschäden oder schweren Verletzungen kommen.
- Page 29 Warnung: Seien Sie beim Öffnen des Deckels vorsichtig, damit Sie sich nicht am austretendem Dampf verbrühen. Beim Ablassen von Dampf wird nicht der gesamte Dampf im Topf entfernt. 14. Lassen Sie den Behälter und den Topf abkühlen und reinigen Sie sie gemäß den Hinweisen im Kapitel „Reinigung und Wartung“.
- Page 30 DE - 30...
- Page 31 DE - 31...
- Page 32 Auswahl des Lebensmitteltyps Drücken Sie mehrmals die Taste PRODUCT SELECTION, um den Typ des Lebensmit- tels auszuwählen: MEAT (Fleisch) – FISH (Fisch) – VEGETABLES (Gemüse). Bei jedem Drücken leuchtet das entsprechende Bildzeichen auf dem Display auf. Die Auswahl des Lebensmitteltyps ist nur für folgende Kochprogramme verfügbar: SOUP (Suppe), STEAM (Zubereitung im Dampf) oder STEW (gedünstete Speise).
-
Page 33: Reinigung Und Wartung
REINIGUNG UND WARTUNG Schalten Sie das Gerät immer aus, ziehen Sie den Netzstecker aus der Steckdose und lassen Sie es vollständig abkühlen, bevor Sie es reinigen oder Wartungsarbeiten durchführen. Reinigen Sie den Schnellkochtopf nach jedem Gebrauch. Warnung: Tauchen Sie das Gerät, das Netzkabel oder den Stecker niemals in Wasser oder andere Flüssigkeiten. -
Page 34: Problemlösung
PROBLEMLÖSUNG Problem Ursache Lösung Der Deckel lässt sich nur Die Silikondichtung wurde Setzen Sie richtig die Sili- mühsam schließen. nicht richtig aufgesetzt. kondichtung richtig auf. Das Sicherheitsventil ist Drücken Sie sie leicht dar- stecken geblieben. auf, um ihn zu lösen. Der Deckel lässt sich nur Das Sicherheitsventil ist Drücken Sie das Sicher-... - Page 35 Problem Ursache Lösung Fehlermeldung E5. Fehler des Hochdruck- Wenden Sie sich an eine schalters. autorisierte Kundendienst- stelle. Wenn das Problem nicht in der obigen Tabelle angeführt ist oder das Problem nicht behoben werden konnte, schalten Sie das Gerät aus, ziehen Sie den Stecker des Netz- kabels aus der Steckdose und wenden Sie sich an eine autorisierte Kundendienststelle.
-
Page 36: Bezpečnostní Informace
Pokud potřebujete pomoci s rozsáhlou údržbou nebo opravou výrobku, která vyžaduje zásah do jeho vnitřních částí, je vám k dispozici náš autorizovaný servis na emailové adrese siguro@alza.cz nebo operátoři na infolince prode- jce. Pro vaše pohodlí při řešení jakýchkoliv problémů s výrobkem jsme tato kontaktní... - Page 37 otřete dosucha. 8. Tento spotřebič je určený pro použití v domácnosti a uvnitř budovy. Tento spotřebič není vhodný pro venkovní použití. 9. Pravidelně kontrolujte napájecí přívod, zda nevykazuje známky poškození, a je-li přívod poškozen, nesmí se spotřebič používat. 10. Tento spotřebič není určen pro činnost prostřednictvím vnějšího časového spínače nebo dálkového ovládání.
- Page 38 21. Spotřebič umístěte na rovný, suchý, pevný a teplovzdorný povrch. Nepokládejte spotřebič do blízkosti ohně nebo jiných zdrojů tepla. Umístěte spotřebič v dostatečné vzdálenosti od povrchů nebo předmětů citlivých na teplo. 22. Napájecí přívod nenechávejte viset přes okraj desky nebo stolu. Zabraňte, aby se napájecí...
- Page 39 a madlo. Madlo víka nepoužívejte k přenášení spotřebiče. 42. Mezi víko a okraj spotřebiče nepokládejte žádné předměty. Ujistěte se, že je těsnění víka správně nasazeno. 43. Víko otevírejte tak, aby pára směřovala od obličeje nebo rukou. Pára má vysokou teplotu a hrozí riziko vážného opaření při nesprávné manipulaci. 44.
- Page 40 Tělo spotřebiče Bezpečnostní ventil Rukojeť víka Víko Rukojeti parního hrnce (umístěny na obou stranách) Tělo parního hrnce Tlakový ventil Ovládací panel s displejem Vnitřní nádoba Odnímatelný napájecí přívod (bez vyobrazení) 10 Lžíce na rýži (součástí balení, bez vyobrazení) Odměrka (součástí balení, bez vyobrazení) Přehled tlačítek na ovládacím panelu WARM/CANCEL Tlačítka +/-...
- Page 41 Program vaření MILK Ikona COOKING označuje PORRIDGE: vhodný pro přípravu v hrnci přípravu mléčných kaší Program vaření STEW: vhodný pro přípravu Ikona WARM označuje dušených jídel; možnost režim uchování potra- výběru typu připravované vin v teple po dokončení potraviny: MEAT (maso) – přípravy FISH (ryba) –...
-
Page 42: Použití
Napájení 220–240 V~, 50/60 Hz Příkon 1 000 W Maximální objem Provozní tlak 0–70 kPa Maximální tlak 90 kPa Přípustný tlak 1,05 bar Teplota funkce uchování v teple 60–80 °C Rozměry 32 × 33,5 × 33,5 cm Hmotnost 5,2 kg POUŽITÍ... - Page 43 Varování: Vždy dodržujte rysky maximální a minimální hladiny tekutiny s potravi- nami. V opačném případě hrozí poškození spotřebiče, škody na majetku nebo vážné zranění. 4. Otřete dno nádoby suchou utěrkou, abyste odstranili vodu nebo nečistoty, a naplněnou nádobu vložte do hrnce. 5.
- Page 44 do 24 hodin. 5. Pro spuštění přípravy stiskněte tlačítko START. Nabídka programů vaření K výběru programů vaření slouží tlačítko MENU. 2. Opakovaným krátkým stisknutím tlačítka MENU vyberte požadovaný program vaření. Každý program má přednastavenou dobu přípravy a doplňkové funkce – více v tabulce níže.
- Page 45 CZ - 45...
- Page 46 CZ - 46...
- Page 47 Výběr typu potraviny Opakovaným stisknutím tlačítka PRODUCT SELECTION vyberte typ připravované po- traviny: MEAT (maso) – FISH (ryba) – VEGETABLES (zelenina). Každým stisknutím se na displeji rozsvítí i příslušná ikona. Výběr typu potraviny je dostupný pouze u programů vaření: SOUP (polévka), STEAM (příprava v páře) nebo STEW (dušený...
-
Page 48: Čištění A Údržba
ČIŠTĚNÍ A ÚDRŽBA Před čistěním nebo jakoukoli údržbou vždy spotřebič vypněte, odpojte zástrčku přívod- ního kabelu od síťové zásuvky a nechte jej zcela vychladnout. Tlakový hrnec čistěte po každém použití. Varování: Nikdy neponořujte spotřebič, přívodní kabel ani zástrčku přívodního kabe- lu do vody ani jiné... -
Page 49: Řešení Problémů
ŘEŠENÍ PROBLÉMŮ Problém Příčina Řešení Je obtížné zavřít víko. Silikonové těsnění není Nasaďte silikonové těsnění správně nasazeno. správně. Bezpečnostní ventil je Mírně na něj zatlačte, abys- zaseknutý. te jej uvolnili. Je obtížné otevřít víko. Bezpečnostní ventil ještě Opatrně zatlačte bezpeč- nespadl dolů... -
Page 50: Bezpečnostné Informácie
Ak potrebujete pomôcť s rozsiahlou údržbou alebo opravou výrobku, ktorá vyžaduje zásah do jeho vnútorných častí, je vám k dispozícii náš autorizovaný servis na e-mailovej adrese siguro@alza.cz alebo operátori na infolinke preda- jcu. Pre vaše pohodlie pri riešení akýchkoľvek problémov s výrobkom sme tieto kontaktné... - Page 51 Opláchnite a utrite dosucha. 8. Tento spotrebič je určený na použitie v domácnosti a vnútri budovy. Tento spotrebič nie je vhodný na vonkajšie použitie. 9. Pravidelne kontrolujte napájací prívod, či nevykazuje známky poškodenia, a ak je prívod poškodený, nesmie sa spotrebič používať. 10.
- Page 52 zásuvky. Odporúčame zapojiť spotrebič do samostatného elektrického obvodu. Nepoužívajte predlžovacie káble. 21. Spotrebič umiestnite na rovný, suchý, pevný a teplovzdorný povrch. Neklaďte spotrebič do blízkosti ohňa alebo iných zdrojov tepla. Umiestnite spotrebič v dostatočnej vzdialenosti od povrchov alebo predmetov citlivých na teplo. 22.
- Page 53 spotrebič v prevádzke. Hrozí riziko vážneho poranenia. 41. Pri manipulácii so spotrebičom vždy používajte tepelne izolované rukoväti a držadlo. Držadlo veka nepoužívajte na prenášanie spotrebiča. 42. Medzi veko a okraj spotrebiča neklaďte žiadne predmety. Uistite sa, že je tesnenie veka správne nasadené. 43.
- Page 54 Telo spotrebiča Bezpečnostný ventil Rukoväť veka Veko Rukoväti parného hrnca (umiestnené na oboch stranách) Telo parného hrnca Tlakový ventil Ovládací panel s displejom Vnútorná nádoba Odnímateľný napájací prívod (bez vyobrazenia) 10 Lyžica na ryžu (súčasťou balenia, bez vyobrazenia) Odmerka (súčasťou balenia, bez vyobrazenia) Prehľad tlačidiel na ovládacom paneli WARM/CANCEL Tlačidlá...
- Page 55 Program varenia MILK Ikona COOKING označuje PORRIDGE: vhodný na prípravu v hrnci prípravu mliečnych kaší Program varenia STEW: vhodný na prípravu Ikona WARM označuje dusených jedál; možnosť režim uchovania potra- výberu typu pripravovanej vín v teple po dokončení potraviny: MEAT (mäso) – prípravy FISH (ryba) –...
-
Page 56: Použitie
Napájanie 220 – 240 V~, 50/60 Hz Príkon 1 000 W Maximálny objem Prevádzkový tlak 0 – 70 kPa Maximálny tlak 90 kPa Prípustný tlak 1,05 bar Teplota funkcie uchovania v teple 60 – 80 °C Rozmery 32 × 33,5 × 33,5 cm Hmotnosť... - Page 57 Varovanie: Vždy dodržujte rysky maximálnej a minimálnej hladiny tekutiny s potravi- nami. V opačnom prípade hrozí poškodenie spotrebiča, škody na majetku alebo vážne zranenie. 4. Utrite dno nádoby suchou utierkou, aby ste odstránili vodu alebo nečistoty, a naplnenú nádobu vložte do hrnca. 5.
- Page 58 4. Tlačidlami +/- nastavte požadovaný čas prípravy. Tu môžete nastaviť v rozmedzí od 1 do 24 hodín. 5. Na spustenie prípravy stlačte tlačidlo START. Ponuka programov varenia Na výber programov varenia slúži tlačidlo MENU. 2. Opakovaným krátkym stlačením tlačidla MENU vyberte požadovaný program varenia.
- Page 59 SK - 59...
- Page 60 SK - 60...
- Page 61 Výber typu potraviny Opakovaným stlačením tlačidla PRODUCT SELECTION vyberte typ pripravovanej po- traviny: MEAT (mäso) – FISH (ryba) – VEGETABLES (zelenina). Každým stlačením sa na displeji rozsvieti aj príslušná ikona. Výber typu potraviny je dostupný iba pri programoch varenia: SOUP (polievka), STEAM (príprava v pare) alebo STEW (dusený...
-
Page 62: Čistenie A Údržba
ČISTENIE A ÚDRŽBA Pred čistením alebo akoukoľvek údržbou vždy spotrebič vypnite, odpojte zástrčku prí- vodného kábla od sieťovej zásuvky a nechajte ho celkom vychladnúť. Tlakový hrniec čistite po každom použití. Varovanie: Nikdy neponárajte spotrebič, prívodný kábel ani zástrčku prívodného káb- la do vody ani inej tekutiny. -
Page 63: Riešenie Problémov
RIEŠENIE PROBLÉMOV Problém Príčina Riešenie Je ťažké zavrieť veko. Silikónové tesnenie nie je Nasaďte silikónové tesne- správne nasadené. nie správne. Bezpečnostný ventil je Mierne naň zatlačte, aby zaseknutý. ste ho uvoľnili. Je ťažké otvoriť veko. Bezpečnostný ventil ešte Opatrne zatlačte bezpeč- nespadol dole po vypustení... -
Page 64: Biztonsági Információk
Amennyiben a készüléken olyan karbantartást vagy javítást kíván végreha- jtani, amelyhez a készüléket meg kell bontani, akkor forduljon a márkasze- rvizhez siguro@alza.cz, vagy hívja fel a vevőszolgálatunkat. A kényelmesebb ügyintézés érdekében egybevontuk a kapcsolati helyeinket, így a fenti kapc- solatokat nem csak a javítások és karbantartások megrendeléséhez, hanem a reklamációk benyújtásához vagy a garancia utáni szervizeléshez is fel lehet... - Page 65 6. A készüléket és a hálózati vezetéket vízbe vagy más folyadékba mártani, vagy folyóvíz alatt elmosni tilos. 7. A belső edényt mosogatószeres meleg vízben kézzel mosogassa el. Öblítse le és szárítsa meg (vagy törölje szárazra). 8. A készülék csak háztartásokban és fedett helyen használható.
- Page 66 aljzathoz. Ha a lehetséges, akkor a készüléket önálló áramköri ághoz csatlakoztassa. A készüléket ne üzemeltesse hosszabbító vezetékről. 21. A készüléket csak tiszta, száraz, stabil, vízszintes és hőálló felületre helyezze le. A készüléket ne tegye forró helyre, nyílt láng vagy más hőforrások közelébe.
- Page 67 készülék működik, ezeket a szelepeket ne fogja meg és ne próbálja meg beállítani. Égési sérülés érheti. 41. A készüléket csak a hőszigetelt fogantyúknál fogja meg. A fedél fogantyúját nem szabad használni a készülék mozgatásához vagy szállításához. 42. A készülék széle és a fedele közé ne tegyen semmilyen tárgyat vagy anyagot.
- Page 68 A készülék részei Biztonsági szelep Fedél fogantyú Fedél Oldalsó fogantyú (mindkét oldalon) Készülékház Nyomásszelep Kijelzős működtető panel Belső edény Kihúzható hálózati vezeték (ábrázolás nélkül) 10 Rizs kanál (tartozék, ábrázolás nélkül) Mérőpohár (tartozék, ábrázolás nélkül) A működtető panel gombjai és funkciói WARM/CANCEL +/- gomb Fűtés indítása (WARM);...
- Page 69 STEW program: alapanya- gok párolásához (gőzön WARM: a kész étel mele- főzéséhez); kiválasztható gen tartása a főzés után alapanyagok: MEAT (hús) – FISH (hal) – VEGETABLES (zöldség) MEAT (hús) ikon: hús főzé- sét mutatja a SOUP és a RISOTTO: rizottó készítése STEW programokban STEAM program: alap- FISH (hal) ikon: hal főzését...
-
Page 70: Használat
Tápellátás 220–240 V~, 50/60 Hz Teljesítményfelvétel 1 000 W Maximális mennyiség Üzemi nyomás 0–70 kPa Maximális nyomás 90 kPa Megengedett nyomás 1,05 bar Melegen tartás funkció 60–80 °C Méretek 32 × 33,5 × 33,5 cm Tömeg 5,2 kg HASZNÁLAT Az első használatba vétel előtt Vegye ki a készüléket és tartozékait a dobozból. - Page 71 Figyelmeztetés! Az edénybe ne töltsön a minimális szintnél kevesebb, vagy a maximális szintnél több folyadékot (az egyéb alapanyagokkal együtt). Ellenkező eset- ben a víz kifolyhat és a készülék meghibásodását vagy balesetet okozhat. 4. A belső edény alját törölje szárazra, a fenéken nem lehet víz vagy szennyeződés, majd a fentiek szerint megtöltött edényt tegye a készülékbe.
- Page 72 gombot. 4. A +/– gombokkal állítsa be a kívánt főzési időt. A főzési idő 1 óra és 24 óra között állítható be. 5. A főzés indításához nyomja meg a START gombot. Főzési programok A főzési programok kiválasztásához nyomogassa a MENU gombot. 2.
- Page 73 HU - 73...
- Page 74 HU - 74...
- Page 75 Az alapanyag típusának a kiválasztása A PRODUCT SELECTION gomb nyomogatásával válassza ki a főzni kívánt alapanyag típusát: MEAT (hús) – FISH (hal) – VEGETABLES (zöldség) A gombnyomás után a kivá- lasztott alapanyag ikonja bekapcsol. Az alapanyag típusát csak a következő programokban lehet kiválasztani: SOUP (leves), STEAM (gőzben főzés) vagy STEW (párolt ételek).
-
Page 76: Tisztítás És Karbantartás
TISZTÍTÁS ÉS KARBANTARTÁS Bármilyen karbantartási vagy tisztítási munka megkezdése előtt a készüléket kapcsol- ja le, és a hálózati csatlakozódugót is húzza ki a fali aljzatból. A készüléket és az edényt minden használat után tisztítsa meg. Figyelmeztetés! A készüléket, a hálózati vezetéket, vagy a csatlakozódugót vízbe vagy más folyadékba mártani tilos. -
Page 77: Problémamegoldás
PROBLÉMAMEGOLDÁS Probléma Megoldás Nehezen lehet lezárni a A szilikon tömítés rosszul Helyezze fel helyesen a fedelet. van felhelyezve. szilikon tömítést. A biztonsági szelep bera- Nyomja meg (mozgassa gadt. meg) a szelepet. Nehezen lehet kinyitni a A biztonsági szelep még A biztonsági szelepet egy fedelet. -
Page 78: Informations Relatives À La Sécurité
Nous vous remercions de l’achat d’un appareil SIGURO. Nous vous remercions de votre confiance et nous sommes contents de vous présenter ici cet appareil dans les pages suivantes, ainsi que l’en- semble de ses fonctionnalités et modes d’usage. Nous misons sur la clarté et la responsabilité, par conséquent, nous coopé- rons exclusivement avec des fournisseurs qui respectent nos critères stricts... - Page 79 6. Ne plongez pas l’appareil, le cordon d’alimentation ou la fiche dans de l’eau ou d’autres liquides. 7. Lavez le récipient intérieur à l’eau chaude avec une faible quantité de produit vaisselle. Rincez et séchez bien. 8. Cet appareil est destiné à un usage exclusivement domestique et intérieur.
- Page 80 18. La surface du corps chauffant conserve de la chaleur après l’utilisation. 19. Avant de brancher l’appareil au secteur, vérifiez que la tension indiquée sur la plaque signalétique de l’appareil correspond à celle de la prise électrique. 20. Branchez le câble d’alimentation à une prise électrique correctement mise à...
- Page 81 danger potentiel de brûlure en cas d’usage incorrect. 38. L’appareil s’échauffe lors du fonctionnement. Ne touchez pas le couvercle ou les parois externes. Il existe un danger de brûlure. 39. Veillez à ce que la soupape de sécurité et la soupape à pression soient propres, sèches et fonctionnelles avant chaque utilisation.
- Page 82 NE PLACEZ PAS vos mains ou votre visage près de la soupape à pression, surtout si de la vapeur s’en échappe. NE FORCEZ PAS pour ouvrir le couvercle, il sera automatiquement libéré une fois les pressions égalisées. FR - 82...
- Page 83 Le corps de l’appareil Soupape de sécurité Poignée du couvercle Couvercle Poignées du cuiseur (situées des deux côtés) Corps du cuiseur Soupape à pression Panneau de commande avec écran Récipient interne Cordon d’alimentation amovible (non représenté) 10 Cuillère à riz (fournie, non représentée) Dosette (fournie, non représentée) Aperçu des touches du panneau de commande WARM/CANCEL (chauf-...
- Page 84 Aperçu des icônes et des symboles de l’écran Programme de cuisson SOUP, adapté à la prépa- ration de soupes, option Icône désactivation des de sélection du type signaux sonores d’aliments cuisinés : MEAT (viande) – FISH (poisson) – VEGETABLES (légumes) L’icône HEAT signale le Programme de cuisson chauffage à...
- Page 85 Programme de cuisson Programme de réglage de CAKE, adapté à la prépara- température tion de gâteaux Programme de cuisson SLOWSTEW, adapté à la Écran numérique cuisson lente Programme de cuisson JAM, adapté à la prépara- tion de marmelades et de confitures Programme de cuisson YOGHURT, adapté...
-
Page 86: Utilisation
Puissance 220–240 V~, 50/60 Hz Consommation 1 000 W Volume maximal Pression de fonctionnement 0–70 kPa Pression maximale 90 kPa Pression admissible 1,05 bars Température de la fonction de main- 60–80 °C tien à chaud Dimensions 32 × 33,5 × 33,5 cm Poids 5,2 kg UTILISATION... - Page 87 d’aliments ne doit pas dépasser 3/5. Lors du remplissage du récipient, respectez également le niveau minimal de 1/5. Avertissement : Respectez toujours les niveaux de quantité maximale et minimale. Autre- ment, l’appareil pourrait être endommagé, il existe également un risque de dégâts matériels ou de blessures graves.
- Page 88 l’écran. 2. Utilisez les touches +/- pour régler la température souhaitée. Vous pouvez régler la température entre 30 ° C et 160 ° C. La température ne peut être réglée que dans le programme MULTICOOK. 3. Appuyez à nouveau brièvement sur la touche TIME/TEMPERATURE pour régler le temps de cuisson.
- Page 89 FR - 89...
- Page 90 FR - 90...
- Page 91 Sélection du type d’aliments Appuyez de manière répétée sur la touche PRODUCT SELECTION pour sélectionner le type d’aliments à cuisiner. MEAT (viande) – FISH (poisson) – VEGETABLES (légumes). Le voyant correspondant s’affiche sur l’écran à chaque appui. Le choix de la nature des aliments est disponible uniquement pour les programmes de cuisson.
-
Page 92: Nettoyage Et Entretien
NETTOYAGE ET ENTRETIEN Avant le nettoyage ou l’entretien, arrêtez toujours l’appareil, débranchez le cordon d’alimentation de la prise électrique et laissez-le refroidir complètement. Nettoyez le cuiseur après chaque utilisation. Avertissement : Ne plongez jamais l’appareil, le câble ou la fiche dans de l’eau ou d’autres liquides. -
Page 93: Problèmes Et Solutions
PROBLÈMES ET SOLUTIONS Problème Cause Solution Le couvercle est difficile à Le joint en silicone est mal Mettez le joint correcte- fermer. mis en place. ment en place. La soupape de sécurité est Poussez doucement des- bloquée. sus pour la débloquer. Le couvercle est difficile à... -
Page 94: Informazioni Di Sicurezza
è disponibile all’indirizzo e-mail siguro@alza.cz oppure tramite gli operatori all’infoline del fornitore. Per co- modità nella risoluzione di eventuali problemi con il prodotto, abbiamo unifi- cato questi punti di contatto e i contatti di cui sopra possono essere utilizzati in caso di reclami o assistenza post-garanzia. - Page 95 o la spina in acqua o in altri liquidi. 7. Lavare il recipiente interno in acqua calda con poco detergente per stoviglie. Risciacquare e asciugare. 8. Questo apparecchio è destinato all'uso domestico e in interni. Questo elettrodomestico non è adatto per l’uso all’aperto.
- Page 96 residuo dopo l’uso. 19. Prima di collegare la spina alla presa elettrica, assicurarsi che la tensione indicata sulla targhetta dell’apparecchio corrisponda alla tensione della presa elettrica. 20. Collegare il cavo di alimentazione a una presa elettrica con adeguata messa a terra. Si consiglia di collegare l'apparecchio a un circuito elettrico separato.
- Page 97 esterne. Rischio di ustioni. 39. Prima di ogni utilizzo, assicurarsi che la valvola di sicurezza e la valvola della pressione siano pulite, asciutte e funzionino correttamente. 40. Non inserire alcun oggetto nella valvola di sicurezza o della pressione. È vietato manipolare le valvole, toccarle mentre l'apparecchio è in funzione. Rischio di gravi infortuni.
- Page 98 IT - 98...
- Page 99 Corpo dell’apparecchio Valvola di sicurezza Manico del coperchio Coperchio Manici della pentola a pressione elettrica (posizionati su entrambi i lati) Corpo della pentola elettrica Valvola della pressione Pannello di controllo con display Recipiente interno Cavo di alimentazione rimovibile (non illustrato) 10 Cucchiaio per riso (incluso, non illustrato) Misurino (incluso, non illustrato) Panoramica dei pulsanti sul pannello di controllo...
- Page 100 Panoramica delle icone e dei simboli sul display Programma di cottura SOUP: adatto per la prepa- razione di zuppe; opzione Icona di silenziamento del di scelta del tipo di alimenti suono dei pulsanti cucinati: MEAT (carne) – FISH (pesce) – VEGE- TABLES (verdure) L'icona HEAT indica il riscal- Programma di cottura...
- Page 101 Programma di cottura Programma di impostazio- CAKE: adatto per la prepa- ne della temperatura razione di torte Programma di cottura SLOWSTEW: adatto per Display numerico cotture lente Programma di cottura JAM: adatto per preparazioni di confetture e marmellate Programma di cottura YOGURT: adatto per la pre- parazione dello yogurt IT - 101...
-
Page 102: Uso
Potenza 220–240 V ~, 50/ 60 Hz Consumo energetico 1.000 W Volume massimo Pressione d’esercizio 0–70 kPa Pressione massima 90 kPa Pressione disponibile 1,05 bar Temperatura della funzione di man- 60–80°C tenimento in caldo Dimensioni 32 × 33,5 × 33,5 cm Peso 5,2 kg Prima del primo utilizzo... - Page 103 3/5. Quando si riempie il recipiente, osservare anche la linea minima: 1/5. Attenzione: Rispettare sempre le quantità massima e minima di alimenti con i livelli di liquidi. La mancata osservanza di questa precauzione può causare danni all'apparecchio, danni materiali o lesioni gravi. 4.
- Page 104 Impostazioni della temperatura e tempo di cottura Premendo brevemente il tasto TIME/TEMPERATURE sul display si accende l'icona t°C. 2. Utilizzare i pulsanti +/- per impostare la temperatura desiderata. È possibile impostare la temperatura da 30°C a 160°C. La temperatura può essere regolata solo nel programma MULTICOOK.
- Page 105 IT - 105...
- Page 106 IT - 106...
- Page 107 Selezione del tipo di alimento Premere ripetutamente il pulsante PRODUCT SELECTION (SELEZIONE PRODOTTO) per selezionare il tipo di alimento da cuocere. MEAT (carne) – FISH (pesce) – VEGE- TABLES (verdure). Ad ogni pressione sul display si accende l'icona corrispondente. La selezione del tipo di alimento è disponibile solo per i programmi di cottura: SOUP (zuppa), STEAM (vapore) o STEW (stufato).
-
Page 108: Pulizia E Manutenzione
PULIZIA E MANUTENZIONE Prima di qualsiasi pulizia o manutenzione, spegnere sempre l'elettrodomestico, scolle- gare il cavo di alimentazione dalla presa e lasciarlo raffreddare completamente. Pulire la pentola a pressione elettrica regolarmente dopo ogni utilizzo. Attenzione: Non immergere mai l'apparecchio, il cavo di alimentazione o la spina del cavo di alimentazione in acqua o altri liquidi. -
Page 109: Risoluzione Dei Problemi
RISOLUZIONE DEI PROBLEMI Problema Causa Soluzione È difficile chiudere il coper- La guarnizione in silicone è Installare correttamente la chio. inserita in modo errato. guarnizione in silicone. La valvola di sicurezza è Spingerla delicatamente bloccata. per rilasciarla. È difficile aprire il coper- La valvola di sicurezza non Spingere con cautela la val- chio. -
Page 110: Informații Privind Siguranța
Dacă aveți nevoie de ajutor pentru întreținerea sau repararea extensivă a produsului, care necesită intervenție la părțile sale interne, service-ul nostru autorizat este disponibil la adresa de e-mail siguro@alza.cz, sau apelați ope- ratorii la linia de informații a vânzătorului. Pentru comoditatea dumneavoas- tră... - Page 111 în apă sau în alte lichide. 7. Spălați vasul interior în apă caldă cu puțin detergent de vase. Clătiți și uscați prin ștergere. 8. Acest aparat este proiectat pentru uz casnic și utilizare în interior. Acest aparat nu este adecvat utilizării în exterior.
- Page 112 19. Înainte de conectarea fișei la priza electrică, asigurați-vă că tensiunea indicată pe plăcuța tehnică a aparatului corespunde cu tensiunea de la priza dumneavoastră electrică. 20. Conectați cablul de alimentare la o priză electrică împământată corespunzător. Vă recomandăm să conectați aparatul la un circuit electric separat.
- Page 113 de presiune sunt curate, uscate și funcționează corespunzător. 40. Nu introduceți niciun obiect în supapa de siguranță sau în supapa de presiune. Este interzisă manipularea supapelor, atingerea lor în timp ce aparatul este în funcțiune. Există riscul de vătămare gravă. 41.
- Page 114 Corpul aparatului Supapă de siguranță Mânerul capacului Capacul Mânerele aparatului de gătit sub presiune (amplasate pe ambele părți) Corpul aparatului de gătit sub presiune Supapă de presiune Panou de control cu afișaj Vas interior Cablu de alimentare detașabil (nu este prezentat) 10 Lingură...
- Page 115 Prezentare generală a pictogramelor și simbolurilor de pe afișaj Programul de gătire SOUP (Supă): adecvat pentru pre- pararea supelor; opțiune de Pictogramă de dezactivare a alege tipul de alimente a sunetului butoanelor gătite: MEAT (carne) – FISH (pește) – VEGETABLES (legume) Programul de gătire RICE Pictograma HEAT (Încălzi-...
- Page 116 Programul de gătire Pictograma de pornire FRYING (Prăjire): adecvat întârziată pentru prăjire Programul de gătire CAKE Programul pentru setarea (Prăjitură): adecvat pentru temperaturii a prepara prăjituri Programul de gătire SLOWSTEW (Gătire lentă): Afișajul numeric adecvat pentru gătirea lentă Programul de gătire JAM (Gem): adecvat pentru prepararea de gemuri și marmelade...
-
Page 117: Utilizare
Alimentare cu energie electrică 220-240 V c.a., 50/60 Hz Consum de energie 1.000 W Volum maxim Presiune de funcționare 0–70 kPa Presiune maximă 90 kPa Presiune admisă 1,05 bari Temperatura funcției de menținere 60-80 °C la cald Dimensiuni 32 × 33,5 × 33,5 cm Greutate 5,2 kg UTILIZARE Înainte de prima utilizare Scoateți aparatul și accesoriile acestuia din ambalaj. - Page 118 Avertizare: Respectați întotdeauna nivelurile minim și maxim ale lichidului împreună cu alimentele. Nerespectarea acestei cerințe poate avea ca rezultat deteri- orarea aparatului, daune materiale sau vătămări grave. 4. Ștergeți fundul recipientului cu o lavetă uscată pentru a îndepărta apa sau murdăria și puneți vasul interior umplut în vasul exterior.
- Page 119 la 30 °C la 160 °C. Temperatura poate fi ajustată numai în programul MULTICOOK (Mai multe tipuri de gătire). 3. Apăsați din nou scurt butonul TIME/TEMPERATURE (Durată/Temperatură) pentru a seta durata de gătire. 4. Utilizați butoanele +/- pentru a seta durata de gătire dorită. Puteți să o setați de la 1 la 24 de ore.
- Page 120 RO - 120...
- Page 121 RO - 121...
- Page 122 Selectarea tipului de aliment Apăsați în mod repetat butonul PRODUCT SELECTION (Selectarea produsului) pentru a selecta tipul de alimente pentru gătire. MEAT (carne) – FISH (pește) – VEGETABLES (legume). De fiecare dată când apăsați, pictograma corespunzătoare se aprinde pe afișaj. Selectarea tipului de aliment este disponibilă...
-
Page 123: Curățare Și Întreținere
CURĂȚARE ȘI ÎNTREȚINERE Înainte de curățare sau înainte de orice activitate de întreținere, opriți întotdeauna aparatul, deconectați cablul de alimentare de la priză și lăsați aparatul să se răcească complet. Curățați aparatul de gătit sub presiune după fiecare utilizare. Avertizare: Nu scufundați niciodată... -
Page 124: Depanare
DEPANARE Problemă Cauză Soluție Capacul este dificil de Garnitura din silicon este Instalați corect garnitura închis. introdusă incorect. din silicon. Supapa de siguranță este Apăsați-o ușor pentru a o blocată. elibera. Capacul este dificil de Supapa de siguranță nu s-a Împingeți cu atenție deschis. - Page 125 ENGLISH nebo obchodu, kde jste produkt zakoupili. Tento výrobek splňuje veškeré základní The use of the WEEE Symbol indicates požadavky směrnic EU. EU prohlášení that this product should not be treated o shodě je k dispozici na www.alzashop. as household waste. By ensuring this com/doc.
- Page 126 exigences des normes européennes corre‑ L’utilizzo del simbolo RAEE indica che spondantes. La déclaration de conformité questo prodotto non dev’essere tratta‑ européenne est disponible sur le site to come un normale rifiuto domestico. www.alzashop.com/DoC. Assicurandosi che questo prodotto venga Ce produit, vendu en Union européenne, smaltito correttamente, si contribuisce a est conforme aux exigences de la Directive proteggere l’ambiente.
- Page 128 R20220927 Alza.cz, a. s., Jankovcova 1522/53, 170 00 Prague 7, Czech Republic © 2022 Alza.cz, a. s. All Rights Reserved. www.siguro.net...
Need help?
Do you have a question about the SGR-MP-X600S and is the answer not in the manual?
Questions and answers