Table of Contents
Advertisement
Available languages
Available languages
Quick Links
Installatie- en gebruikershandleiding
Luiken
(Vluchtluiken en ventilatieluiken)
Installations- und Benutzerhandbuch
Luke
(Vordeckluke und Ventilationsluke)
Manuel d'Installation et d'utilisation
Capots
(Capots de pont et capots de ventilation)
Installation and user manual
(Escape Hatches and Ventilation Hatches)
Hatches
LIBERO - PLANUS
Copyright © 2023 VETUS B.V. Schiedam Holland
NEDERLANDS
ENGLISH
DEUTSCH
FRANÇAIS
ESPAÑOL
ITALIANO
PORTUGUÊS
Manual de instalación y usuario
Escotillas
(Escotillas de escape y escotillas de ventilación)
Manuale d'installazione e d'uso
Boccaporti
(Passouomo e portelli di ventilazione)
Manual de instalação e operação
Gaiutas
(Gaiutas de ventilação e de escape)
3
4
5
6
7
8
9
070107.02
Advertisement
Table of Contents

Related Manuals for Vetus Libero


Summary of Contents for Vetus Libero
- Page 1 Manual de instalação e operação Capots Gaiutas (Capots de pont et capots de ventilation) (Gaiutas de ventilação e de escape) Installation and user manual Hatches (Escape Hatches and Ventilation Hatches) LIBERO - PLANUS Copyright © 2023 VETUS B.V. Schiedam Holland 070107.02...
- Page 2 2 Installation and user manual Hatches 070107.02...
-
Page 3: Montage
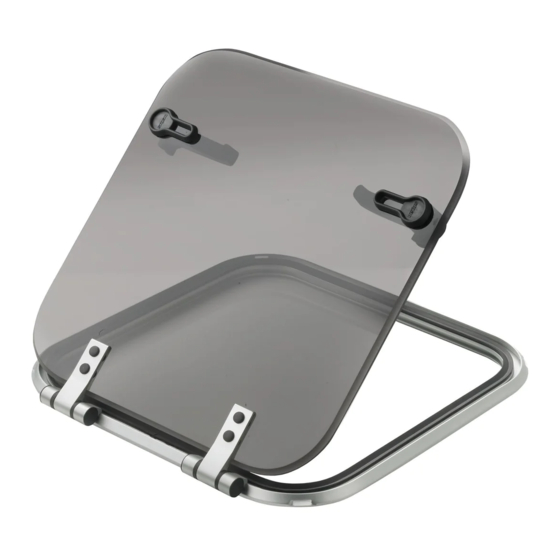
N.B.: Op elk luik is de hoogst toegestane ontwerpcategorie en het hoogst toegestane toepassingsgebied vermeld. • Zorg er voor dat de knevels in stand ‘open’ staan. • Draai knop van de uitsteller los (Alleen Libero vlucht- en deklui- Houdt met de montage van het luik met het volgende rekening: ken). -
Page 4: Operation
• Ensure that the clamps are in the ‘open’ position. When fitting the hatch, take the following into account: • Release the catch knob (Only Libero escape and deck hatches). - The hatch must open outward. • Pull the hatch closed, turn the clamps a quarter of a turn and lock - Fit the hatch in a completely flat surface! The hatch will never be them, see Drawing 1 - (2). -
Page 5: Bedienung
• Drehen Sie die Vorreiber in die Stellung ‘offen’ . mals wasserdicht sein! Füllen Sie eine gekrümmte Fläche vor dem Einbau erst mit einem • Lösen Sie den Knopf des Ausstellers (Nur Libero Vordeck-und Ven- Holzrahmen auf. tilationsluke). - Vor der Prüfung auf Wasserdichtigkeit muß ein Luk erst komplett •... -
Page 6: Entretien
à auto-taraudage ayant un diamètre de 4,2 mm. - Si le pont est en acier, utiliser des vis M5 et des écrous. - Libero (Capots de pont, têtes de pont et capots de ventilation) - Planus (Capots de pont, têtes de pont et capots de ventilation) Commande Figures, voir pages 9 et 10. -
Page 7: Operación
• Procure que los cerrojos estén en posición ‘abierta’ . - ¡Monte la escotilla en una superficie completamente plana! En una superficie curvada, la escotilla, en posición cerrada, ¡no está • Suelte el botón de la guía (Sólo Libero escotillas de escape y de a prueba de agua! cubierta). -
Page 8: Funzionamento
• Bloccare il boccaporto in posizione aperta con l’apposita sicura. Le serrature dei passouomo devono essere aperte durante la naviga- I passouomo PLANUS e i portelli di ventilazione LIBERO non sono zione, vedi disegno 1 - (1). dotati di braccio telescopico, ma rimangono aperti nella posizione desiderata grazie alle cerniere autobloccanti. - Page 9 As gaiutas PLANUS não são equipadas com as travas laterais, elas navegar, veja Desenho 1 - (1). permanecem aberta em qualquer posição devido às dobradiças de fricção. A gaiuta LIBERO possui a trava lateral para fixar a gaiuta na viso posição aberta.
- Page 10 LIBERO PLANUS 10 Installation and user manual Hatches 070107.02...
- Page 11 LIBERO PLANUS LIB2032L ALLEEN SÓLO ONLY SEULEMENT SOLO LIB3432L SOMENTE 11 Installation and user manual Hatches 070107.02...
- Page 12 Fokkerstraat 571 - 3125 BD Schiedam - Holland Tel.: +31 (0)88 4884700 - sales@vetus.com - www.vetus.com Printed in the Netherlands 070107.02 2023-01...
Need help?
Do you have a question about the Libero and is the answer not in the manual?
Questions and answers